Security Considerations
|
Implementing Web Service Security
After considering the previous section, you should probably possess a reasonable understanding of your security needs. This section of the chapter provides examples for implementing some of the security requirements covered in the previous section.
This section begins by looking at identifying the user through authentication and looking at hostnames and IP addresses. Then the focus centers on utilizing SSL as a means of encrypting the connection between Web Service and consumer.
Providing an ID
This is a simple but effective means of securing your Web Service. It simply involves creating a unique ID for each consumer who accesses your service. This can be a simple implementation in which this unique ID is generated by a column in a database table or it can be more complicated by using Globally Unique ID (GUID). (For more information on GUIDs, be sure to see www.guid.org.)
| Tip | Any client-side authorization requires that you communicate with your consumers so that they can easily obtain an ID. When you are designing your services, you want to make sure you plan for a means of communication with your consumers so they can obtain this unique ID quickly and easily. It is best if this can be an automated process. |
Consider the following Axis Web Service.
public class SimpleStockExample { public float getTestQuote(String symbol, String ID) throws Exception { //Have code call a db or other //call to compare ids. if (ID.equals("a123jj5!") { if ( symbol.equals("C") ) { return( (float) 55.95 ); } else { return( (float) -1); } } else { return( (float) -2); } } } This is a rather simple example but it illustrates the point. ID is a String variable that contains a unique identifier. The method checks to ensure that the identification is present and correct.
| Tip | If you look at the previous example code closely, you’ll notice that the method acts differently depending on whether symbol or the ID is passed the wrong value. This is important to your users so that they know whether it’s a problem with the identification or with the method itself. This also gives them a way to test their connection to the Web Service before they receive their ID from you. |
This example is overly simplistic; you need to have a complex mechanism in place to create unique IDs for your users. For example, you may have a large CRM database that generates unique user IDs for you. By putting in some SQL where the code currently checks for a particular string you would have a powerful way of validating a user.
Using the Web Server for Authentication
One of the basic functions of a Web server involves securing Web pages, CGI scripts, Active Server Pages, and other server-side code from unauthorized visitors. Because Web Services utilize port 80 and usually integrate with a technology close to a Web server such as .NET or Tomcat, configuring a Web server to protect a Web Service is usually a simple task. This section focuses on the steps necessary to use a Web server for this form of protection.
| Note | Note that anytime you involve the Web server for authentication, you’re adding another layer that will definitely affect the performance of the Web Service. |
Security with Tomcat and Axis
Axis allows you to set some security within the deployment descriptor. The following XML file deploys an Axis Web Service to look for a text file containing usernames and passwords. Notice that there are extra parameter tags in this descriptor that define the allowedMethods and the allowedRoles. These parameters explicitly define the methods accessible and who may access them.
Then the handler elements tell Axis to load the SimpleAuthenticationHandler and SimpleAuthorization classes into memory so the security handling can occur.
<deployment name="myDeployment" xmlns="http://xml.apache.org/axis/wsdd/" xmlns:java= "http://xml.apache.org/axis/wsdd/providers/java"> <service name="SimpleStockExample" provider="java:RPC"> <parameter name="className" value="SimpleStockExample"/> <parameter name="allowedMethods" value="getTestQuote"/> <parameter name="allowedRoles" value="brianhochgurtel davidp"/> <requestFlow name="checks"> <handler type= "java:org.apache.axis.handlers.SimpleAuthenticationHandler"/> <handler type= "java:org.apache.axis.handlers.SimpleAuthorizationHandler"/> </requestFlow> </service> </deployment>
A file is then created, called users.lst, which belongs in the root directory of the Axis webapps directory under Tomcat, which looks like the following.
brianhochgurtel somepassword davidp
The user brianhochgurtel is required to have a password whereas the user davidp is only required to submit his username.
When a client connects, the request must pass the required credentials to the server. The username and password (if necessary) simply need to be passed on as part of the request in the consumer. This can be done either as part of a command line argument or in the code.
Then, in the consumer, you add the username and password just like you add the name of the service and method you are calling. Note that this code snippet assumes that you have the value of the username and password in the variable’s user and passwd.
//Remember that the call object contains all the //information that gets passed to the service. Call call = (Call) service.createCall(); call.setTargetEndpointAddress( url ); call.setOperationName ( new QName("SimpleStockExample", "getTestQuote") ); //Other parameters need to utilize the Web Service would //appear here. //set the username and password in the call call.setUsername( user ); call.setPassword( passwd ); If you don’t call the protected Web Service with the username and password, you’ll get a 405 Error stating that you are not authorized.
Using Windows-Integrated Authentication
When compiling a Web Service generated in Visual Studio.NET, a web.config file is also created. It is an XML file containing configuration directives that normally aren’t available in the code. The following XML is an example.
<?xml version="1.0" encoding="utf-8" ?> <configuration> <system.web> <compilation defaultLanguage="c#" debug="true" /> <customErrors mode="RemoteOnly" /> <authentication mode="Windows" /> <trace enabled="false" requestLimit="10" pageOutput="false" traceMode="SortByTime" localOnly="true" /> <sessionState mode="InProc" stateConnectionString="tcpip=127.0.0.1:42424" sqlConnectionString="data source=127.0.0.1;user id=sa;password=" cookieless="false" timeout="20" /> <globalization requestEncoding="utf-8" responseEncoding="utf-8" /> </system.web> </configuration>
If you look closely at the XML you’ll find that it sets the language that compiles the service, the authentication mode, whether trace is enabled, and other information. It is here that you can add some XML that either enables or disables a user’s access to a particular Web Service.
By adding the following XML to the web.config file, you begin to regulate the users who access your Web Service.
<system.web> <authentication mode="Windows" /> </system.web> <location path="Service1.asmx"> <system.web> <authorization> <deny users="*"/> </authorization> </system.web> </location>
This XML forces the authentication to use Windows and specifies that Service1.asmx is the protected file. In this case, all users are denied, which might be a handy way to prevent users from accessing your service while you are servicing it. Other possible options look like the following.
<allow users="Administrator"/> <allow users="Brian Hochgurtel"/>
The entire web.config file now looks like this:
<system.web> <authentication mode="Windows" /> </system.web> <location path="Service1.asmx"> <system.web> <authorization> <allow users="Administrator"/> <allow users="Brian Hochgurtel"/> </authorization> </system.web> </location> <system.web> <compilation defaultLanguage="c#" debug="true" /> <customErrors mode="RemoteOnly" /> <trace enabled="false" requestLimit="10" pageOutput="false" traceMode="SortByTime" localOnly="true" /> <sessionState mode="InProc" stateConnectionString="tcpip=127.0.0.1:42424" sqlConnectionString="data source=127.0.0.1;user id=sa;password=" cookieless="false" timeout="20" /> <globalization requestEncoding="utf-8" responseEncoding="utf-8" /> </system.web> </configuration>
Then you need to go into IIS and select the file you wish to secure, in this case service1.asm, and right-click on it and select “Properties.” Select the “File Security” tab. Figure 10.3 shows the dialogue box’s security tab.
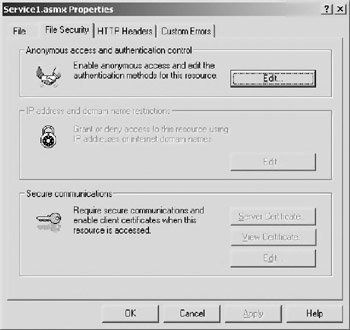
Figure 10.3: The security tab in Internet Information Server.
The first section of this dialogue deals with enabling anonymous access and authentication control. Click on the “Edit” button and another dialogue box appears, as shown in Figure 10.4.
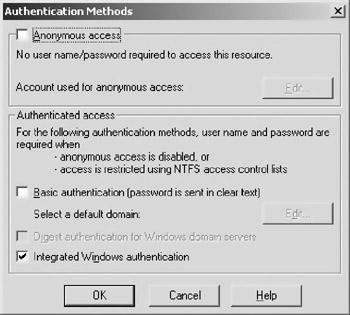
Figure 10.4: The “Authentication Methods” dialogue box.
Disable anonymous access and basic authentication and click on the checkbox for “Integrated Windows Authentication.” This forces Windows authentication on the Web Service. The next time you try to access the Web Service via a browser, Web page, or other consumer, a dialogue box will appear to ask you to log in, as shown in Figure 10.5.
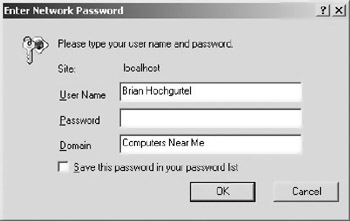
Figure 10.5: The Windows authentication dialogue box.
Using the Windows-integrated login works well if all your consumers use Microsoft Windows. If anyone uses a different platform, you’ll have trouble using this form of authentication. However, if your users are exclusively on Windows, this method prevents people on other platforms from accessing your service.
| Tip | If all your consumers utilize Windows but you need to use Java, it is possible to use Tomcat (or another Java container) and IIS together. This way you may use Apache Axis under Windows and use IIS as a Web server. For more information, be sure to see the following URL: http://jakarta.apache.org/tomcat/tomcat-3.3-doc/tomcat-iis-howto.html. |
Using IIS Basic Authentication
Windows-Integrated Authentication requires that you execute your application on a machine running Windows because the security is so tightly integrated with the operating system. This obviously won’t work in a cross-platform environment. Thus, if you still need to utilize security based on usernames and passwords on a particular machine or domain, IIS Basic Authentication is the answer. It still uses usernames and passwords from Windows but uses an authentication scheme that isn’t as closely tied to the operating system.
Go back to the “Security” tab and select “Basic Authetication,” as shown in Figure 10.6.
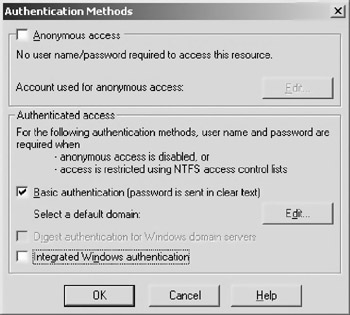
Figure 10.6: The “Security” tab with “Basic Authentication” chosen.
If you need to specify a domain for the authentication, click on the “Edit” button next to the “Basic Authentication” and select a local domain on your network. Figure 10.7 shows this dialogue. Note that on the author’s machine, the only domain available is “Computers Near Me.”
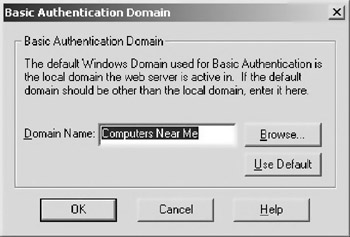
Figure 10.7: Selecting a domain name for users that utilize Basic Authentication to access the Web Services.
When you try to access this server with a browser, you’ll see the prompt for the username and password. Figure 10.8 displays the “Basic Authentication” dialogue box.
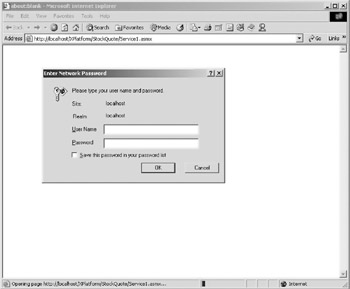
Figure 10.8: The “Basic Authentication” dialogue box in Internet Explorer.
| Note | Remember that you didn’t change the code of the Web Service to integrate it with security under IIS. You just changed the configuration of the Web server. |
Next, to access the Web Service with this authentication, use the following code within the client. By setting idNum1 object’s attribute Credentials to a new NetworkCredential object, the call to the Web Service now contains the information necessary to authorize itself during the transaction.
private void button1_Click(object sender, System.EventArgs e) { String returnValue; NetId.Service1 idNum1 = new NetId.Service1(); idNum1.Credentials = new System.Net.NetworkCredential("Some User","password"); returnValue = idNum1.ServiceId(); textBox1.Text = returnValue; } It is possible to add a third parameter to the NetworkCreditial object that specifies a Windows domain.
In addition to the previous code, when you add a Web reference in Visual Studio, the dialogue prompts you for a username and password so it can access the WSDL, as shown in Figure 10.9.
If you need to use the WSDL tool from the command line, the following example demonstrates using it with the /username and /password options, so you may access the WSDL.
wsdl /language:cs /username:brianhochgurtel /password:somepassword /namespace:www.advocatemedia.com http://localhost/XPlatform/MSNETID/Service1.asmx?wsdl
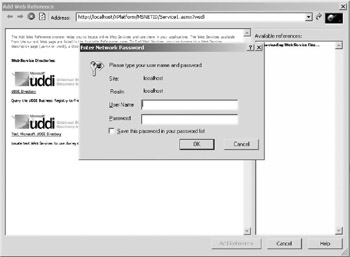
Figure 10.9: Visual Studio.NET asks for your username and password to access the WSDL of a secured Web Service.
This will authenticate the WSDL tool’s request for the WSDL file from the appropriate Web Service.
Looking at IP Addresses and Domains
In this section, we’ll focus on the Apache Web server’s ability to restrict access to particular files. Tomcat does not have this ability, but Apache allows you to configure it so it can send and receive requests to Tomcat. Remember that Tomcat is a container that allows you to run Java code and not much else whereas Apache is a fully functioning Web server that has the ability to assign different security measures to a particular directory.
Tomcat and Apache communicate through the Apache JServ Protocol (AJP), which is similar in some ways to telnet. This connection is open between Tomcat and Apache and is a high-speed data connection for them to transfer requests and responses between each other. This is much faster than simply having Apache redirect requests to Tomcat through HTTP.
| Note | For information on how to configure Apache with Tomcat, please see the following URL on the Apache Group’s Web site: http://jakarta.apache.org/tomcat-old/ jakarta-tomcat/src/doc/tomcat-apache-howto.html |
Consider that the SimpleStockExample Axis Web Service is normally accessible through the following URL: http://localhost:8080/axis/services/SimpleStockExample. Remember that port 8080 is the port that Tomcat utilizes, but once it is configured to work with Apache you will no longer need to specify the port. Now the URL is the following: http://localhost/axis/services/SimpleStockExample.
To configure security based on IP address or domain, you need to edit the Apache Web server’s httpd.conf file for the whole system, which includes all URLs the server handles with the following code.
Order Deny, Allow Deny from all Allow from advocatemedia.com charlesriver.com
The Order statement tells the server to handle the Deny command first and then the Allow. Deny from all tells Apache to reject all connections unless the configuration file has any Allow statements like the next line. Allow then sets up the server to allow anyone connecting from the domain advocatemedia.com and charlesriver.com.
If you wish to protect one particular directory, you need to use the directory element surrounding this directive. Consider the following.
<Directory /usr/local/tomcat/webapps/axis> Order Deny, Allow Deny from all Allow from advocatemedia.com charlesriver.com </Directory>
Now everything under the access directory is protected except from users from the two specified domains. IP addresses can be specified instead. Thus, if you want to deny someone at a particular IP address you simply add the following to the conf file.
deny 216.183.123.21
| Tip | When basing the security on IP addresses, ensure that your consumers possess static IP addresses. Many Networks use Dynamic Host Configuration Protocol (DHCP), which can assign IP addresses to a system every time a reboot occurs. When this occurs, your consumer will no longer be able to access the Web Service because its new IP address will not be in the configuration file. |
| Note | Unfortunately, IIS under Windows XP Pro, Windows 2000, and Windows NT does not allow you to deny users access by IP address. You need the server versions to do this. For information on how to configure IIS under one of the server versions, see the following URL: http://msdn.microsoft.com/library/default.asp?url=/ library/en-us/dnservice/html/service09052001.asp. |
Secure Socket Layer
Secure Socket Layer (SSL) encrypts transmission of requests and responses between a Web server and a client. When the client first communicates with the server, a certificate is exchanged between the two and a key remains on the server. Both the certificate and the key contain information to allow the encryption and decryption of requests and responses to the server. Rather than using port 80 like most requests to a Web server, SSL utilizes port 443.For you to take advantage of this security, you must configure Apache to proxy requests to Tomcat via the Apache JServ Protocol (AJP) because Tomcat has no means of utilizing SSL on its own.
Properly installing SSL on a Web server involves purchasing a certificate from a Certificate Authority (CA) such as Verisign. Anyone can actually generate a certificate with various software packages, but a CA verifies names and addresses and other information related to the owners of the certificate and actually provides some insurance for the transactions that occur.
Unless you are using the server version of Windows, SSL is only available to you using the Apache Web server. You can download a binary version of Apache that is SSL enabled from http://www.modssl.org/contrib/ftp/contrib/. Look for a version that includes Apache, mod_ssl, and openssl. Openssl is software that allows you to create a key, a certificate-signing request, and a test certificate.
| Note | SSL support for IIS exists only for the server versions of Microsoft operating systems, such as Windows 2000 server, which this book does not support. If you are interested in setting up SSL with Web Services, see the following URL at Microsoft’s support site: http://support.Microsoft.com/default.aspx?scid=kb;EN-US;q307267. |
Creating a Certificate and Key
For testing purposes, it is useful to generate a self-signing certificate. The following batch file examples combine all the necessary openssl commands to generate the key and signing request, and actually sign the certificate as well. The inspiration for this batch file comes from the instructions that come with the openssl download for Apache with SSL enabled and with the openssl executable.
The first step specifies which config file openssl should utilize when creating the key and the certificate-signing request. A .conf file for openssl should come with the distribution. When the first line executes, it will ask you questions about your job and location; most of this information is used to create a seed to create a random encryption key. The only question that you need to answer truthfully is for the “Common Name.” This should be the URL of the Web Site that you wish to enable SSL on. If it isn’t the same as the Web site, a user’s browser will throw a warning with each visit to the site. Remember the password that you create in this step because the second step requires it.
The second step removes the password for your key and signing request. This makes it easier for you when creating certificates and requests because it’s one less thing to remember. The third step actually signs the X509 certificate. This is usually the step that you let Verisign or another CSA do. When in development, however, creating your own key saves time and allows you to test under SSL. The last step takes the certificate and creates a form of certificate that Internet Explorer can place in its certificate store.
openssl req -config openssl.cnf -new -out advocatemedia.csr openssl rsa -in privkey.pem -out advocatemedia.key openssl x509 -in advocatemedia.csr -out advocatemedia.cert -req -signkey advocatemedia.key -days 1000 openssl x509 -in advocatemedia.cert -out advocatemedia.der.crt -outform DER
Even if you use the test certificate included on the CD-ROM, it’s still good for you to see how to create a CSR. If you are ever involved in any sort of Web project, it is likely that you will complete this step.
SSL and Apache
Apache handles SSL very easily if you either compile SSL into your current Apache installation or download a binary version for Windows from the Web site www.openssl.org. Once you have the download, follow the instructions in the root directory of the extracted files.
The configuration involves telling Apache to listen to port 443, load the SSL module, set commands for openssl, and move a couple of dlls to the WINNT\system directory. If you follow the instructions carefully, you should have an SSL-enabled version of Apache up and running in a few minutes.
Configuring and Testing Tomcat
Once your SSL-configured Apache is up and running, you need to configure Tomcat to work together with Apache. As mentioned earlier, Apache and Tomcat communicate via the AJP protocol, which is a bare-bones telnet-like binary communication stream.
Tomcat creates a lot of configuration files for you to easily integrate with Apache, and it generates these files every time it starts up looking at the different webapps directories you added. In the conf directory of the Tomcat distribution, you’ll find a conf file named Apache-Tomcat.conf. This is a file generated by Tomcat when a new webapps directory gets added. Notice that the directories for Axis and SOAP are already present. The following text is an excerpt of the configuration file.
Alias /soap "C:/xmlapache/tomcat/webapps/soap" <Directory "C:/xmlapache/tomcat/webapps/soap"> Options Indexes FollowSymLinks </Directory> ApJServMount /soap/servlet /soap <Location "/soap/WEB-INF/"> AllowOverride None deny from all </Location> <Directory "C:/xmlapache/tomcat/webapps/soap/WEB-INF/"> AllowOverride None deny from all </Directory> <Location "/soap/META-INF/"> AllowOverride None deny from all </Location> <Directory "C:/xmlapache/tomcat/webapps/soap/META-INF/"> AllowOverride None deny from all </Directory> Alias /axis "C:/xmlapache/tomcat/webapps/axis" <Directory "C:/xmlapache/tomcat/webapps/axis"> Options Indexes FollowSymLinks </Directory> ApJServMount /axis/servlet /axis <Location "/axis/WEB-INF/"> AllowOverride None deny from all </Location> <Directory "C:/xmlapache/tomcat/webapps/axis/WEB-INF/"> AllowOverride None deny from all </Directory> <Location "/axis/META-INF/"> AllowOverride None deny from all </Location> <Directory "C:/xmlapache/tomcat/webapps/axis/META-INF/"> AllowOverride None deny from all </Directory>
The text in the configuration file sets up all the directives Apache needs to proxy requests to it. Once set up correctly, you no longer need to direct your Tomcat requests to port 8080. By simply including this conf file in Apache’s httpd.conf file, the Web server possesses the ability to proxy requests through port 80 to Tomcat’s webapps directory.
There are actually several different methods and protocols to configure Tomcat to work with Apache. For more information, be sure to see the following URL on the Apache Group’s Web site: http://jakarta.apache.org/tomcat/tomcat-3.2-doc/tomcat-apache-howto.html.
| Tip | Once you have Tomcat and Apache working together, you may notice that you have difficulty accessing the Web Services through the links that Apache provides. This has to do with the configuration of Tomcat and Apache working together. If you have this problem, you can access the Web Service and the WSDL with a URL such as the following: https://localhost/axis/servlet/AxisServlet/xmltoday-delayed-quotes?wsdl |
| Tip | It is a common mistake for people who are new to Apache products to not execute both the Apache Web server and Tomcat running at the same time. To utilize Axis or another server-side Java code and HTTPS, Tomcat and Apache must execute simultaneously, but you can configure them to run on separate systems. |
Registering a Certificate
When you participate in E-Commerce over the Internet, your browser handles the security for you because it has a built in mechanism to do so. To use an application with SSL, it is necessary to register that certificate with the client machine—unless the application has a mechanism to handle the details of SSL like your browser. This must be done for both .NET Web Services and Apache.
Under Windows, registering a client certificate is done using the “Management Console.” Start the console by doing a “Start” and “Run,” and then type “mmc.exe.” Figure 10.10 shows the console when it first loads.
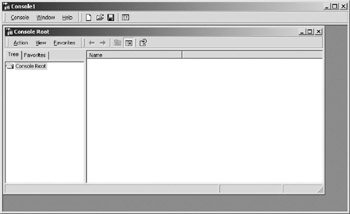
Figure 10.10: The “Management Console” on Windows 2000 Pro when it first loads.
Click on “Console” and select “Add/Remove Snap In” from the menu. Figure 10.11 shows the new window that appears.
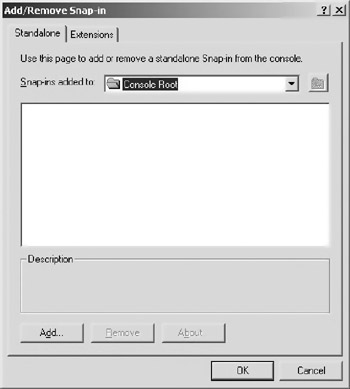
Figure 10.11: The "Add/Remove Snap In" window.
Now click on “Add” and from the list in the window select “Certificates” by double-clicking on the certificate option. Figure 10.12 shows the list of certificates from which you can choose.
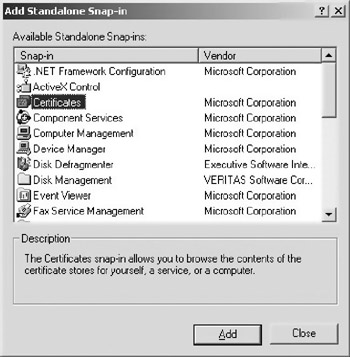
Figure 10.12: The window in the management console where you select certificates to manage.
A window will pop up and ask who you want to manage the certificates. Select “My User Account” and the console will now look like Figure 10.13.
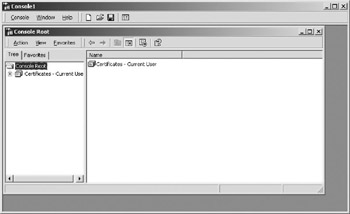
Figure 10.13: The console window with certificates selected for the current user.
On the CD Select “Trusted Root Authority” and a list of all certificates installed for you on the client side will be shown. From the “Action” menu select “All Tasks” and then import and browse to either ther temporary certificate you created or the one included on the CD-ROM for this book. Figure 10.14 shows the certificate registered on the author’s machine.
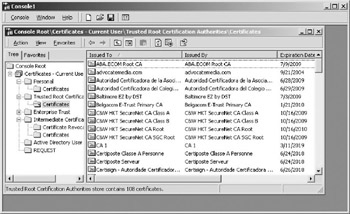
Figure 10.14: The console window shows the installed certificates for the author’s machine.
Now that the client system has the certificate installed, you’re ready to read the WSDL to make the proxy.
HTTPS and the Proxy
When executing Web Services under HTTPS, you need to ensure that your WSDL that you build your proxy against contains the proper URL. If your WSDL is generated on the fly, make sure that the WSDL changes appropriately. If you have static WSDL files, you may need to have two files: one for unsecured connections and another for secure connections.
The main piece of WSDL that changes is toward the bottom of the file and involves the address tag. You want to ensure that the WSDL generator changes appropriately when you use HTTP or HTTPS. Remember that HTTPS indicates to the Web server that SSL needs to be used for the request and response. Consider the address element for the WSDL file for one of the example Web Services that ships with Apache Axis.
<wsdl:port binding="intf:xmltoday-delayed-quotesSoapBinding" name="xmltoday-delayed-quotes"> <wsdlsoap:address location= "https://HOMER/axis/servlet/AxisServlet/xmltoday-delayed-quotes" /> </wsdl:port>
Notice how the URL in the WSDL reflects the use of SSL with HTTPS. You need to ensure that this is present in your proxy as well.
Consider the following snippet from a generated proxy. Notice how the value for this.URL indicates SSL from the URL beginning with HTTPS. This ensures that your client accesses the Web Service through SSL.
/// <remarks/> [System.Diagnostics.DebuggerStepThroughAttribute()] [System.ComponentModel.DesignerCategoryAttribute("code")] [System.Web.Services.WebServiceBindingAttribute (Name="xmltoday- delayed-quotesSoapBinding", Namespace="https://HOMER/axis/servlet/AxisServlet/xmltoday" + "-delayed-quotes/axis/servlet/AxisS" + "ervlet/xmltoday-delayed-quotes")] public class StockQuoteServiceService : System.Web.Services.Protocols.SoapHttpClientProtocol { /// <remarks/> public StockQuoteServiceService() { this.Url = "https://HOMER/axis/servlet/AxisServlet/xmltoday-delayed-quotes"; } | Note | Although SSL does provide encryption of requests and responses, it tends to have a very high overhead and uses a lot of memory and processor. If you need to use SSL, you may want to consider having a dedicated SSL server or use SSL as sparingly as possible. |
|
EAN: 2147483647
Pages: 128