Prerequisites for Using Apache Axis
|
Creating and Deploying an Axis Web Service: Differences between Apache Axis and SOAP
The coding of a Web Service with Axis doesn’t look that much different than a SOAP Web Service shown in Chapter 7. The main differences are the import statements and how you compile the service for deployment. The following examples show an Axis Web Service and its XML deployment descriptor.
The Web Service
Consider the following code for Axis that contains the code for the SimpleStockExample class used in previous chapters.
public class SimpleStockExample { public float getTestQuote(String symbol) throws Exception { if ( symbol.equals("C") ) { return( (float) 55.95 ); } else { return( (float) -1); } } } This is just a simple program with no import or package statements. You can compile this in the directory where you created it to ensure that it is syntactically correct, but when you’re ready to deploy, change the extension of the Java (SimpleStockExample.java) file from .java to .jws (SimpleStockExample.jws) and copy it into c:\xmlapache\tomcat\webapps\axis\. With Tomcat running, point your browser to the following URL: http://localhost:8080/axis/SimpleStockExample. By pointing the browser to that URL, you compile the code into a Web Service and the results look like Figure 8.5.

Figure 8.5: The response to the browser when pointed to the SimpleStockExample Web Service.
| Note | Apache Axis creates its own WSDL for each Web Service, and just like Microsoft’s .NET, this WSDL is available by simply putting “WSDL” in the query string of the URL like this: http://localhost:8080/axis/SimpleStockExample?WSDL. |
If, for some reason, this method of deployment doesn’t work for you, you can create a directory under the Axis directory in the Tomcat directory structure and create a Web Service that looks like the following.
package samples.SimpleStock; import org.w3c.dom.Document; import org.w3c.dom.Element; import org.w3c.dom.NodeList; import javax.xml.parsers.DocumentBuilder; import javax.xml.parsers.DocumentBuilderFactory; public class SimpleStockExample { public float getTestQuote(String symbol) throws Exception { if ( symbol.equals("C") ) { return( (float) 55.95 ); } else { return( (float) -1); } } } This last example is more like what was found with the Apache SOAP library, and also requires a deployment descriptor. Using this method may be more work, but it may give you more flexibility because a deployment descriptor allows you to specify certain meta information that you don’t get when using a .jws file.
The Deployment Descriptor
The deployment descriptor in Apache Axis uses different syntax than its predecessor in SOAP, but the idea remains the same. It’s an XML document that describes how the Axis server should deploy the service if it is necessary to specify additional information beyond just creating a .jws file.
In the following example, note that the deployment element starts off by giving this deployment description a name and describes the namespaces used in the document. The service element attributes name the service and describe the type or provider that makes the service available. The child elements, which are both parameter, describe the class available to the service and the methods to be accessed. In this case “*” gets used to indicate that all the methods are available.
<deployment name="load" xmlns="http://xml.apache.org/axis/wsdd/" xmlns:java= "http://xml.apache.org/axis/wsdd/providers/java"> <service name="SimpleStockExample" provider="java:RPC"> <parameter name="className" value= "samples.SimpleStock.SimpleStockExample"/> <parameter name="allowedMethods" value="*"/> </service> </deployment>
Save the XML in a file called deploy.wsdd and use the following command to set up the Web Service with Axis:
java org.apache.axis.client.AdminClient deploy.wsdd
Now, if you go look at the deployed Web Services in Axis’ admin GUI, you should see that SimpleStockExample is now considered a deployed Web Service, as shown in Figure 8.6.
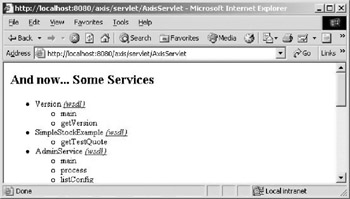
Figure 8.6: All the deployed Web Services available at http://localhost:8080/axis/AxisServlet.
In Apache SOAP there was no easy means of providing WSDL, but with Axis the WSDL for the example is found by adding “WSDL” in the query string like this:
http://localhost:8080/axis/services/SimpleStockExample?wsdl
Figure 8.7 shows the WSDL output for the SimpleStockExample class.
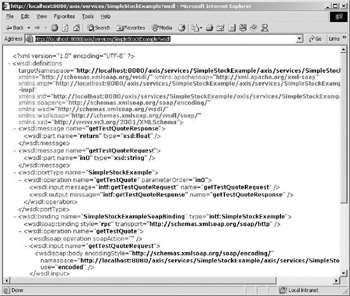
Figure 8.7: The WSDL for the SimpleStockExample from Apache Axis.
| Note | If you look closely at the WSDL for the SimpleStockExample, you notice that many of the namespace entries are actually incorrect. Entries for this service should use the URL: http://localhost:8080/axis/services/SimpleStockExample but are, instead, using http://localhost:8080/axis/services/SimpleStockExample/axis/services/SimpleStockExample. Remember that Axis was in Beta when this chapter was written so this bug might get fixed by the final release. |
Undeploying the SimpleStockExample
An XML file is also required to remove or undeploy a Web Service from the Axis server.
The following XML example undeploys the SimpleStockExample. The root element is undeployment, whose attributes define the name of this undeployment descriptor and the namespace for the XML file. The service child element describes which class should no longer be served by Axis.
<undeployment name="load" xmlns="http://xml.apache.org/axis/wsdd/"> <service name="SimpleStockExample"/> </undeployment>
Then, by executing the following command, the AdminClient reads the undeploy.wsdd to determine which class or classes to remove.
java org.apache.axis.client.AdminClient undeploy.wsdd
Relaxing Deployment Rules
Unlike Apache SOAP, Axis does not come with remote administration installed. It only allows you to administer from the local machine. If you wish to allow remote administration to occur so an entire development team has access to deployment, the server-confi.wsdd file needs to be modified. This file contains directives for the entire Axis server, and by adding the following to the AdminService directive, the deployment of Web Services from remote machines is enabled.
<service name="AdminService" provider="java:MSG"> ...Other directives <parameter name="enableRemoteAdmin" value="true"/> </service>
The entire entry might look like the following.
<service name="AdminService" provider="java:MSG"> <parameter name="allowedMethods" value="AdminService"/> <parameter name="enableRemoteAdmin" value="false"/> <parameter name="className" value="org.apache.axis.utils.Admin"/> <parameter name="sendXsiTypes" value="true"/> <parameter name="sendMultiRefs" value="true"/> <parameter name="sendXMLDeclaration" value="true"/> <namespace>http://xml.apache.org/axis/wsdd/</namespace> <parameter name="enableRemoteAdmin" value="true"/> </service>
Having remote administration rights turned on by default was a major security problem with the SOAP library because many people wouldn’t know it was turned on. This way users cannot deploy Web Services to your server without your knowledge.
Using TCP Monitor
TCP Monitor™ is an updated version of the TCP Tunnel GUI discussed in Chapter 7. It is a tool that allows you to view the requests and responses to a particular server. It acts as a proxy so that it intercepts requests and responses, prints them to the screen, and then forwards them to the appropriate server or client. To use this tool, execute the following command.
java org.apache.axis.utils.tcpmon 8000 localhost 8080
Figure 8.8 displays the TCP Monitor when it first loads under Windows 2000.
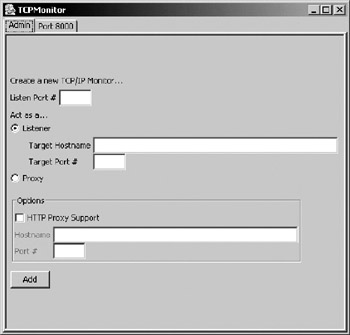
Figure 8.8: The TCP Monitor as it appears when it first loads.
Click on the tab that says “Port 8080” and you’ll see any Web Service request and responses to that port. Figure 8.9 shows TCP Montior watching Port 8080.
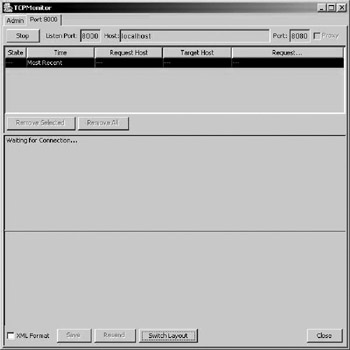
Figure 8.9: The “Port 8080” display window of TCP Monitor.
Figure 8.10 shows a request and response within the TCP Monitor.
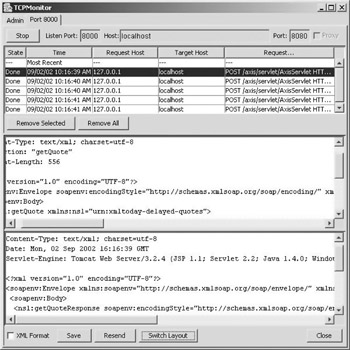
Figure 8.10: The TCP Monitor window showing the results of SOAP requests and responses.
Unlike the TCP Tunnel GUI, TCP Monitor handles requests for multiple ports and, therefore, you can monitor several different Web Services.
|
EAN: 2147483647
Pages: 128