The TRadioButton Component
Like check boxes, radio buttons are used to present a set of options. The difference is that check boxes enable the user to select multiple options at the same time, while radio buttons work as a group and only allow a single radio button to be selected at a time. When the user selects a radio button, all other radio buttons in the same group are automatically deselected. Radio button groups are defined by their container. If you want to create more radio button groups, place the radio buttons in a separate container control (TGroupBox or TPanel).
The TRadioButton component is used just like the TCheckBox component. The Checked property defines whether or not the button is selected and the OnClick event enables us to execute code immediately after the radio button is selected.
Now, let's use the TRadioButton component to create an application that will enable the user to modify the message dialog box presented by the MessageDlg function. The MessageDlg function is typically used to display four standard message boxes: the warning, error, information, and confirmation dialog boxes.

Figure 14-3: Different dialog boxes displayed by the MessageDlg function
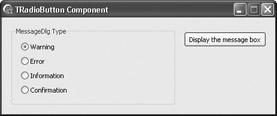
First, add a TGroupBox component to the Designer Surface and then add four TRadioButton components to it. Set the Caption properties of the radio buttons to "Warning," "Error," "Information," and "Confirmation." Set the Checked property of the Warning radio button to True. After you've defined the radio buttons, add a button to the form. This button will display the dialog box defined by the radio buttons.

Figure 14-4: The user interface of the TRadioButton example
The message box type is defined by the TMsgDlgType enumeration declared in the Dialogs unit:
TMsgDlgType = (mtWarning, mtError, mtInformation, mtConfirmation, mtCustom);
The easiest way to change the message box type is to define a private TMsgDlgType variable and then assign the appropriate value to the variable in the OnClick event of every radio button.
Listing 14-6: Changing the message box type
private { Private declarations } FMessageType: TMsgDlgType; public { Public declarations } end; var MainForm: TMainForm; implementation {$R *.dfm} procedure TMainForm.WarningRadioClick(Sender: TObject); begin FMessageType := mtWarning; end; procedure TMainForm.ErrorRadioClick(Sender: TObject); begin FMessageType := mtError; end; procedure TMainForm.InformationRadioClick(Sender: TObject); begin FMessageType := mtInformation; end; procedure TMainForm.ConfirmationRadioClick(Sender: TObject); begin FMessageType := mtConfirmation; end; procedure TMainForm.DisplayButtonClick(Sender: TObject); begin MessageDlg('MessageDlg function', FMessageType, [mbOK], 0); end;
C++Builder Sets
In C++, sets are implemented as objects. To declare a new set type in C++, use the following syntax:
typedef Set<data_type, first_value, last_value> SetName;
For instance, here's how you can declare a Letters set in both Delphi and C++:
// Delphi type TLetters = set of 'a'..'z'; // C++ typedef Set<char, 'a', 'z'> Letters;
You can also create a new set based on an enumerated type. To create a new set based on an enumerated type in C++, use the following syntax:
typedef Set<enum_type, first_enum_value, last_enum_value> SetName;
Here's how you can create a TDays set based on the TDay enumeration in both Delphi and C++:
// Delphi type TDay = (Monday, Tuesday, Wednesday, Thursday, Friday, Saturday, Sunday); TDays = set of TDay; // C++ enum TDay {Monday, Tuesday, Wednesday, Thursday, Friday, Saturday, Sunday}; typedef Set<TDay, Monday, Sunday> TDays;
Working with Sets in C++
To add values to the set or remove them from the set, use the << and >> operators:
TDays days; // add Monday-Wednesday to the set days << Monday << Tuesday << Wednesday; // remove Monday from the set days >> Monday;
To determine if a value is included in the set, use the Contains method:
void __fastcall TForm1::Button1Click(TObject *Sender) { TDays days; days << Monday << Tuesday << Wednesday; if(days.Contains(Monday)) { ShowMessage("I don't want to work on Monday."); days >> Monday; } }
Using the MessageDlg Function in C++
Now that you know a bit more about sets in C++, you can start using the MessageDlg function and other functions that accept set parameters in your C++ VCL Forms applications.
To pass a set as a parameter to a function or a procedure, you need to know the following:
-
The syntax for passing sets to functions
-
The name of the set
-
The values you need
The syntax for passing sets to functions looks like this:
SetName() << value_1 << value_2 << value_n
The MessageDlg function accepts only one set parameter: the Button parameter, of type TMsgDlgButtons. To display the MessageDlg dialog box with only the OK button, you need to add the mbOK value to the set.
Here's how you call the MessageDlg function in a C++ VCL Forms application:
MessageDlg("MessageDlg function", mtInformation, TMsgDlgButtons() << mbOK, 0);
The Sender Parameter
Another way to change the message box type is to merge the code from the existing event handlers into a single event handler. In the merged event handler we can use the Sender parameter to identify the radio button that called the event handler and then change the message box type accordingly. First, completely remove the OnClick event handlers of the Error, Information, and Confirmation radio buttons and then write the following code in the OnClick event handler of the Warning radio button.
Listing 14-7: Using the Sender parameter to identify the component that called the event handler
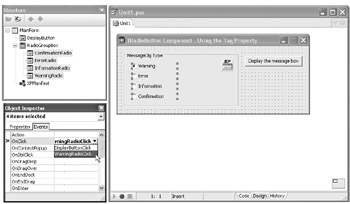
procedure TMainForm.WarningRadioClick(Sender: TObject); begin if Sender = WarningRadio then FMessageType := mtWarning else if Sender = ErrorRadio then FMessageType := mtError else if Sender = InformationRadio then FMessageType := mtInformation else FMessageType := mtConfirmation; end; procedure TMainForm.DisplayButtonClick(Sender: TObject); begin MessageDlg('MessageDlg function', FMessageType, [mbOK], 0); end; Now we have to assign this event handler to the OnClick event of all four radio buttons. The fastest way of assigning a single event handler to a larger number of components is to first select the components on the Designer Surface and then use the Object Inspector to assign the event handler to the appropriate event.
If the components you wish to select reside in a container control, you won't be able to select them as easily as you can select components that reside directly on the form. To select components that reside in a container control, press and hold the Ctrl key and then draw the selection rectangle. Another way to select components in a container control is to first select a single component by left-clicking on it, then press and hold the Shift key, and left-click all the other components you wish to select.

Figure 14-5: Assigning a single event handler to multiple events
The Tag Property
An even better way to change the message box type is to utilize the Tag property. The Tag property has no special purpose, except that it allows us to store an integer value and use it as we please. In this case, we can use the Tag property to completely remove the if-then statement from the event handler.
What we have to do is assign an integer value to the Tag property of the radio buttons to match the ordinal values of the mtWarning, mtError, mtInformation, and mtConfirmation constants. Thus, we can leave the Tag property of the Warning radio button unchanged since Ord(mtWarning) is 0, but we have to modify the Tag property of the other three radio buttons. So, set the Tag property of the Error radio button to 1, the Tag property of the Information button to 2, and the Tag property of the Confirmation button to 3.
Now that the Tag property of all four radio buttons contains the appropriate message type, we don't have to use the if-then statement to determine the message box type. We only have to typecast the Tag value of the Sender component to TMsgDlgType. We actually have to perform two typecasts. First, we have to typecast the Sender object to TComponent because the Tag property is defined in the TComponent class, and then we have to typecast the Tag property to TMsgDlgType.
Listing 14-8A shows how to use the Sender's Tag property in Delphi and Listing 14-8B shows how to use the Sender's Tag property in C++.
Listing 14-8A: Using the Tag property to change the message box type, Delphi version
procedure TMainForm.WarningRadioClick(Sender: TObject); var SenderComp: TComponent; begin SenderComp := TComponent(Sender); FMessageType := TMsgDlgType(SenderComp.Tag); end; procedure TMainForm.DisplayButtonClick(Sender: TObject); begin MessageDlg('MessageDlg function', FMessageType, [mbOK], 0); end; As you can see, using the Tag property greatly reduces the amount of code needed to change the message box type. If you want to, you can also remove the SenderComp variable and perform both typecasts in the same line to reduce the amount of code even more.
procedure TMainForm.WarningRadioClick(Sender: TObject); begin FMessageType := TMsgDlgType(TComponent(Sender).Tag); end;
Listing 14-8B: Using the Tag property to change the message box type, C++ version
void __fastcall TMainForm::WarningRadioClick(TObject *Sender) { TComponent* SenderComp = dynamic_cast<TComponent*>(Sender); FMessageType = static_cast<TMsgDlgType>(SenderComp->Tag); } void __fastcall TMainForm::DisplayButtonClick(TObject *Sender) { MessageDlg("MessageDlg function", FMessageType, TMsgDlgButtons() << mbOK, 0); } EAN: 2147483647
Pages: 212