Actions
When you create VCL Forms applications, you usually have to do the following:
-
Add user interface elements to the Designer Surface.
-
Write code that enables or disables these elements depending on what the user can and cannot do at a given time.
-
Write the actual application logic.
For instance, the following simple application enables the user to display the text entered in the text box if the check box is checked and the text box isn't empty (see Figure 15-21). If the check box is unchecked or if the text box is empty, the application has to disable the ShowMessage button. This way, the user will know when it's possible to use the button.

Figure 15-21: A simple VCL Forms application
In order to create this simple application, we have to write three different event handlers (see Listing 15-8):
-
An event handler for the OnClick event of the check box to enable/disable the ShowMessage button
-
An event handler for the OnChange event of the text box to enable/disable the ShowMessage button if the check box is checked and the text box isn't empty
-
An event handler for the OnClick event of the ShowMessage button to display the text entered in the text box
Listing 15-8: The ShowMessage button related code
procedure TForm1.CheckBox1Click(Sender: TObject); begin if CheckBox1.Checked then Button1.Enabled := Edit1.Text <> '' else Button1.Enabled := False; end; procedure TForm1.Button1Click(Sender: TObject); begin ShowMessage(Edit1.Text); end; procedure TForm1.Edit1Change(Sender: TObject); begin if CheckBox1.Checked then Button1.Enabled := Edit1.Text <> ''; end;
Now, let's create a main menu that enables the user to show the text from the text box by selecting Message ® ShowMessage. Add a TMainMenu component to the Designer Surface, create the Message menu, and add the ShowMessage item to the Message menu. Finally, assign the Button1Click method to the OnClick event of the ShowMessage menu item.
To complete the implementation of the ShowMessage menu item, we have to write validation code for it, just like we had to for the ShowMessage button.
Listing 15-9: Implementation of the ShowMessage user interface item
procedure TForm1.CheckBox1Click(Sender: TObject); begin if CheckBox1.Checked then begin Button1.Enabled := Edit1.Text <> ''; ShowMessage1.Enabled := Button1.Enabled; end else begin Button1.Enabled := False; ShowMessage1.Enabled := False; end; end; procedure TForm1.Button1Click(Sender: TObject); begin ShowMessage(Edit1.Text); end; procedure TForm1.Edit1Change(Sender: TObject); begin if CheckBox1.Checked then begin Button1.Enabled := Edit1.Text <> ''; ShowMessage1.Enabled := Button1.Enabled; end; end;
You can also write this validation code in a function and then call the function when necessary, as shown in Listing 15-10.
Listing 15-10: Moving the validation code to a function
type TForm1 = class(TForm) private { Private declarations } function ShowMessageUpdate: Boolean; public { Public declarations } end; var Form1: TForm1; implementation {$R *.dfm} function TForm1.ShowMessageUpdate: Boolean; begin Result := CheckBox1.Checked and (Edit1.Text <> ''); end; procedure TForm1.CheckBox1Click(Sender: TObject); begin Button1.Enabled := ShowMessageUpdate; ShowMessage1.Enabled := ShowMessageUpdate; end; procedure TForm1.Button1Click(Sender: TObject); begin ShowMessage(Edit1.Text); end; procedure TForm1.Edit1Change(Sender: TObject); begin Button1.Enabled := ShowMessageUpdate; ShowMessage1.Enabled := ShowMessageUpdate; end; end. When creating user interface commands, you should seriously consider using actions to implement their functionality. Actions are special components that allow us to write both validation and actual code for a user interface command in one place. Actions allow us to separate the application logic from the user interface. Once an action is completely defined, it can be assigned to one or more client controls.
Now, we'll recreate the previous example using actions. The first thing we need to do is add the necessary components to the Designer Surface. Add a TGroupBox component to the Designer Surface and then add TCheckBox, TEdit, and TButton components to the TGroupBox component (see Figure 15-22). Finally, change only the Caption property of the TCheckBox component to "Enable ShowMessage Button?".

Figure 15-22: The empty user interface
To use actions in an application we have to drop either the TActionList or the TActionManager component on the Designer Surface. Both components enable us to manage actions in the application.
Select the TActionList component in the Standard category on the Tool Palette window, drop it on the Designer Surface, and then double-click the TActionList component on the Designer Surface to display the Action List editor, shown in Figure 15-23.
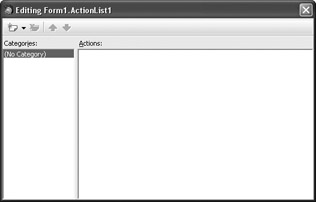
Figure 15-23: The Action List editor
Now, we'll use the Action List editor to create the ShowMessage action. To add a new item to the list, click the New Action button or click the drop-down arrow to the right of the New Action button and select New Action.
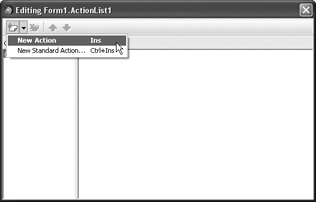
Figure 15-24: Adding a new action to the list
When you select the New Action item, the Action List editor creates a new action named Action1. To create the ShowMessage action, we need to change the Caption property of the Action1 component to "ShowMessage" and then give it a more descriptive name, like ShowAction.
Now that we have defined the action's properties, we can assign the action to a client control. Select the Button1 component on the Designer Surface and then assign the ShowAction action to its Action property. As you can see, when you assign an action to a client control, the properties of the action are copied to the client control.
Finally, we have to write code that displays the text entered in the text box and the code that disables the button when the message shouldn't or can't be shown. Display the Action List editor (if you've closed it), select the ShowAction action in the Actions list, and display the Events list in the Object Inspector.
The most important event is the OnExecute event. You should write the actual application logic in the OnExecute event handler. In this case, the OnExecute handler should only contain code that displays the text entered in the text box.
Listing 15-11: The OnExecute event handler
procedure TForm1.ShowActionExecute(Sender: TObject); begin ShowMessage(Edit1.Text); end;
Select the ShowMessage button and display its Events list in the Object Inspector. As you can see, the OnExecute event handler is automatically assigned to the OnClick event of the ShowMessage button. Thus, the action's OnExecute event gets fired when the user clicks the ShowMessage button.
The OnUpdate event can be used to update the action at run time. When an action is updated, all client targets are also automatically updated. Actions are usually updated when the application is idle, although you can explicitly update actions associated with a form by calling the UpdateActions method.
In this case, we can use the OnUpdate event to enable the action or disable it when the check box is unchecked or the text box contains no text.
Listing 15-12: Updating the ShowAction action
procedure TForm1.ShowActionUpdate(Sender: TObject); begin ShowAction.Enabled := CheckBox1.Checked and (Edit1.Text <> ''); end;
That's it. If you run the application now, you'll see that the ShowMessage button is always properly updated even though we didn't write the event handlers for the OnClick event of the check box and the OnChange event of the text box.
To see just how easy it is to assign an action to a larger number of client controls, let's create the main menu that will enable the user to display the text by selecting Message ® ShowMessage. First, drop a TMainMenu component on the Designer Surface and then do the following:
-
Double-click the MainMenu1 component to display the Menu Designer.
-
Type "Message" in the Caption property of the unnamed menu item to create the Message menu.
-
Select the new unnamed menu item that appears beneath the Message menu.
-
Assign the ShowAction action to the Action property of the unnamed menu item.
When you assign an action to the unnamed menu item, the action automatically updates the necessary properties and events of the menu item. If you run the application now, you'll see that we don't have to write additional validation code to update the menu item because the action automatically updates all controls that use it, as shown in Figure 15-25.
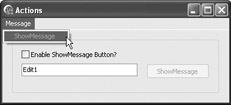
Figure 15-25: Using actions
Standard Actions
Besides being able to create new actions, the Action List editor enables you to add predefined actions to your application. Predefined actions are completely developed actions which contain their own code and have defined properties such as captions, hints, shortcuts, and even images. Predefined actions can be added to the application by clicking the drop-down arrow next to the New Action button in the Action List editor.
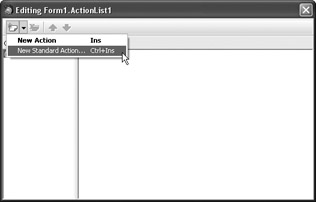
Figure 15-26: Adding standard actions to the application
If you want to use the predefined images contained in the standard actions, you have to drop a TImageList component on the Designer Surface and assign it to the action list's Images property before adding actions to the Actions list.
Add a TImageList component to the Designer Surface, assign it to the Images property of the TActionList component, and select New Standard Action in the Action List editor to display the list of available standard actions.
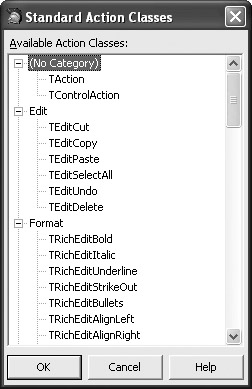
Figure 15-27: List of available standard actions
Select all actions in the Edit section and click OK to add them to the Actions list. These actions provide everything you need to manage text in TEdit and TMemo components, or any other TCustomEdit descendant.
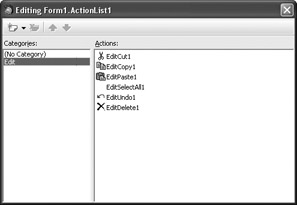
Figure 15-28: Standard Edit actions
To use these actions, add a TMainMenu component to the Designer Surface, and again, before creating menu items, assign the TImageList component to the Images property of the TMainMenu component. This way, when you assign an action to an unnamed menu item, the action also assigns the action's image to the menu item.
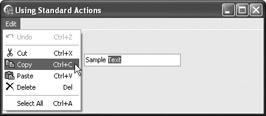
Figure 15-29: Standard Edit actions at run time
If you run the application now, you'll see that you are able to cut, copy, and paste text to and from the clipboard and undo changes in the text box without writing a single line of code.
The following chapter shows how to create a text editor application. You'll learn how to manually implement the functionality of these standard actions.
EAN: 2147483647
Pages: 212