Scrolling in Animation: Wyvern s Claw
Scrolling in Animation: Wyvern's Claw
In this first example, we'll step through the technique of manually tweening your animation planes to simulate depth. The main idea of this method, and with parallax scrolling in general, is that you separate your animation into distinct planes (typically housed in movie clips) that you tween at separate rates. Each plane should consist of whatever elements exist at that particular depth in your animated world. For this exercise, the drawings have all been completed for you (they are available for download along with the rest of this book's examples from www.friendsofed.com ), so you can concentrate on the camera movement and how you can use parallax scrolling to give your animated world more dimension.
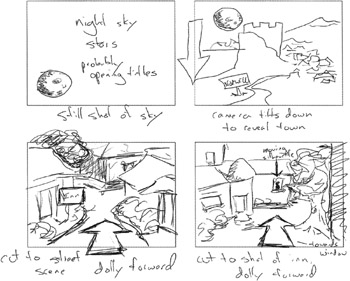
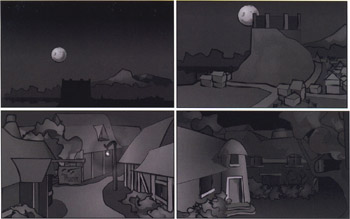
What you will be creating are the opening shots for an episodic animation entitled Wyvern's Claw, which is a Philip Marlowe/Sam Spade-type film-noir detective story transplanted to a fantasy setting. Imagine this setup: the camera is fixed on the nighttime sky as a voiceover begins (" There are a million stories in the naked city..." ”you get the general idea). Slowly, the camera tilts and pans down on the town where our tale takes place. Cut to a typical street in the town as the camera is dollied forward, down the street. The final establishing shot of the opening voiceover will be of the inn where our hero resides, which we'll slowly move toward before cutting to the interior of his room.
Look to the storyboard below to get a better idea of our task, and then, as a teaser, open up wyvernsClaw_end.swf to see the completed project:
Often with animations, you will see scrolling that is parallel to the viewing plane (think of the repeating backgrounds in a Hanna-Barbera cartoon such as Scooby Doo or The Flintstones ). This is pretty easy to achieve, and the next two examples explore this. For manual tweening, though, you can be a bit more adventurous. The only thing you need to remember is that objects farther from the camera will move less than objects nearer to the camera.
Shot 1: Over Town
-
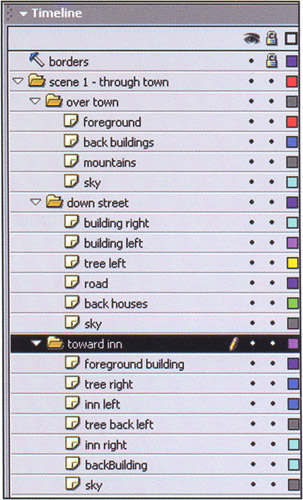
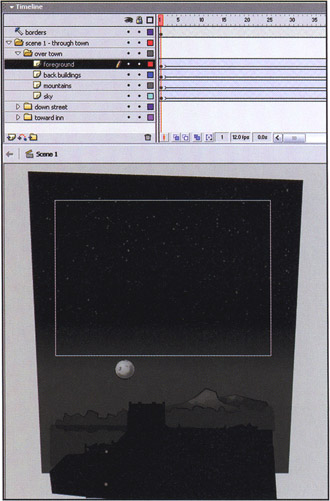
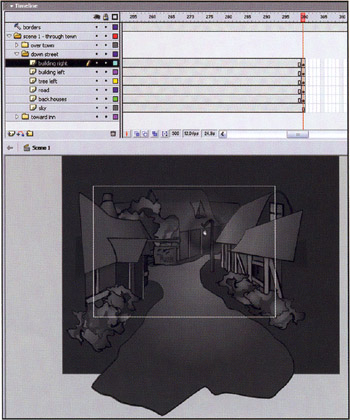
Open the file Wyvernsclaw_start.fla. This file contains all of the drawings for this animation. The timeline has a single top-level folder named scene 1 - through town . Inside this folder are three additional folders for each shot in the scene: over town, down street , and toward inn . Expand each of these folders to see the layer structure for each shot in the scene (and note that the Library contains a similar structure for all the featured symbols). The initial graphics have been placed in their appropriate layers , all ready for you to start tweening.
-
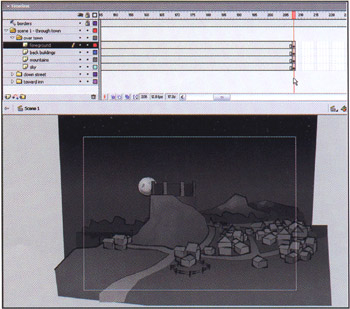
Expand the over town folder and look at frame 1. This is actually the end position of each of your planes for the first shot. We usually lay out our shots by placing the clips where we want them to end up when the "camera" stops moving rather than where they are at the start of the shot ( especially here, since all of the elements will be offstage). Since this is how you want the shot to end, you need to add an ending keyframe for each layer. Select frame 208 in all four over town layers ( foreground, back buildings , mountains , and sky ). Now press F6 or use the menu command Insert > Keyframe .
-
Return to frame 1 and alter the properties of the movie clips in the four layers using the following values. Use the Property Inspector and the Info and Transform panels for the most accuracy, but play with the values if you wish to tweak (you'll need to deselect the Constrain option in the Transform panel in order to scale the clips disproportionately, which we do for a slightly more organic effect):
Movie Clip
_xscale
_yscale
_x
_y
foreground
46.7%
45.4%
-17.1
225.2
back buildings
46.7%
45.4%
270.6
274.3
mountains
48.3%
47.0%
-15.4
194.6
sky
no change
no change
-67.6
-343.1
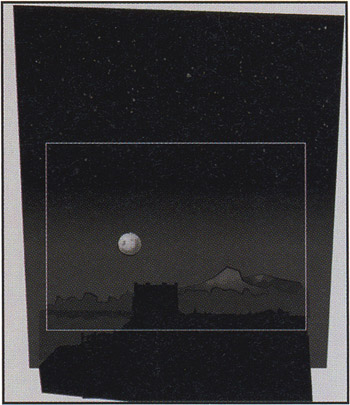
These values were all determined by fervent tweaking until we saw the desired effect. Each project will have different values, so just work to find what's right for you. You will notice, though, that the planes that are farthest from the viewer move the least. The sky (which doesn't scale at all) moves only a small distance, as do the mountains, whereas the foreground graphic scales and moves more than any of the others.
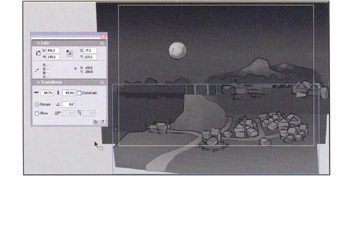
Note that you must scale the movie clips first before you adjust their positions , since scaling the clips repositions them on the stage.
-
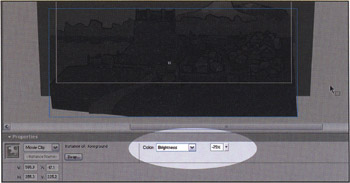
To add to the effect, you're going to tween the brightness of your two nearest foreground planes, so that they may "come into the light." Select the foreground movie clip at frame 1 and set its brightness value in the Property Inspector to -75% (select Brightness from the Color drop-down menu, and then move the corresponding slider down to -75 ). Next, select the back buildings clip at frame 1 and set its brightness value to -66%.
-
So you can check what you currently have, select all four layers at frame 1. You should see animation options appear in the Property Inspector. Select Motion from the Tween drop-down menu, and then test your movie to see where you are. You have a nice zoom-in movement toward the town. The sky and mountains barely move, while the foreground moves and scales quite a bit.

-
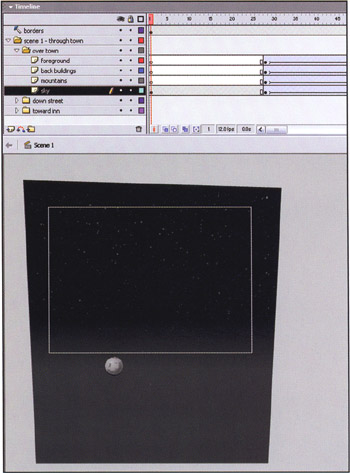
Now you're going to add a bit of camera tilt at the start, so that the camera is initially focused on an empty sky. To do this, you first need to get rid of the motion tween you added in the last step by using Undo (CTRL+Z). Alternatively, so you may see how easy it is to remove a tween, select frame 1 in all four layers and change the Tween option in the Property Inspector to None .
-
Add a new keyframe in each layer at frame 110 by pressing F6 (note that if you had not removed the tween in the previous step, the values in this new keyframe would be off). Now head back to frame 1 and change the properties of each graphic using the following values:
Movie Clip
_y
Brightness
foreground
517.1
-100%
back buildings
570.1
-100%
mountains
481.9
__
sky
-73.8
__
As you can see, you are only changing the _y value as the camera tilts (plus the Brightness to affect the foreground and back buildings).
-
Create motion tweens at frame 1 and at frame 110 for all four layers by first selecting the frames and then selecting the Motion option in the Tween drop-down of the Property Inspector (you can also rightclick/CMD-click the layers and select Create Motion Tween from the Insert menu).
-
Now select frame 79 in all four layers and create a new keyframe in each. Adjust the values of each layer's movie clip as follows :
Movie Clip
_y
Brightness
foreground
297.1
-100%
back buildings
350.1
-100%
mountains
261.9
__
sky
-293.8
__
-
You will keep the camera still at the start of your shot. To do that, drag the keyframes in frame 1 for all four layers to frame 28. That should leave the first 27 frames blank. Now copy the sky movie clip at frame 28, and use Edit > Paste in Place (CTRL/CMD+SHIFT+V) at frame 1 of the sky layer. Test your movie now to see the results.
-
The final step to finish this shot is to add some easing to your camera moves to make things seem less mechanical. Easing creates acceleration and deceleration in your animation. Easing in values will cause clips to accelerate through a tween, whereas easing out values will cause clips to slow down during a tween.
Set the easing values for each keyframe by selecting it and then adjusting the Ease value in the Property Inspector to the following:
-
Frame 28 (all layers) - Ease: -10 ( In )
-
Frame 79 (all layers) - Ease: 60 ( Out )
-
Frame 110 (all layers) - Ease: - 40 ( In )
-
Not bad for a first shot!
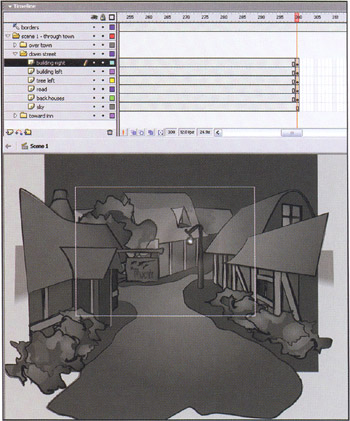
Shot 2: Down Street
The next shot of our camera moving forward down a street will only require two keyframes at the start and end of the sequence.
-
Close the over town folder and open the down street folder to see the new layers. Go to frame 209, which is the first frame of the sequence, to see how the shot will start out. Then go to frame 300 (the last frame) of each layer in this folder and create a new keyframe (F6). You don't have to create a keyframe for the sky layer, as you will not be tweening it in this shot and it will remain static.
-
Set the values for the properties of the movie clips in frame 300 to the following:
Movie Clip
_xscale
_yscale
_x
_y
building right
102.0%
88.2%
172.3
6.4
building left
102.3%
92.3%
-226.8
3.0
tree left
80.4%
80.4%
-72.9
25.8
road
91.0%
72.5%
-91.9
245.3
back houses
65.2%
65.2%
-8.4
16.4
-
You move the buildings at the right and left foreground more of a distance off the stage since they are nearest to the viewing plane. The back buildings, being central in the viewing plane, hardly move at all to the right or left. We've also added some scale distortion by not keeping the _xscale and _yscale values proportionate on a movie clip to aid in the illusion of having the side buildings in the viewer's peripheral vision.
-
Select the five keyframes at frame 209 (all excluding the sky layer) and create a motion tween in the Property Inspector. Test your movie to see the results.
Shot 3: Toward Inn
The final shot moves the camera around a building and toward the inn, which houses the hero of our piece. Keep an eye on how the building in the foreground right moves more than any other movie clip on the stage, while the buildings behind the inn remain fairly still. This all goes to aid in the illusion of depth for our 2D drawings.
-
Close the down street folder and open the toward inn folder in the timeline layers. Again, you will have two keyframes for each layer, excluding the sky layer, which will remain static. Go to frame 352 for all layers in the toward inn folder (except sky ) and create a new keyframe in each (F6).

-
The movie clips are currently set for the ending of the shot, so you need to adjust the first keyframes' values. Go to frame 301 and set each movie clip's properties to the following:
Movie Clip
_xscale
_yscale
_ x
_y
Brightness
foreground building
41.9%
41.9%
277.4
-61.00%
( None )
tree right
47.9%
47.9%
83.9
24.1
13%
inn left
47.9%
47.9%
-23.3
153.1
-40%
tree back left
47.9%
47.9%
-81.8
84.1
-70%
inn right
47.9%
47.9%
120.0 1
56.6
-55%
back building
47.9%
47.9%
65.8
116.3
-80%
-
Select the same five layers at frame 301 (excluding sky) and create a motion tween in the Property Inspector. Set the Ease value for these tweens to 30 (ease out). Now test your movie to see the final result.
In this demonstration, you have successfully used manual tweening of multiple animation planes to simulate depth, plus you've made a pretty cool animation in the process!
Next, we will look at how we can incorporate parallax scrolling into Flash games to enhance the pseudo-3D feel.
- Chapter VIII Personalization Systems and Their Deployment as Web Site Interface Design Decisions
- Chapter X Converting Browsers to Buyers: Key Considerations in Designing Business-to-Consumer Web Sites
- Chapter XIII Shopping Agent Web Sites: A Comparative Shopping Environment
- Chapter XV Customer Trust in Online Commerce
- Chapter XVII Internet Markets and E-Loyalty