Scrolling in Games: Mars Patrol
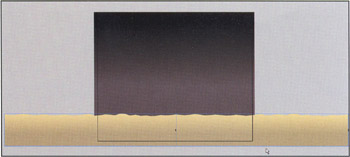
When we were first considering content for a chapter on parallax scrolling, the example we thought of right away was the 1980s arcade hit Moon Patrol. This game featured a multilevel scrolling background as the moon buggy remained fairly static in the foreground, giving a nice 3D feeling of the vehicle moving over a lunar landscape. We thought we could create a similar setup here ”though transplanted to the Red Planet this time.
This tutorial will focus on explaining the ActionScript that is necessary to move the background landscape planes across the screen. You will constantly assess locations of the planes as they move so that you may remove clips once they leave the left side of the stage (they will be moving left, simulating movement of your vehicle to the right), and then attach new clips when needed off the right side of the stage, thus creating a seamless landscape scroll. As you code, keep in mind that for the effect to work, you need to move the landscape planes at different rates depending on their relation to the foreground ”more specifically , the planes farthest away from the viewer will move the least.
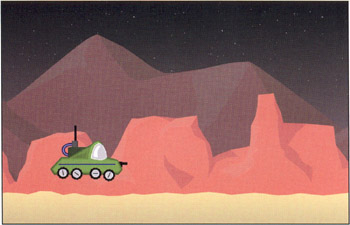
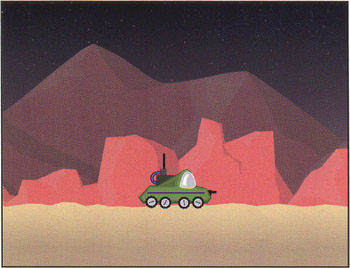
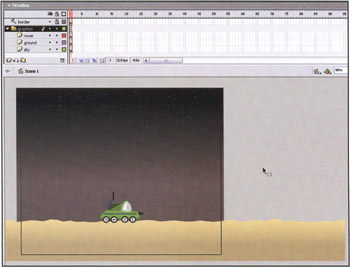
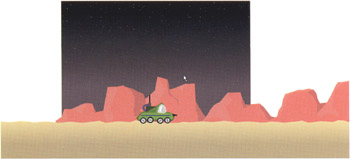
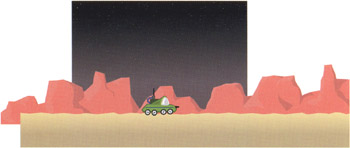
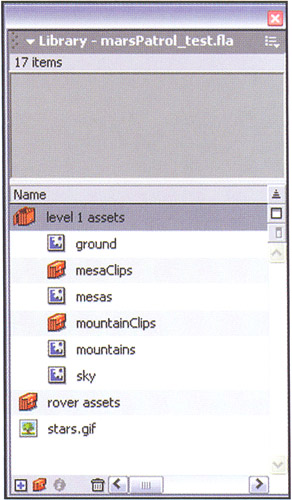
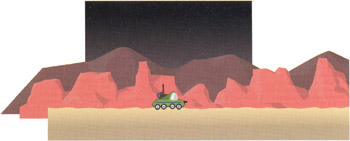
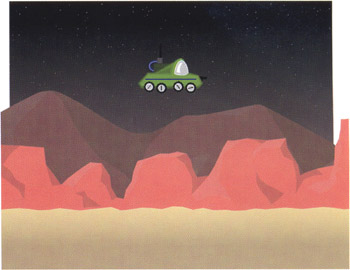
The file marsPatrol_start.fla has already been set up for you with all of the graphics prepared in its Library, though you will be attaching all of the clips and adding the necessary code for the scrolling effect. Note, however, that the finished project will not be a complete game, but merely the framework to build upon. Take a look at marsPatrol_end.swf to see how far we're going to take this project. Pay particular attention to the different levels of scrolling mountains (also, see what happens when you press the left, right, and up cursor keys).
Setting the Stage
-
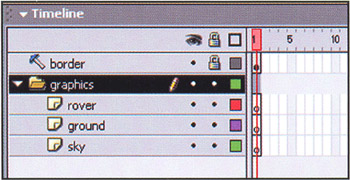
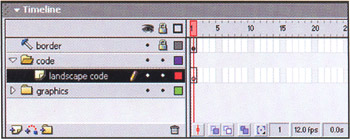
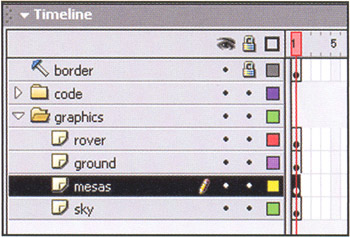
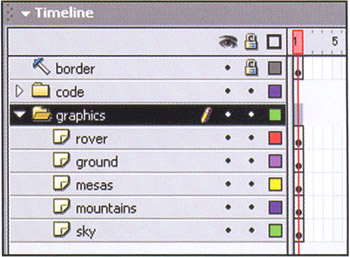
On the main timeline of the file marsPatrol_start.fla, create a new layer folder below the border guide layer (the border layer is there so you can see the stage borders in the authoring environment). Name the new layer folder graphics .
-
Create three new layers and name them, from top to bottom, rover, ground, and sky . Drag all three folders into the graphics folder you created in step 1.
-
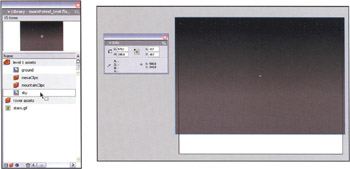
Open up the Library (CTRL/CMD+L or F11) and find the sky movie clip in the level1 assets folder. Drag the movie clip onto the stage in the sky layer and position it at x: -11.7, y: -10.7 using either the Info panel or the Property Inspector. Look at all that Martian dust!
-
Now find the ground movie clip in the level 1 assets folder in the Library. Drag two instances of this clip onto the stage in the ground layer and name them (using the < Instance Name > field in the Property Inspector) groundA and groundB, respectively. Still using the Property Inspector, position them at (groundA) x: -331.8, y: 352.5 and (groundB) x: 279.0, y: 352.5. This should line the two identical ground instances right up against each other.
-
In a moment we'll show you how to move both instances to the left by a few pixels each frame using ActionScript. As soon as one instance completely moves off the left side of the stage, it will reposition itself directly to the right of the other ground clip, almost like a game of leapfrog . This will ensure that the ground continues scrolling seamlessly throughout the game, and it is a common technique for creating seamless scrolling backgrounds. Note that to make this work (as with a lot of seamless backgrounds), the left and right side of the ground movie clip are at the same height, so when two clips are set next to each other, you are unable to tell where the break is.
-
Finally, drag a rover movie clip instance from the rover assets folder in the Library onto the stage in the rover layer. Using the Info panel or Property Inspector, position the rover instance at x: 213.7, y: 275.6. Name this instance rover so that you may reference it later in your code.
Test your movie to see what you have set up, though right now there's not much to look at. We've already preprogrammed the bouncing of the wheels (though they don't as yet rotate) with the following code, which you can find inside the wheel instance in the Library:
this.onEnterFrame = function() { this._rotation += this._parent.wheelRotSpeed*this._parent.speed; this._y = Math.random()*4 - 2; }; Since the wheels would continue moving throughout the entire game, we thought taking care of it using an onEnterFrame for each wheel would be the best way to go about it. As you can see, every frame the wheels will rotate a little based on two variables : the constant value of the rover's wheelRotSpeed variable and the changing value of the rover's speed variable. You will set both of these variables later in this tutorial. The _y position of each wheel is also set generating a random number between -2 and 2 .
You'll see the wheels working in just a few steps. First, let's work on making the ground move beneath the rover to get the game rolling (sorry about the pun!).
Hitting the Ground Running
-
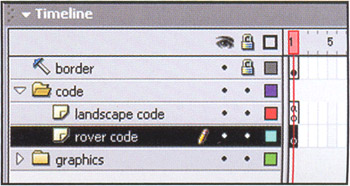
Create a new layer folder above the graphics folder on the main timeline and name it code . Create a new layer named landscape code and drag this new layer into the code folder.
-
With the landscape code layer's first frame selected, type the following ActionScript into the Actions panel (F9):
// rate each plane moves at scrollSpeeds = {}; scrollSpeeds.ground = 10;Here we have created an object called scrollSpeeds that will hold the rate that each landscape plane will move at. Each plane will be represented by a separate property of the scrollSpeeds object. This is just a nice way to contain all of the movement rates in one package, instead of having individual variables for each plane. As a side note, the following lines will yield identical results to those preceding :
scrollSpeeds = new Object(); scrollSpeeds.ground = 10; scrollSpeeds = {ground:10}; -
Type the following lines after the previous object declaration:
// moves and swaps out ground clips moveGround = function() { this._x -= scrollSpeeds.ground; // if clip is off stage left... if (this._x <= -5) { // places clip off stage right this._x += (this._width*2); } }; groundA.onEnterFrame = groundB.onEnterFrame = moveGround;This covers all of the movement for your ground plane (with a few tweaks you'll add in a moment). moveGround is a function that moves a movie clip this (which is whatever movie clip calls the function) a little to the left each time it is called. It then checks to see if the clip has gone off the left of the stage. If so, the clip is moved to the right by twice its _ width, which should place it directly to the right of the next ground plane (since both instances are the same width). The final line sets the onEnterFrame event handler for both ground clips to call the moveGround function each frame.
Test your movie now to see the results. Not bad! But, as you will notice, you have a small gap between the two clips ”you'll fix that next.
-
Add the following lines of code before the moveGround function:
// x pixel overlap for each clip in plane groundA.xOffset = groundB.xOffset = 2;
This adds a new property to both ground clips with a value of 2. You will use this as a pixel overlap buffer to ensure that the clip always meets up with (or possibly overlaps) the other, making a seamless landscape.
-
Modify the moveGround function by adding the code in bold below:
moveGround = function() { this._x -= scrollSpeeds.ground; // if clip is off stage left... if (this._x <= -5) { // places clip off stage right this._x += (this._width*2) - this.xOffset; } };Notice that you can also reference the xOffset value using this since you set it as a property of the movie clip. Test your movie again to see that the gap has been fixed.
This method of leapfrogging the clips is an effective way to seamlessly scroll a background. Perhaps it's not ideal for a game situation (or at least this game), since the ground plane will need to display different characteristics at different stages, such as craters to jump over, but it serves our purpose as a simple demonstration of scrolling. We will explore another, perhaps more useful, form of attaching and removing scrolling clips in the next section.
Scrolling Mesas
The next step is to add the second landscape plane to your stage, the mesas. You will do this completely dynamically using an empty movie clip, so you will only see the completed effect in the published file. The movie clip itself will hold all of the code to move the mesas, so it makes sense to place all of the graphics for that plane inside that movie clip. This technique will allow you to add multiple planes to your game with the confidence that each plane will act independently of all other planes, making things more modular and easier to alter and update.
-
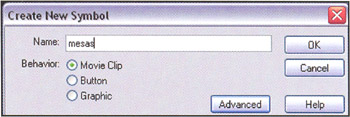
Use the menu command Insert > New Symbol... (CTRL/CMD+F8) to create a new movie clip symbol named mesas . Once you click OK in the dialog box to create the symbol, you will be taken to symbol editing mode for the new symbol.
Go ahead and exit this mode and return to the main timeline by clicking the Scene 1 button at the bottom left of the timeline. With your Library open, drag the new mesas symbol into the level 1 assets folder.
-
Create a new layer on the main timeline within the graphics folder between the sky and ground layers. Name this new layer mesas .
-
Drag an instance of the empty mesas movie clip from your Library onto your stage in the mesas layer that you just created. Place it at x : , y : 392.5 , using the Info panel or Property Inspector and name the instance mesas . This will place the movie clip, which is pretty small to begin with (being empty), underneath the ground plane. Don't worry, you haven't lost it!
In the upcoming code, you will attach the individual mesa movie clips to the empty clip you just placed on the stage. Keeping these inside a clip allows for a nice container for both the code and the graphics, as you will see.
-
Go to frame 1 of the landscape code layer and open your Actions panel. Add the following lines to your previous code (new lines are shown in bold):
// rate each plane moves at scrollSpeeds = {}; scrollSpeeds.ground = 10; scrollSpeeds.mesas = 2; // x pixel overlap for each clip in plane groundA.xOffset = groundB.xOffset = 2; mesas.xOffset = 30;Here you are simply adding values for the movement of the mesas in the same way you added them for the ground planes. However, you will create a different method for controlling the mesas' (and eventually the mountains') movement.
-
Add the following function after the moveGround function you entered earlier:
// adds initial landscape planes makeLandscape = function() { // array to hold clip references this.mcs = [] ; this.mcs.push(this.attachMovie(this._name + Math.floor(Math.random()*3), this._name + "0", 0)); this.mcs.push(this.attachMovie(this._name +
  Math.floor(Math.random()*3), this._name + "1", 1)); this.mcs[0]._x = -this.xOffset; this.mcs[1]._x = this.mcs[1]._width - this.xOffset*2; this.onEnterFrame = moveLandscape; };
 This function is more complex than moveGround , but it sets up quite a bit as well. In this function, you first create a new array named mcs in which you will store references to the movie clips you will add to the stage. The next two lines attach two random mesa movie clips. You see, the three mesa symbols in the Library are exported as mesas0, mesas1, and mesas2-you can verify this by right-clicking (or CMD-clicking on a Mac) any of these symbols in the Library and selecting Linkage.... So, finding a random integer between and 2, inclusive (which is accomplished with Math. floor (Math. random () *3)), and tacking that onto the end of the name of this particular holder movie clip (which you named mesas back in step 3) will return the identifier of one of the three mesa symbols in the Library. In addition to attaching the clips, you also push references to these new clips into the mcs array at the same time.
On the next two lines of the function, you set each clip's _x position based on the clip's _width and the xOffset value. The final line of the function sets the movie clip's onEnterFrame handler to equal a new function that you will write in a moment, although the purpose of the function, named moveLandscape, should be obvious.
Now how do you apply this function to your empty mesas movie clip that you placed on stage? Read on!
-
Add the following line of code after the makeLandscape function:
makeLandscape.apply(mesas);
Pretty easy, huh? What apply does in this context is run the function as if it was called by the specified movie clip. That means that every time this is used inside the function, it will be referring to the movie clip mesas . It's a pretty handy feature that allows you to write a single generic function and then apply it to numerous movie clips.
Test your movie now to see the mesa graphics added to the stage. Now all you need to do is get them moving.
Add the following function before the makeLandscape function that you just completed:
// moves and attaches/removes other landscape planes moveLandscape = function() { // should always be 2 clips on stage for (var i in this.mcs) { this.mcs[i]._x -= scrollSpeeds[this._name]; // if clip is off the left of stage, remove it // and add another off stage right if (this.mcs[i]. x < -this.mcs[i]. width) { // stores depth to place next clip at var depth = this.mcs[i].getDepth(); this.mcs[i].removeMovieClip(); // removes clip reference from array this.mcs.splice(i, 1); var newClip = this.attachMovie(this._name + Math.floor(Math.random()*3), this._name + depth, depth); // stores clip reference this.mcs.push(newClip); // places clip off stage right newClip._x = this.mcs[0]. x + this.mcs[0]. width - this.xOffset; } } };
 So what does this function do exactly? Well, it loops through all movie clips that are stored in the mcs array and moves them slightly to the left each frame, based on the scrollSpeeds variable. The way you grab this variable is by using the movie clip's name to find the property in scrollSpeeds . So for the holder movie clip mesas , the following three lines are equivalent:
scrollSpeeds[this._name] scrollSpeeds["mesas"] scrollSpeeds.mesas
Accessing the property in the way you have, you can use this moveLandscape function for your mountain clips as well.
Once you have moved a mesa movie clip inside the holder clip, you check to see if it has gone off the left side of the stage. If it has, you first store that clip's depth, and then remove the clip from the stage, as well as its reference in the mcs array. Next, you attach another mesa symbol using the stored depth value, store the new clip's reference, and then place the new clip off the right of the stage, ready to be scrolled on.
Test your movie now to see the mesas moving and the parallax scrolling really adding to the depth of the animation.
Moving Mountains
The process for adding and moving the mountain clips is the exact same as for adding and moving the mesa clips, so we'll cruise through this next section.
-
Create a new symbol (CRTL/CMD+F8) named mountains. Exit the editing mode for the symbol and return to the main timeline, but in the Library, drag the newly created symbol into the level 1 assets folder.
-
Create a new layer in the graphics folder on the main timeline. Place this new layer between the sky and mesas layers and name it mountains .
-
Drag a mountains instance from your Library and place it in the mountains layer. Name the instance mountains and place it at x : 0, y : 377.3 .
-
Add the following three bolded lines of code to the landscape code layer:
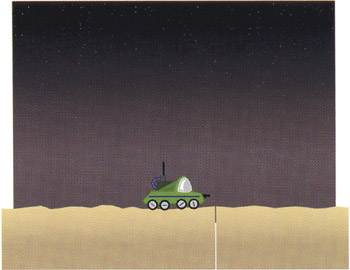
// rate each plane moves at sorollSpeeds = {}; scrollSpeeds.ground = 10; scrollSpeeds.mesas = 2; scrollSpeeds.mountains = .5; // x pixel overlap for each clip in plane groundA.xOffset = groundB.xOffset = 2; mesas.xOffset = 30; mountains.xoffset = 250; /* CODE REMAINS UNCHANGED FOR moveGround, moveLandscape, and makeLandscape functions */ makeLandscape.apply(mesas); makeLandscape.apply(mountains);It's pretty easy to add further planes, isn't it? That's what you get for modular programming! Test your movie now to see the results. Notice that the stars in the sky don't move at all since they are so far away that their movement is negligible to the viewer. The mountains move at a fairly slow rate compared to the mesas in front of them, and the ground plane streams by at the fastest rate since it is the nearest to the viewer. All these different scroll rates (as set in scrollSpeeds ) control this effect, so play around with the values to see how they alter the animation.
Patrol's Controls
Now that you have your landscape moving, you need to take care of your user 's sprite, which should be interactively included in the scrolling effect. First, you will add some code that will allow the rover to respond to keyboard input.
-
In the code folder on the main timeline, create a new layer below the landscape code layer and name it rover code .
-
Select frame 1 of the rover code layer and type the following into the Actions panel:
// handles all keyboard input to control rover rover.checkKeys = function() { // can't change direction in mid-air! if (!this.jumping) { if (Key.isDown(Key.RIGHT)) { this.moveRight(); } else if (Key.isDown(Key.LEFT) ) { this.moveLeft(); } if (Key.isDown(Key.UP)) { this.jumping = 1; } } updateAfterEvent(); };Here, checkKeys is a function that will look for keyboard input from the user. You will take care of left, right, and jumping movement in this tutorial. As you can see, the rover will only respond to the keys as long as it is not currently jumping. If the rover is not jumping, it looks to see if the right or left arrow is down, and calls functions to handle the movement (which you will write next). If the up arrow is pressed, you will have the rover jump, though at this time all you do is set a variable flag to positive.
-
Add the following two functions after the checkKeys function:
rover.moveRight = function ( ) { var moveAdj = this.jumping ? .5 : 1; if (this._x < this.maxX) { this._x += this.accel * moveAdj; } }; rover.moveLeft = function() { var moveAdj = this.jumping ? .5 : 1; if (this._x > this.minX) { this._x -= this.accel * moveAdj; } };These functions, as indicated by their names , will move your rover to the left or right. First, you set an adjustment percentage based on whether the rover is currently jumping. Basically, if you are jumping, moveAdj will be 0.5 (50%). If not, it will be 1 (100%). So if the rover is currently in the air, its movement to the right or left will be half of its normal value.
Next, you check to see if your _x value is still less than the maximum x-position or more than the minimum x-position (you'll set these variables in a moment). If you have not exceeded the rover's _x range, you move its x-position based on an acceleration variable multiplied by your moveAdj variable. Let's now add these two new variables to the start of the code.
-
At the top of the rover code script, add the following lines:
stageWidth = 550; stageMiddle = stageWidth/2; // max and min x-positions on stage rover.maxX = stageMiddle + stageMiddle/2; rover.minX = stageMiddle - stageMiddle/2; // rate rover can increase/decrease speed rover.accel = 5; rover.wheelRotSpeed = 30;
The first two variables correspond to the current width of the stage (550 pixels). You find the maxX and minX values based on the stagewidth. The accel property that you accessed in the moveLeft and moveRight functions is also set, as is a new property called wheelRotspeed, which controls the rate at which the rover's wheels rotate.
Just one more line of code to get your rover reacting to user input!
-
Add the following line of code to the end of all the current rover code script:
movelnterval = setlnterval(rover, "checkKeys", 40);
This line of code creates a new interval call for rover: every 40 milliseconds it will call its checkKeys method, which looks to see if the user is currently pressing any keys. Test your movie now to see the start of your rover actions. Using the left and right arrows should move the rover to the left and right on the screen. Pressing the up arrow will eventually cause the rover to jump, but at the present time it merely locks up the controls.
You Say You Want a Revolution
Everything is working fine to start, though your wheels are still are not turning, despite your new wheelRotspeed variable. This is because the wheels are attempting to access a property of rover named speed , which you have yet to set. This property will be the perceived speed of the rover based on its position on the stage, so when the rover is on the right side of the stage it should appear to be going faster, and when it is on the left it should appear slower.
The way you will get this illusion to work is by altering the rate of rotation of the wheels as well as changing the scrolling speeds of each of the landscape planes. Since everything should be relative in a scrolling landscape, you can use a single variable that will return a percent that each plane (and the wheels) can look to. This is what is accomplished with the variable speed.
-
In the rover's checkKeys method, add the following bold line:
// handles all keyboard input to control rover rover.checkKeys = function() { this.speed = this.getSpeed();So speed will be recalculated every 40 milliseconds.
-
Now let's define the getSpeed method. At the end of all the rover code, after the moveLeft function but before setInterval , add the following lines:
rover.getSpeed = function() { return (this.accel + ((this._x - stageMiddle) * this.speedFactor))/this.accel; };
 That looks pretty convoluted, so let's break it down. Basically, when the rover is at the middle of the stage, this._x - stageMiddle will evaluate to and you will be left with this.accel/this.accel .
So, when the rover is centered on the stage you get 1 , or 100%. If the rover moves to the right or left of center, you get a value either below 100% (which will slow the rate down once it's multiplied with this value) or above 100% (which will increase rates). speedFactor is a variable that will bring the massive pixel size that might be returned by ( this._x - stageMiddle ) into a usable range. For instance, if the rover is at an x-position of 350 , then ( this._x - stageMiddle ) will return 75 . The value returned by this function then (without speedFactor included) would be 1600%. So let's take care of setting the speedFactor next.
-
Add the following bold line to the variable declarations at the top of the rover code :
// rate rover can increase/decrease speed rover.accel = 5; rover.speedFactor = 8/stageWidth; rover.wheelRotspeed = 30;
This will make sure the speed property stays within a healthy range. Go ahead and test your movie to see the wheel's spinning relative to the rover's placement on the stage. Next, you will look at altering the landscape scrolling rates based on the speed variable as well.
-
To change the scrolling rate of the ground based on the rover's speed variable you need to multiply the scrollSpeed by the value found in rover.speed (remember, this value will be less than 1 when the rover is on the left side of the screen, greater than 1 when the rover is on the right side of the screen, and exactly 1 when the rover is in the middle of the screen). Add the following bold code to the moveGround function in the landscape code layer:
// moves and swaps out ground clips moveGround = function() { this._x -= scrollSpeeds.ground *rover.speed;Piece of cake! Let's do the same thing for the other landscape planes.
-
Add the following bold code to the moveLandscape function in the landscape code layer:
moveLandscape = function() { // should always be 2 clips on stage for (var i in this.mcs) { this.mcs[i]._x -= scrollSpeeds[this._name] *rover.speed;Test your movie now to see how the scrolling rate of the landscape as well as the rotation rate of the wheels changes based on the rover's position.
Jumpin' Jehoshaphat!
The final step in our parallax scrolling experiment is adding some bounce to the patrol vehicle.
-
Add the following bold lines to the rover's checkKeys function in the rover code layer:
if (Key.isDown (Key.UP)) { // ground plane this.startY = this._y; // how high and powerful this.jumpEnergy = 7; // works with friction to end bouncing this.bounceFactor = 1; // flag this.jumping = 1; this.jumpInterval = setInterval(this, "jump", 40); }Whenever the user presses the up arrow (if the rover is not already jumping), this code will run. After initializing three variables to control the jump, you create another setInterval call to handle the jumping action. As you can see, you will be calling a new function called jump every 40 milliseconds. Since the rover can't actually jump until that function is written, you'll write that function next.
-
Add the following new function after the rover's moveLeft function and before getSpeed:
rover.jump = function() { // moves rover up AND down this._y -= this.jumpEnergy--; // hitting ground plane if (this._y >= this.startY) { this._y = this.startY; this.jumpEnergy *= -this.bounceFactor; } };Every 40 milliseconds, you will change the rover's y-position based on its current jumpEnergy (which starts at 7 , then is subtracted from each iteration). When the rover hits the ground plane, it reverses direction. Test your movie now to see the result.
Notice the problem? Well, other than the fact that you haven't coded anything yet to end the jumping, the rover actually bounces higher each time it hits the ground. What you need to do is code it to lose energy each time it touches down. As soon as its energy is completely diminished, you will end the jump sequence.
-
Add the following bold lines to the jump function you just created:
rover.jump = function() { // moves rover up AND down this._y -= this.jumpEnergy--; // hitting ground plane if (this._y >= this.startY) { this._y = this.startY; // decreases each time ground is hit this.bounceFactor -= this.friction; this.jumpEnergy *= -this.bounceFactor; // bouncing ended if (this.bounceFactor <= 0) { delete this.jumpMove; this.jumping = 0; clearInterval(this.jumpInterval); } } };So each time the rover hits the ground, you will subtract a friction amount from the bounceFactor (you'll set friction in the next step). Once bounceFactor hits , you clear the jumping interval and delete the unnecessary variables.
-
Add the following bold line to the initial variable declarations at the top of the rover code :
rover.accel = 5; rover.speedFactor = 8/stageWidth; rover.wheelRotspeed = 30; // how quickly rover bouncing will be dampened rover.friction = .25;
Test your movie now to see the jumping made a bit more realistic. The only thing left to do is write the code that will keep the rover moving left or right (when necessary) while jumping through the air.
-
Add the following bold lines to rover's checkKeys function:
if (Key.isDown(Key.UP)) { // stores which way rover is currently moving // so that it will continue to do so while in the air if (Key.isDown(Key.RIGHT)) { this.jumpMove = this.moveRight; } else if (Key.isDown(Key.LEFT)) { this.jumpMove = this.moveLeft; } // ground plane this.startY = this._y; // how high and powerful this.jumpEnergy = 7; // works with friction to end bouncing this.bounceFactor = 1;Here you check to see if the right or left arrow is also being pressed before the jump. If it is, you store the appropriate function in a new variable called jumpMove . This will allow you to call this.jumpMove() inside your jump method and the appropriate method (if any) will be called.
-
Add the following bold line to rover's jump method:
rover.jump = function () { // keeps rover moving in saved direction this.jumpMove( ); // moves rover up AND down this._y -= this.jumpEnergy--;
Now, if anything is stored in jumpMove, it will be called and the rover will move in the appropriate direction.
That's it! You have successfully completed a believable scrolling background system for a Flash game. Landscape planes move at different rates based on their relative distance from the user, as well as the relative speed of the foreground sprite. The way we have set it up, it's also fairly easy to add further planes of animation to your game. Now all you need are the hazards, enemies, and weapons.