Systems Administration
| As with any computer application, Kubuntu will occasionally need administrative support. Do not be afraid of personally administrating the Kubuntu system. While it is not completely foolproof, there have been a lot of changes to help make things easier. Knowledge of the command line will go a long way in configuring the system, but the developers have made sure to provide graphical interfaces when they make sense. Everything from changing the IP address from Dynamic Host Control Protocol (DHCP) to static to installing packages can all be done without having to drop down to the command line. This section will focus exclusively on system administration through the graphical interface. Installing New PackagesAs mentioned earlier, Kubuntu is built around some of the same applications and system as Ubuntu. All applications are installable through packages. Like Ubuntu, Kubuntu uses the Advanced Package Tool (APT) and also like Ubuntu has a wonderful graphical interface that makes it easier to use that is called Adept. Adept is becoming the de facto installer for the KDE environment on Debian-based systems. This program was sponsored by Canonical Ltd. to help further the project of Kubuntu and other Linux distributions. The old package manager, Kynaptic, was lacking many features and was not user-friendly. Adept seeks to solve this problem. Adept is composed of four parts: the installer (Add/Remove Programs), the main program (Adept), adept update-notifier, and adept-updater. These programs will help you install packages and keep your system up-to-date with the latest and greatest changes. To start Adept and begin installing new applications, open up the K menu and click on Add/Remove Programs, or simply type Add/Remove programs in Katapult. Once launched, the screen shown in Figure 7-13 will be displayed. Figure 7-13. Add/Remove Programs main window.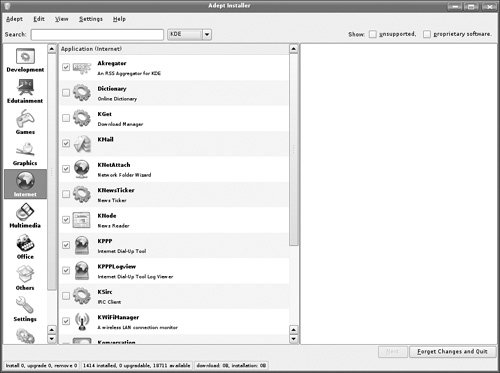 Add/Remove programs breaks programs into three groups: packages that can be installed with KDE, applications that can be installed with GNOME, and applications that can be installed on either desktop environment. Searching for that needed application is very simple. Just type in the application you are looking for, click on it, and select install. Figure 7-14 shows an example of this. Figure 7-14. Installing an application with Add/Remove Programs.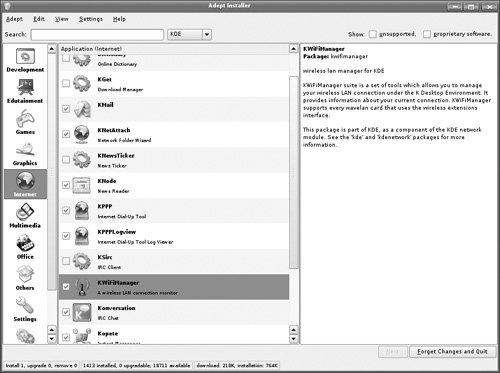 Once you click on Apply Changes, Add/Remove Programs will download the information from the repository and install the application. Easy and painless. Add/Remove programs will also download any dependencies to prevent any conflicts or broken programs. The main Adept program is slightly more powerful than Add/Remove Programs. Not only can you can install programs and update your system, you can also manage the different repositories from which you can download programs. To start Adept and begin to install new applications open up the K menu, and move through the System folder to Adept. The different sections can be seen in Figure 7-15. Figure 7-15. Adept.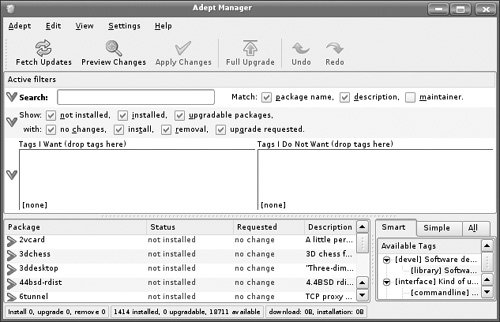 Adept has an easy-to-use search feature that allows the user to quickly locate the application that needs to be installed. Simply locate the name of the application, click the drop down arrow, and select install. This will queue the package to be installed; simply clicking on apply changes will set up the application on the system. Unlike Microsoft Windows, Kubuntu is great about not forcing a system restart in order for the new application to work correctly. Note A restart could be required if the version of KDE is updated. Packages are organized into four different groups or repositories: main, restricted, universe, and multiverse. A standard installation will set up the system to install packages from the main repository. This repository contains applications that are free software and programs that allow for complete redistribution and which are also fully supported by the Kubuntu team. When the user installs something from the main repository he or she is guaranteed to receive security updates and support through the various venues. The restricted group of software is reserved for software that is commonly used and is supported by the Kubuntu team, even though they may not be able to change or update it. An example of software included here are binary videos drivers that some vendors publish. Software in the universe repository is where almost every other known Open Source software application can be found. Software here comes with a variety of licenses, and some might have restricted use in various countries. Users should take care to ensure that they do not violate these restrictions. Items built and maintained in this group are put together by the Masters of the Universe (MOTU). However, there is no support from the core developers for these items. Anything from the multiverse repository contains software that is not free, which is defined by the Kubuntu Main Component License Policy. Software here is used at the user's own risk. Managing RepositoriesWith Adept, you do not need to know how to manually edit a sources.list. Adept can guide you through making these changes. From the File menu simply select Manage Repositories, and you will see a window that looks like the display in Figure 7-16. Figure 7-16. Editing your repositories in Adept.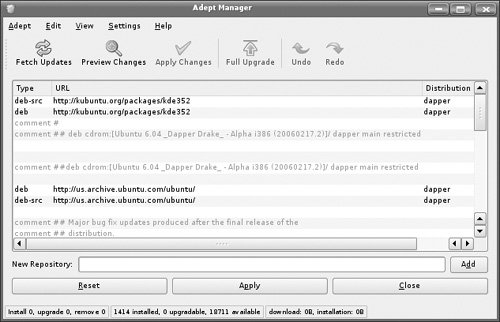 To enable the universe repository, edit the repository labeled universe, and remove the comments by following these steps.
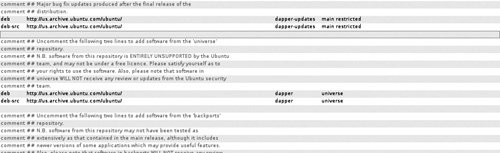
Sometimes there is the need to add repositories to your sources listing, and that is done just as easily as enabling a repository.
Installing a PackageThe easiest way to find the package you need to install on your system is to use the search function built into Adept. After opening up Adept and typing in the password, you will be presented with the main Adept screen. Just type the name of the package you are looking for, and Adept will display a listing of every package that includes what you are looking for (see Figure 7-18). Figure 7-18. Using the search bar in Adept to find packages.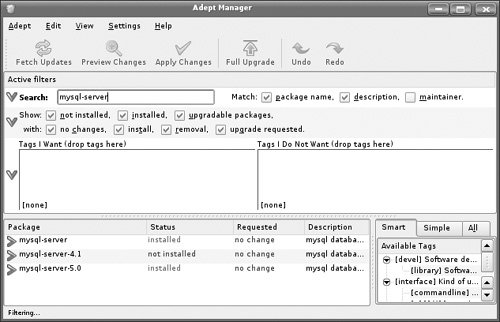 Through the use of filters, Adept will help limit the package listing you are searching for. These filters include: show packages that are not installed, show packages that are installed, and show packages that are upgradeable. Once the package has been found, click on the name or drop-down arrow, and Adept will display the description of the program and current version (see Figure 7-19). Figure 7-19. Expanded information regarding a specific package.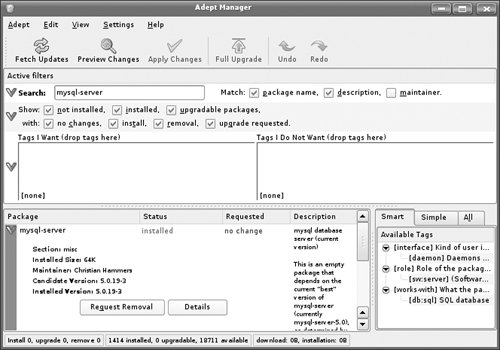 At this time you will be presented with two options: install the package and view the details of the package. Details will show more information including dependent packages and where the files will be installed. Once an application is marked for installation, Adept will also mark all of the dependent files for installation as well. This will prevent what is referred to as "dependency hell" in which not all of the required files are installed to get an application to function correctly. Notice that the requested action will change from "no change" to "install." Figure 7-20 shows mysql-server (an Open Source database server) marked for installation. Figure 7-20. Installing mysql-server with Adept. A very important part of installation packages through Adept is to make sure you always preview the changes by clicking on Preview Changes at the top before clicking Apply Changes. Any changes marked can be undone up to the point of applying them simply by clicking Undo. Figure 7-21 shows the additional packages that will be installed along with the main package. Figure 7-21. Previewing changes in Adept.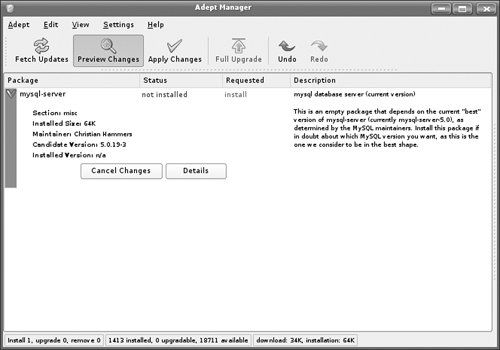 Upgrading KubuntuIf you are using the last release of Kubuntu, Kubuntu 5.10 (the Breezy Badger), by simply editing the repositories you can upgrade to the most current version. To change from Breezy Badger to Dapper Drake, change all references to Dapper under Manage Repositories, and save the changes. Make sure you reload the repositories to get all the updates by selecting Fetch Updates. After the information is downloaded, select Full Upgrade. That is it. No need to purchase a new OS, no need to worry about how a new version will affect the budget. Simply upgrade to the latest and greatest Kubuntu. Now it is time to grab a cup of coffee, sit back, relax, and watch the system upgrade as it will take a while to download all the changed packages and install them on the system. How to Keep the System Up-to-DateTwo parts of Adept, the Adept Updater and the Adept-Updater-Notifier, will help keep the system current with the latest fixes and updates. Open up the K menu, and under the System folder launch the System Updater Wizard (Adept Updater). After entering your password, the application will launch and will allow the user to install any needed updates for the system. Like any software package, there are updates. However, Adept updater will help keep you current with the latest and greatest. Just as when installing new packages, the system will rarely have to be restarted for these changes to take effect. The Adept-Update-Notifier will periodically check for updates and will then allow the user to launch Adept-Updater and install the fixes. The application functions much like the Windows Update icon in Windows systems. When there are updates available for your system a red triangle will appear in the taskbar. Clicking on it will launch Adept-Updater. After entering your password the necessary updates will be downloaded and the user will be prompted for installation. System SettingsThe System Settings application (see Figure 7-22) is a new addition to Kubuntu. This program allows users to make many changes to the system, including setting Sound, User Accounts, Mouse Behavior, and other settings on the network. For those familiar with using KDE, System Settings replaces the K Control Center. However, the application is still there and can be run by hitting Alt+F2 for the run command and typing in Kcontrol or by typing Kcontrol in Katapult. Figure 7-22. The System Settings application.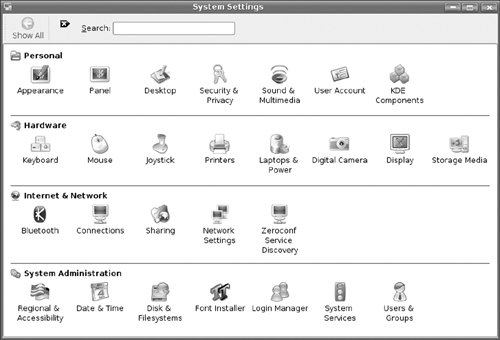 System Settings can be found in the K menu or by typing System Settings in Katapult. When making changes, there will be times that you will be prompted to enter your password. These changes are system-wide and will affect all users of the Kubuntu system and can be made by entering Administration Mode. System Settings is divided into four sections: personal, hardware, Internet and network, and system administration. When migrating through the different options, to return to the main screen, be sure to select Show All instead of closing out the application. This is a common mistake and may take some getting used to. Selecting this option will return the user to the main System Settings window. PersonalChanges made to this section will only affect the current user signed in. The user can change the fonts, how the panel behaves, and various KDE components. Under the personal section, you can change the panel, desktop, and even user information. Changing the desktop background and settings has already been addressed in this chapter. However, this is another way of accessing this information. One area in the personal settings where a lot of changes can be made to customize your Kubuntu system, including changing your password, is the user account section. Another area is session management. It can help save your settings upon logging out. You can do a lot of customization to make Kubuntu your very own. HardwareThis section explains changing how the mouse functions, how power control is set up, and other hardware-related tasks. It is through this section that the user will learn to set up the type of printer connected to the Kubuntu system. Upon selecting Printers, the Common Unix Print System (CUPS) will initialize and enable control of the printing subsystem. Figure 7-23 shows the printer window open. Figure 7-23. The printer window.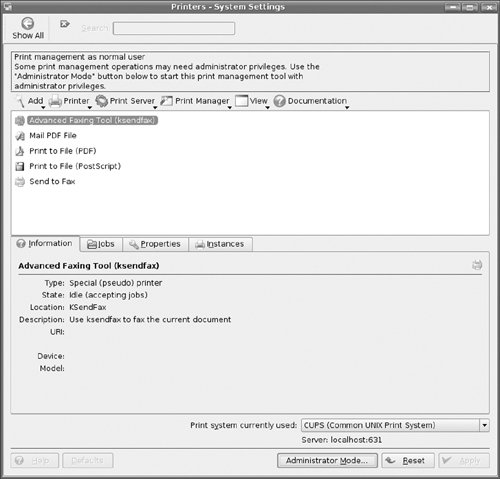 To add a printer, select Add and follow the guide for configuring the printer. CUPS can print to a locally attached printer, a network attached printer, or even a printer shared out through a Windows print server. For some of the changes made at this level, the user will need to enter administration mode through use of your password. New to this version of Kubuntu (6.06) is the capability to change how the graphical system displays. Kubuntu provides an easy-to-use graphical tool (Display) to help manage the X window configuration. Now it is no longer a painful process to change your screen size or resolution, but can be easily done through the system settings window. Internet and NetworkIn this section of System Settings, the user can make changes that affect how the system operates on a network. For those who use a wireless network, there is a good chance that the network card will be detected during installation. This can be managed here as well. New to this release of Kubuntu is the capability to run Zeroconf Discovery. Zeroconf allows computers to communicate on a network without any kind of configuration. This utility will discover the different services that are running on any computer that is available on any of the network connections. For example, Zeroconf comes into play when multiple users want to connect two laptops to each other via a crossover cable to transfer a file or play a network game. Kubuntu can also be set up to share files and sessions across the network. By selecting Sharing, a new window will open up, allowing the user to manage desktop sharing, file sharing, and even local network browsing. If desktop sharing is enabled, others can connect to the first user's Kubuntu and see what is happening on that desktop. This is a great utility for those trying to support and troubleshoot other computers. File sharing and local network browsing enable the system to act as mini file server and provide outside access to files on the system. A lot of information can be modified under the Network section, but be careful. Users can drastically change how the system functions and may accidentally make a change that will prevent Internet access. See Figure 7-24 for an example of how this looks. Figure 7-24. The network section.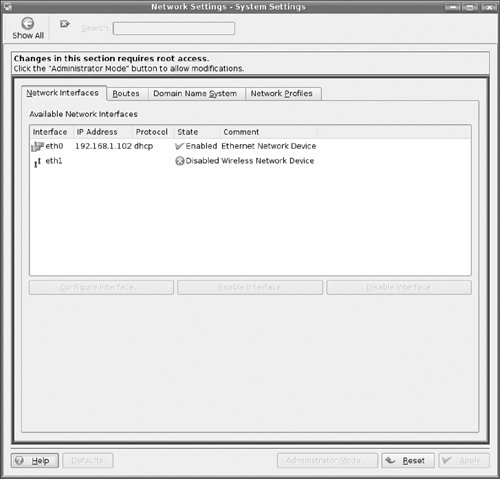 When installing Kubuntu, the installer asked some questions that set up basic networking, including whether or not the IP address would be static or dynamic, the default gateway, and other necessary information. All of these options can be changed here. Any changes made to this section require your user password. In this section the user can make changes to the network interfaces, the routes, how Domain Name System (DNS) is set up, and create additional network profiles (See Figure 7-25). Making all these changes used to require knowledge of the command line, but now it can all be managed within Kubuntu. Figure 7-25. Configuring a network interface. The first tab on the network settings window allows configuration of the different interfaces and determining if the addressing will be static or dynamic. Going left to right, the next tab allows changes to the default route and which interface to use. Instead of having to manually edit a host file, under the DNS tab you can set up different static host names and entries. This is all information that you set up during installation, but it can later be changed here. Setting up and changing how your system works used to require knowledge of text files and the command line, scaring people away from using Linux. With the advent of different graphical tools and the intuitive grouping of programs, system administration has become a lot easier. System AdministrationThe final section of System Settings deals with administrating your Kubuntu system. Changes made here will require that you enter your password. Items that can be changed in this section include date and time, users and groups, regional settings, services, and other options. In the users and groups section you can manage who will be able to access the system and what groups they belong to. If you would like more then one person to be able to access the sudo account, add that individual to the admin group. However, you will need access to the sudo password to make any changes here. The process of adding and changing users has been simplified to help you out. Figure 7-26 shows this process. Figure 7-26. Adding users through system settings.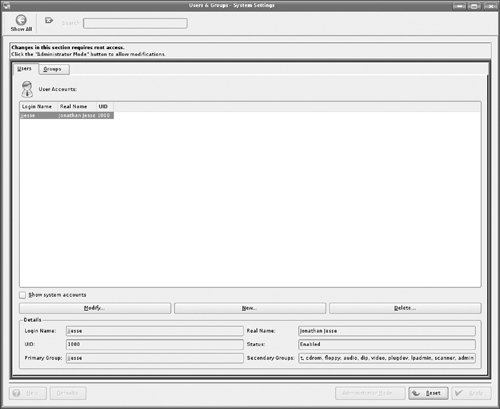 Is your newly installed Web server not starting automatically? Are you having problems setting up a service to run correctly? System services will guide you through the different run levels and setting up when a service will start. Figure 7-27 shows an example of making such a change. Figure 7-27. Configuring services.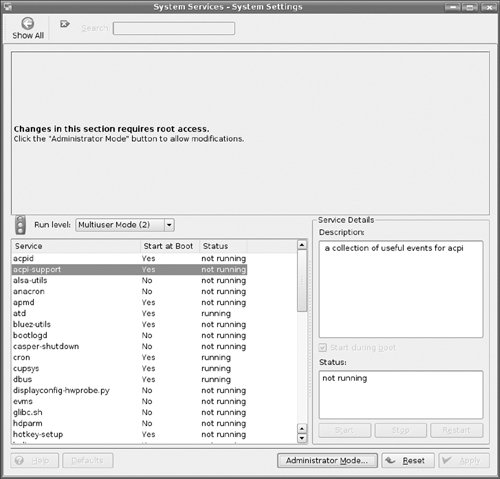 |
EAN: 2147483647
Pages: 133
- Getting Faster to Get Better Why You Need Both Lean and Six Sigma
- Seeing Services Through Your Customers Eyes-Becoming a customer-centered organization
- Success Story #3 Fort Wayne, Indiana From 0 to 60 in nothing flat
- Success Story #4 Stanford Hospital and Clinics At the forefront of the quality revolution
- Phase 3 Mobilization