An AntHill HelloWorld
With the AntHill example project experience under our belt, let's work on a HelloWorld-type example to see how to use AntHill within the scope of a new project. We'll start the process by creating a new software project based on the familiar HelloWorld code.
Creating the Project
For this project, we are are going to assume that you have acccess to AntHill as well as a working CVS repository. Within your home directory, create a new directory called helloworld and a subdirectory called src, and within the subdirectory, create a new file called HelloWorld.java and type in the following code:
import java.io.*; public class HelloWorld { String myHello; public void buildString(String s) { myHello = s; } public String getString() { return myHello; } public static void main (String [] args) { HelloWorld hw = new HelloWorld(); hw.buildString("Fancy HelloWorld"); System.out.println(hw.getString()); } } Next we need to create a simple build.XML Ant script to handle the compiling of our HelloWorld class. The following listing shows the simple Ant script that we need to put in the directory with our Java code.
<?xml version="1.0"?> <project name="HelloWorld" default="all" basedir="."> <target name="init"> <mkdir dir="dist"/> <mkdir dir="dist/classes"/> <mkdir dir="dist/lib"/> </target> <target name="build-src"> <javac srcdir="src" destdir="dist/classes" classpath="${build-classpath}" debug="on" deprecation="off"/> </target> <target name="build" depends="init,build-src"> </target> <target name="jar" depends="build"> <jar jarfile="dist/lib/HelloWorld.jar" basedir="dist/classes"/> </target> <target name="clean"> <delete dir="dist"/> </target> <target name="all"> <antcall name="init"/> <antcall name="clean"/> <antcall name="build"/> <antcall name="jar"/> </target> </project> Impounding the Project
In order for our system to ultimately build fresh source code, we need to have our code within the configuration system. In this example, we will be using CVS as our repository of choice. Let's impound the code into CVS with a command like the following:
cvs -d ~/repository import -m "" hello hello initial
The result of the import should be:
N hello/build.xml cvs import: Importing /home/node2/repository/hello/src N hello/src/HelloWorld.java No conflicts created by this import
At this point we are ready to test whether our code and Ant build script are set up correctly before working with AntHill to automate the process.
Doing a Test Build Using Ant
Before setting up a project within AntHill it is important to make sure that our Ant build.xml script and environment are set up properly to ensure that the code will build and that we have an issue only with the code. The following shows an example of what we should see when we execute Ant on our build script and the HelloWorld source code:
[node2@node2 helloworld]$ ant Buildfile: build.xml clean: [delete] Deleting directory /home/node2/helloworld/dist init: [mkdir] Created dir: /home/node2/helloworld/dist [mkdir] Created dir: /home/node2/helloworld/dist/classes [mkdir] Created dir: /home/node2/helloworld/dist/lib build-src: [javac] Compiling 1 source file to /home/node2/helloworld/dist/classes build: jar: [jar] Building jar: /home/node2/helloworld/dist/lib/HelloWorld.jar all: BUILD SUCCESSFUL Total time: 16 seconds
Of course, the magic words from this build are BUILD SUCCESSFUL. If you see these words, we can move to the AntHill project.
Creating an AntHill Project
Now that we know that our build process is successful, we want to move closer to a continuous integration system by allowing AntHill to automatically handle all of the tasks necessary for a successful build. Remember that a successful build is determined by the project itself. If you need to accomplish Javadocs, PDF output, testing, and other processes, just include them in your project build.xml script. For this example, we've removed all of the projects and dependencies from the AntHill Administration page by clicking the Delete links.
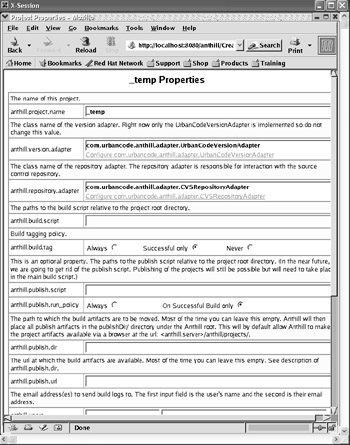
Now let's create a new AntHill project. Click the Create New Project link from the Administration page. You will receive a page like this:

The options available for a new project are the following:
-
anthill.project.name: The name of the project. This value will display on the AntHill Administration page.
-
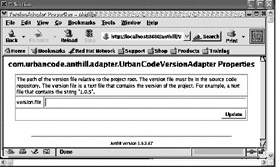
anthill.version.adapter: The version adapter to use for this project. The default value entered for AntHill will be displayed. You don't want to change this adapter, but it can be configured. Click the Configure link to display the page shown below.

For every project in the AntHill system, there needs to be a version file within that contains the current version of the software. In the Properties line of the Version Adapter, enter the name of the file relative to the root directory of the project. For example, we might enter the filename of version and place it in the root of our project. Within the file, put a starting string such as 1.0.0.
-
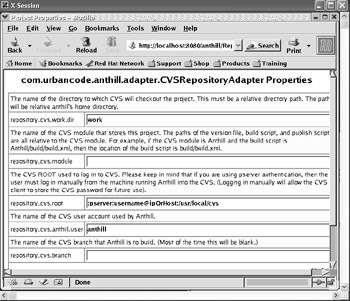
anthill.repository.adapter: The default repository adapter for the project will be displayed in each part of the Project page. You cannot change the repository adapter, but you can configure it for this specific project. The followingfigure shows an example of the options available for the repository adapter:
For each of the various repository adapters, there will be options to determine the access specifics for the current project. You will need to update which user to use when accessing the respository as well as the project directory specifics.
-
anthill.build.script: AntHill needs to know where the Ant build.xml script is located within the project directory. Put the path relative to the root directory of the project along with the build script name in this field.
-
anthill.build.tag: When a build is performed, the system will generally assign a build tag to the code within the repository. The options available are Always, Successful Only, and Never. The default is Successful Only. It is generally a good idea to have a build tag on all successful builds in order to have a history and be able to re-create the build as needed.
-
anthill.publish.script; Within the current version of AntHill, publishing is a separate process and requires a different script. The script path should be added into this field. The current release notes indicate that this process will change to be accomplished within the main build script. If you don't put a script in this field, AntHill will not perform a publish and you will need to put the publishing steps in your build.xml script.

-
anthill.publish.run_policy: The policy for the publish script can be either Always or On Successful Build only.
-
anthill.publish.dir: During the build process, various artifacts will be created such as the logs. If this field is empty, AntHill will automatically place the artifacts in the /publishDir of the root. If you change this directory, the artifacts won't be automatically available.
-
anthill.publish.url: If you change the location of the artifact directory, you will need to put the URL of the directory in this field.
-
anthill.users: The name of the user or users to which an e-mail will be sent after the build. There are two fields in the users area. The first is just a name and the second is an e-mail address.
-
anthill.mail.policy: The policy to use when sending an e-mail to the above users. The options are Always and Failed Builds Only. The default is to always send an e-mail.
-
anthill.build.ant.params: Additional parameters to be sent to Ant when this project is executed.
-
anthill.publish.ant.params: Additional parameters to be sent to the publish Ant script.
-
anthill.java.extra.options: Additional parameters to be sent to Java.
-
anthill.schedule: The current schedule to use for this project.
For our HelloWorld project, we filled the New Project options with the following values:
-
Anthill.project.name: Used the name of HelloWorld.
-
Anthill.version.adapter: Added a file called version containing the text 1.0.0. Also impounded the file to CVS.
-
Anthill.repository.adapter: Added the name of the directory for the AntHill to build withinhello. Added the name of the CVS projecthello. Added the username of a CVS user. It is important if you are using CVS that you have the specified user log in to the build machine so that CVS can remember the user's password since AntHill doesn't have the ability to handle passwords.
-
Anthill.build.script: Our build.xml script is located in the root directory of the project, so we added build.xml to this field.
-
Anthill.build.tag: Left this field at the default.
-
Anthill.publish.script: Didn't enter one.
-
Anthill.publish.run_policy: Left at the default.
-
Anthill.publish.dir: Left at the default.
-
Anthilll.publish.url: Left at the default.
-
Anthill.users: Added a single usertom tom@yahoo.com.
-
Anthill.mail.policy: Left at Always.
-
Anthill.build.ant.params: Left empty.
-
Anthill.publish.ant.params: Left empty.
-
Anthill.java.extra.options: Left empty.
-
Anthill.schedule: Set to default (we will change this later).
Once we have entered all of the fields, the new project will appear on the AntHill Administration page and we will be ready for a build.
Doing a Build
After the new project has been created, you will have an option to Edit, Build, or Delete it. Let's manually build the project to be sure that our project properties are accurate. To build the project, just click the Build link. Be sure to enable the Force Build checkbox when prompted. If you have filled out everything correctly, the build will be successful and you will see a green field; otherwise you will see red. If the field is red, click the name of the project and view the buildLog to see what the problem was during the build. In most cases it will be an issue with the repository settings.
This task has shown that we can use the AntHill system to accomplish a forced build just like we would have done by executing Ant within the directory of our project. Looking in the logs, we find that the build was successful and it was provided the appropriate label 1.0.1 based on the version of 1.0.0 that we supplied in the version file.
If you take a close look at the output produced when you click the HelloWorld project name, you will see that there is no /dist directory. If you look back at our Ant build script, you will see that a /dist directory is supposed to be created. Let's take a moment to understand what we are looking at when we click on a project's name from the Administration page. Open a terminal window and browse to where you installed AntHill. The path might be something like /usr/local/anthill. Within the installation directory there will be another directory called publishDir. This is where AntHill puts all of the files produced from the build. Recall that during the setup of the HelloWorld project and the discussion of the deployDir property, this property will be passed to the Ant build script with the location of the directory where the project will be published by AntHill. In our case, the property will have the value /usr/local/anthill/publishDir/HelloWorld. It is within this directory that we want to put our .jar file. Clearly the build.xml script we developed earlier won't do. So consider the following script:
<?xml version="1.0"?> <project name="HelloWorld" default="all" basedir="."> <property name="deployDir" location="dist"/> <property name="dist.dir" location="${deployDir}"/> <target name="build"> <mkdir dir="classes"/> <javac srcdir="src" destdir="classes" classpath="${build-classpath}" debug="on" deprecation="off"/> </target> <target name="jar" depends="build"> <mkdir dir="${dist.dir}/lib"/> <jar jarfile="${dist.dir}/lib/HelloWorld.jar" basedir="classes"/> </target> <target name="clean"> <delete dir="classes"/> </target> <target name="all"> <antcall target="clean"/> <antcall target="build"/> <antcall target="jar"/> </target> </project> Notice at the top of the script that we have two new property tags:
<property name="deployDir" location="dist"/> <property name="dist.dir" location="${deployDir}"/> AntHill will pass in the value for the deployDir, and we will use that value in the jar <target> element so that we will have a specific place to put the results of our project. Now we need to set up a specific schedule for performing nightly scheduled builds.
Scheduling a Nightly Build
When we created a new project, we chose a schedule to use called default. If you take a look at the Administration page, you will see an entry for a schedule called default. Click the Edit link next to the schedule. Each schedule will have a specific name, the total number of minutes between builds, and the time when the build will actually start. The default build schedule is quite aggressive at a build every 30 minutes. All of the projects that are currently using a specific schedule will be shown at the bottom of the Schedule page.
If you click the Back button, you will also see that there is a link to create a new schedule. When you click the link, you will be required to enter a schedule name, interval, and start time. To use the new schedule, edit a specific project and select the newly entered schedule; then click Update.
Adding More Builds
If you have a situation where there is a need to have builds at a specific time of the day, you will need to have multiple schedules. For example, let's say we would like to have a build at 11:00 A.M. and 3:00 P.M. each day but also a nightly build at 2:00 A.M. Since the times aren't separated by equal intervals, we will need to create three different schedule tasks as well as three different projects. The reason is that the projects are able to be associated with only a single schedule.
So we might ultimately have the following projects and their associated schedules:
-
HelloWorld_1100am
-
HelloWorld_300pm
-
HelloWorld_nightly
These three builds will have all of the necessary support for our project by allowing the developers to submit code throughout the day and be sure that they don't break the build.
EAN: 2147483647
Pages: 228