Obtaining and Installing AntHill
There are a few key questions to ask yourself when installing AntHill. The first is where to host the system. Since AntHill is designed to act as a central server that handles the nightly builds, it is a good idea to install the software on a machine divorced from the development platform itself. This machine should probably be considered a separate build machine and labeled as such. AntHill requires the use of an application server such as Tomcat, Resin, or JBoss, so make sure one of those is available on the build machine. It should be noted that AntHill has been tested only on Tomcat versions 3.2.2, 3.3.1, and 4.0.2. We used Resin 3.0 for this chapter during testing as well.
Once the binary AntHill file has been downloaded, you will need to determine where to install AntHill. The recommended location is /usr/local/anthill. One of the directories extracted from the tar is called /dist. Within the /dist directory is a file called anthill.war. This file should be placed in the webapps directory of your application server.
After the .war file has been transferred to the webapps directory of your application server, open a browser and browse to your application server and the directory /anthill, for example, http://localhost:8080/anthill. The result should look something like this:
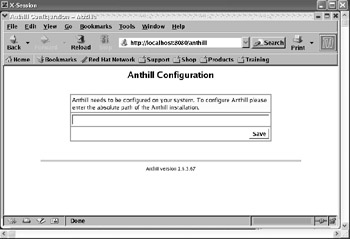
The AntHill Configuration page requires that you enter the path where you installed AntHill. If you installed it in /usr/local/anthill, just enter this path into the page's edit line. Once you've entered the path, click the Save button. The installation path will be saved, and the primary AntHill Administration screen will be displayed, as shown below.
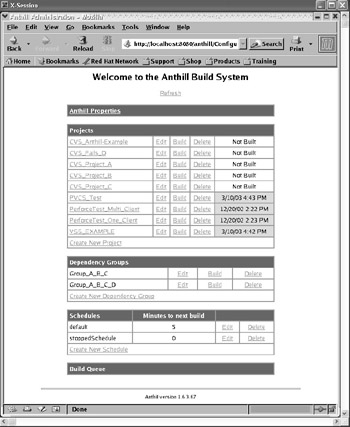
Let's take a moment and discuss the various parts of the Administration page, since it will be an important part of getting our continuous integration system up and running. As you can see from the previous image, there are five different functional areas for administrating a build system. These areas are:
-
AntHill Properties
-
Projects
-
Dependency Groups
-
Schedules
-
Build Queue
When the Administration page is first opened, it shows the examples preconfigured for AntHill. Later in this chapter, we will run through the example build before building our own system. The first option on the page is for the AntHill properties. In the next section we will look at this link in detail. Next on the page is a table of projects showing the name of the project, the time it was last built, and the outcome of the build. When you view the Administration page on your computer, you will see that the build status is either red or green, indicating whether or not the build was successful. There are three options links available for each project, as well as a link to add a new project.
After the project table is a table for dependency groups. The dependency groups are used to create a hierarchy of projects. For example, we might have three projects, A, B, and C, where project B needs to be build before A and C. We can build a dependency group to tell the build system the order in which the projects must be built. After the dependency group table is the schedule. The schedule table includes a list of the different times the automated build will be kicked off. There can be more than one time when a build will be scheduled, so there may be more than one entry in the schedule table. Finally, the Build Queue area of the page shows all of the builds currently being built and those in the queue to be built.
Configuring AntHill
Before we start working with AntHill, let's take a moment and review the properties needed to use AntHill. Click the AntHill Properties link at the top of the Administration page to reveal the page found below.
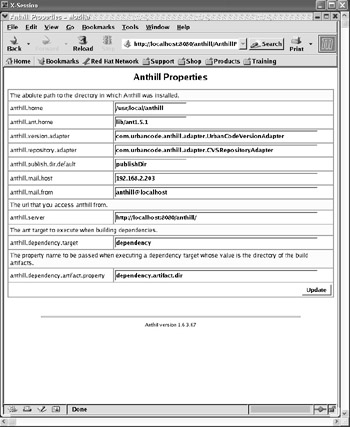
There are a total of 10 different configuration options to be set in AntHill, which are outlined here:
-
anthill.home: This option is the same as the directory added when we first accessed the system. If you move the location of the AntHill application directory, you will need to change this option as well.
-
anthill.ant.home: As you might expect, AntHill uses Ant to perform the actual builds. You need to set this option to the current server's Ant application directory.
-
anthill.version.adapter: When builds are fired off by AntHill, the version number of the build needs to be increased. The version adapter handles the incrementing of the build version automatically. Currently, AntHill ships with only a single adapter called com.urbancode.anthill .adapter.UrbanCodeVersionAdapter, and this value should not be changed. As you will see shortly, the build version number appears as major.minor.build. The default adapter will increase only the build number. To increase either the major or minor version, an unscheduled build must take place. Also, if you are building within a branch, only a single build number is used, which is appended to the branch label name.
-
anthill.repository.adapter: AntHill is required to pull current source files from a repository. This option is used to set the default adapter for your specific CM system. Note: This option is used to set only the adapter type for your CM repository software but not the actual values for the repository. You will set the repository options when you add a project to the system.
The current options available are:
-
com.urbancode.anthill.adapter.CVSRepositoryAdapter
-
com.urbancode.anthill.adapter.PVCSRepositoryAdapter
-
com.urbancode.anthill.adapter.PerforceRepositoryAdapter
-
com.urbancode.anthill.adapter.VSSRepositoryAdapter
-
com.urbancode.anthill.adapter.MKSIntegrityRepositoryAdapter
-
com.urbancode.anthill.adapter.FileSystemRepositoryAdapter
-
-
anthill.publish.dir.default: The Publish Directory option prompts the user to specify a directory where all of the artifacts from a build will be placed and subsequently accessed by the Administration page. The default location is the publishDir directory of the primary AntHill installation directory.
-
anthilll.mail.host: AntHill will send e-mails to appropriate people based on the build. In this option, you will need to set up the host of the mail system to be used to send those e- mails .
-
anthill.mail.from: This option sets the mail-from text value for the e-mails sent by the system.
-
anthill.server: In the default case, the AntHill Administration page is accessed from the URL http://localhost:8080/anthill. If you need to access the page through a different URL, make the appropriate change here.
-
anthill.dependency.target: When a dependency has been created for several projects, the system will use a specific target for Ant to designate the dependency. The default task name is dependency.
-
anthill.dependency.artifact.property: When a dependency target is executed, the name of the build artifacts directory will be passed in the property name of this option.
Experimenting with AntHill
Before we start the process of setting up our own projects in AntHill, we have the opportunity to see how the system works using an example project hosted by urban{code}. In order to use the example in its fullest, set the e-mail server to your server name. You will also need to set up a CVS repository for the example project. Since you are setting up a build server, we are going to assume that you already have a repository set up in your organization. However, for the AntHill example, you will need CVS installed. If you don't have CVS installed, you can obtain it from http://www.wincvs.org. Once it is installed, you will need to execute the following command:
cvs d :pserver:anthill-example@cvs2.urbancode.com:/usr/local/anthill-test login
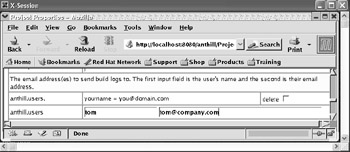
The urban{code} CVS repository will return with a password. Type in the value anthill-example . Now we also want the example project to send us notification e-mails. Click the Edit link next to the Anthill-Example project. Locate the option for anthill.users, and enter your e-mail address, as shown below.
At this point, you are ready to begin using the example. Find the entry called CVS_Anthill-Example link in the Projects part of the AntHill Administration page, and click the Build link to reveal the image shown here:

Now enable the checkbox for Force Build to tell the system to force a build of this project. Notice that we could place a specific value in the Version field; otherwise , we will just let AntHill use the version it finds appropriate. Now click the Build button. After you do, the Build Queue will have an entry called CVS_Anthill-Example Being Built. The CVS_Anthill-Example row under Projects will update to show the current data and time. After some time, the Administration page will automatically update to show a successful build, or you can just click the Refresh button at the top of the Administration page. Once the example project is successful, as shown by the green highlighting of the Time/Date field, click the CVS_Anthill-Example link to reveal the project artifacts, as shown below.
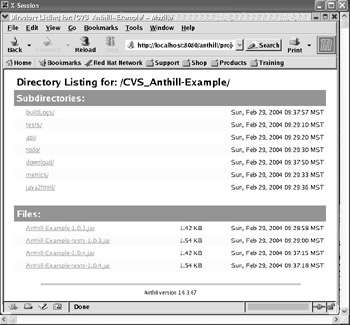
When the example project has been built, you should receive an e-mail showing the status of the build. Notice that there are a number of subdirectories created from the Ant build script as well as AntHill itself. Click the first directory link called buildLogs. Within this directory you will find the logs from the various builds that have been performed on the project. If you click one of the log links, you will see the output from the Ant build.xml script.
EAN: 2147483647
Pages: 228