| As you create fields for your database, you'll need to assign names and field types (for example, text or number), then choose how they will be displayed. The following steps cover most field types. For information on defining calculation and summary fields, see pages 119 and 124. To define a field 1. | To create a field, choose File > Define > Database (Figure 9.2). Or use your keyboard:  (Windows) or (Windows) or  (Mac). (Mac).
Figure 9.2. To create a field, choose File > Define > Database. 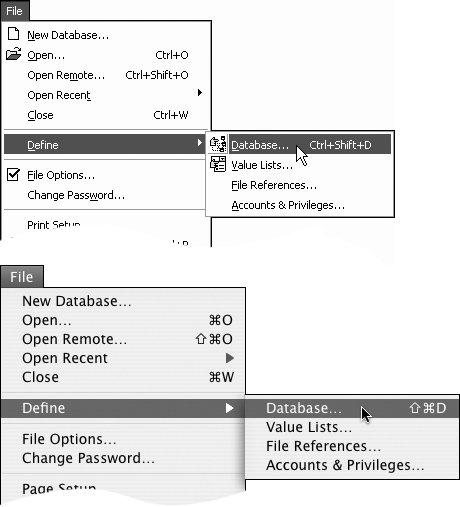
| 2. | When the Define Database dialog box appears, the Fields tab is selected automatically. Type the name of your first field in the Field Name text box (Figure 9.3).
Figure 9.3. Assign a name to a new field within the Define Database dialog box. 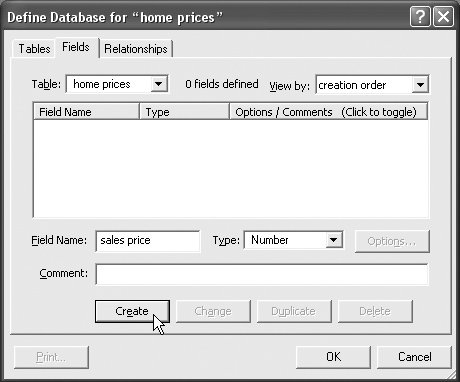
| | | 3. | Choose the type of field you want from the dialog box's Type drop-down menu (Figure 9.4). For more on deciding which field type best suits your needs, see Choosing a Field Type on page 94.
Figure 9.4. The Type drop-down menu in the Define Database dialog box offers a choice of eight field types. 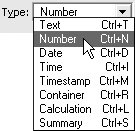
| | | 4. | Once you click the Create button, the name of your new field appears in the center window of the Define Database dialog box (Figure 9.5).
Figure 9.5. Once you create a field, its name appears in the list of fields within the Define Database dialog box. 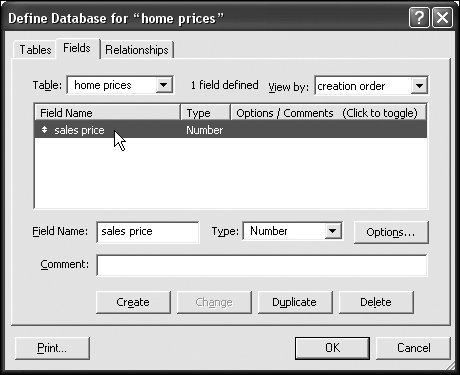
| 5. | At this point, you can repeat the steps to create another field. Or you can further define your field by highlighting its name in the center window of the Define Database dialog box and then clicking the Options button. See Setting Field Entry Options on page 98.
| 6. | When you've finished creating fields (you can always add more later), click OK to close the dialog box. FileMaker then displays the created fields in Browse mode. To dress up a field's appearance and layout, see Creating Layouts on page 143.
|
 Tip Tip
In naming your fields, FileMaker prevents you from using any of the symbols or words it needs to calculate functions:, (comma),+,*,/,ˆ,&,=,>,<,(,),",;,:, AND, OR, XOR, NOT. You also cannot use words that are the names of FileMaker functions, such as Status, Count, or Sum. One last thing: Don't start a file name with a period or a number.
To delete or add a field 1. | Choose File > Define > Database ( in Windows, on the Mac) to open the Define Database dialog box where the Fields tab is automatically selected (Figure 9.3).
| 2. | To delete a field, click on its name in the center window, then click the Delete button. When the warning dialog box appears, again click Delete.
To add a field, type the new field's name into the Field Name text box, make a selection from the Type drop-down menu, and click the Create button.
| 3. | When you're ready, click OK to close the dialog box.
|
To change a field's name or type 1. | Choose File > Define > Database ( in Windows, on the Mac) to open the Define Database dialog box where the Fields tab is automatically selected (Figure 9.3).
| 2. | To change the name of a field, click on its name in the center text window and type a new name into the Field Name text window.
To change a field's type, highlight the field in the center text window, then find and select your new type choice in the Type drop-down menu.
| 3. | Click OK to close the dialog box.
|
|