Tips for Your Burning Endeavors
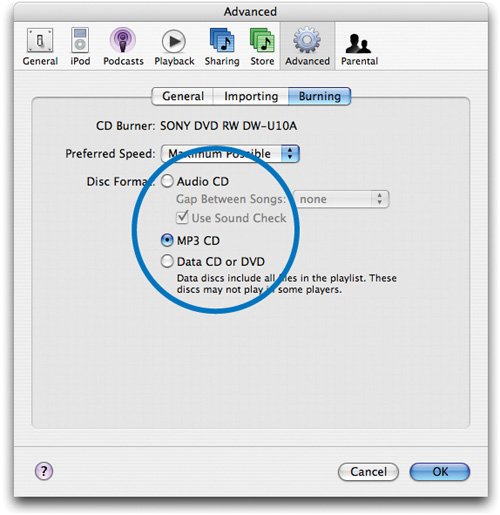
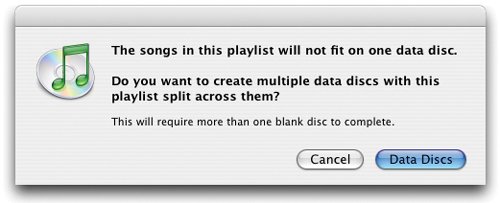
| By adjusting burning preferences, you can control the pause between songs, volume levels, and even the format of your final CD. Choose Preferences from the iTunes menu, click the Advanced button, then click Burning. Gap Control When iTunes burns an audio CD, it uses a two-second gap to separate songs. Depending on what you're burning, you may want to omit, or at least change, that gap. On many albums, one song flows seamlessly into the next. When burning these kinds of tracks, close the gap: choose None from the Gap Between Songs pop-up menu. Unfortunately, because of the nature of audio compression, you may still hear a tiny gap between songs. If you can't bear even the smallest pause, rip the songs from an audio CD using the Join Tracks option (page 20). Volume Control Not all albums are mastered at the same volume level, and if you mix and match tracks from a few CDs, some songs may sound much quieter than others. Don't reach for the volume knobclick the Sound Check box before burning, and iTunes adjusts each track to make the final CD's levels consistent. You can also apply Sound Check when playing music in iTunes; see page 74 for details. Burning MP3 CDs Normally, iTunes burns CDs in standard audio CD format. But you can also burn tracks as MP3 files; this lets you take advantage of MP3's compression so you can squeeze more music onto a CDroughly ten times the number of songs that an audio CD will hold. But there are a couple of catches. Catch Number One: Most audio CD players can't play MP3-format CDs. If you're shopping for a CD or DVD player, you may want to look for one that supports MP3 playback. Catch Number Two: When you burn a playlist in MP3 format, iTunes skips over any songs that are stored in AAC format. If you're taking advantage of AAC's superior efficiencyor if you've built a library of purchases from the iTunes Music Storethe MP3 CD format won't be of much use to you. To have iTunes burn in MP3 format, click the MP3 CD button in the Burning preferences dialog box. When ripping CDs that you'll subsequently be burning in MP3 format, you might find it useful to activate the iTunes track numbering option: in the Preferences dialog box, click Importing and then check the box labeled Create file names with track number. Track numbering is useful because many players play the songs on MP3 CDs in alphanumeric orderactivating track numbering will enable the tracks to play back in the correct order. Back Up What You Buy You've bought some musicand then your hard drive dies. The songs and videos you bought are gone, and the only way to download them again is to buy them again. Clearly, backing up is good to do. iTunes can help. Choose Preferences from the iTunes menu, click Burning, then choose the Data CD option. Next, create a playlist of the songs you want to back up. (If you want to back up only the items you've purchased, just click the Purchased playlist or create the smart playlist I describe on page 51.) Finally, burn that playlist to a CD or DVD. If you have more music than will fit on a single CD or DVD, iTunes displays a message letting you know. Verify that you have a few blank discs available, then click the Data Discs button. Another way to back up a huge music library is to drag it to a second hard drive. An external FireWire hard drive is inexpensive and makes great backup media for music and photos alike. Go to your Home directory (choose Home from the Finder's Go menu), then locate and double-click your Music folder. Locate the folder named iTunes and drag it to the other hard drive. Unlike the burning approach, this technique also backs up all of your playlists. Tip If you've copied your entire music library to an iPod, you can use an iPod utility to recover your songs; see page 100. Blank Advice Many brands of CD-R media are available, and some people swear by a given brand. Some users even claim that certain colors of CD-R blanks are better than others. My advice: don't sweat itjust buy name-brand CD-R blanks. And don't fret about their colors. Color varies depending on the organic dyes used by the CD-R's manufacturer, and different manufacturers use different dye formulations. Color isn't a useful indicator of CD-R quality anyway. How long will your burned CDs last? Manufacturers toss out figures ranging from 75 to 200 years, but these are only estimates based on accelerated aging tests that attempt to simulate the effects of time. One thing is certain: a CD-R will last longer when kept away from heat and bright light. Avoid scratching either side of a CD-Ruse a felt-tipped pen to label it, and don't write any more than you need to. (The solvents in the ink can damage the CD over time.) Also, think twice about applying a peel-and-stick label to the CD. The label's adhesive can damage the CD over time, and if you don't center the label perfectly, the CD will be out of balance as it spins, which could cause playback problems. To learn more about CD-R media, visit the CD-Recordable FAQ at www.cdrfaq.org. Burning to CD-RW Media For broadest compatibility with CD players, you'll want to burn using CD-R blanks, which can't be erased and reused. But the CD burners in all current Macs can also use CD-RW mediarewritable media, which costs more but can be erased and reused again and again. A growing number of CD players can play back rewritable media, and if yours is among them, you might consider using rewritable media for some burning jobssuch as burning some podcasts for car listening. This media is also ideal for backing up your iTunes music library. Note that iTunes can't erase a CD-RW disc. To do that, use Mac OS X's Disk Utility program; it's located in the Utilities folder, inside the Applications folder. |