Organizing Presentations
| We assume at this point that you've created a presentation file using the information starting on page 638, and now want to modify the slide order, and insert new ones. To get your slides and headings in the right order, Impress provides you with several tools. Each one has a different set of capabilities, though there are some overlaps.
You can also use the summary slide generator to document the slide order once you're done (see Creating a Summary Slide on page 678). Renaming a SlideIn Drawing view, use either method:
Deleting a SlideUse either of the following methods :
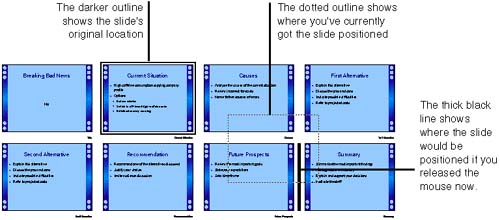
Rearranging SlidesWhen you rearrange the order of slides in a presentation you'll be presenting on a computer, you'll need to reassign the transition effects between slides. Refer to Applying Slide Transition Effects on page 720 for more information. Slide ViewIn Slide view, you can quickly rearrange slide order. If you want to move subpoints from one slide to another, refer to the following section, which describes the process in Outline view. However, moving slides in Slide view is simpler and less error-prone . Refer to Using Master Views on page 653 if you want more information about Slide view.
Outline ViewYou can move a part of your presentation to a new location by dragging its heading to a different place in the outline, or by using the Move Up and Move Down icons in the object bar . The advantage of using Outline view is, among other factors, that you can view just the text of each heading, as well as viewing or hiding subpoints (the text within each slide). See Using Master Views on page 653 if you want more information about Outline view. If you're repositioning a slide heading, its subpoints will be moved, as well. (It's possible to insert a heading in the middle of a slide, though, separating heading and bulletsthough this might not be what you want.) Graphics remain with the original slide heading. Dragging
Note If you're showing all levels of the presentation, be careful not to accidentally reposition a slide heading in the middle of another slide. You'll get illogical, if amusing, topic mixes . Using the Object Bar
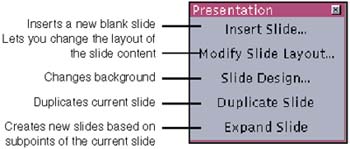
Inserting a New Empty SlideYou can add a slide at a specific spot in your presentation in several ways; we'll cover two here. When you add a slide, it is added with a specific layout . The layout is the structure of the slide: this can include features such as default area for a heading and text, a blank chart with text bullets above it, etc. Depending on how you add the slide, a default will be used, or you can select the one you want. Note Impress uses the term "layout" frequently and inconsistently. A layout, or slide layout, is the structure of one slide. A presentation layout (see Presentation Backgrounds on page 700) is the background for an entire presentation. Quickly Adding a Slide
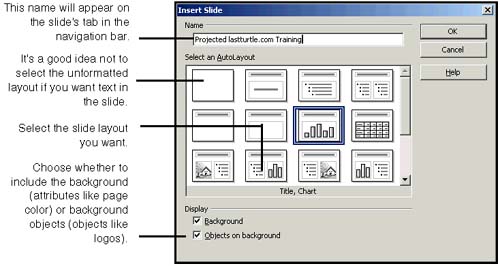
Adding a Slide and Selecting the Layout
Note We strongly recommend that you select the layout in Figure 26-4 that most closely matches the content you're going to add. A lot of default formatting, which makes it easier to add text, comes with the preset layouts. Unless you're just going to import an object and have no text, there isn't much reason to use the completely unformatted layout in the upper left corner. For instance, if you're a PowerPoint user , you're used to being able to press the Tab key to indent a bulleted item to the next line. This won't happen unless you choose a layout that contains bulleted items. Selecting a Slide Layout for a New or Existing SlideThis is very similar to adding a new slide. Review the precautions at the beginning of Inserting a New Empty Slide , then follow these steps.
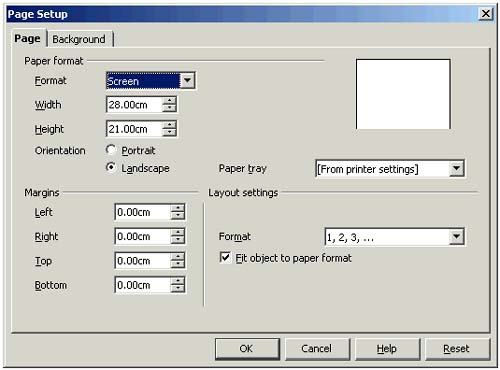
Specifying Slide Orientation and MarginsSelecting the slide layout takes care of most of the slide options. However, you can use the Page Setup window to specify other aspects, including slide orientation (portrait or landscape). The options you set here are not slide-specific; they affect the entire file. For more information on page setup, see Figure 7-42 on page 234.
Inserting Existing Slides from Impress or DrawDraw and Impress are both based on slides as the basic component of the file, so adding a slide from another presentation or a graphic in an existing Draw file creates a new slide in your presentation. The slides will keep the background and styles from the documents where they are now; they won't get the background and styles of the presentation you insert them in. Inserting Slides Using the NavigatorYou can insert a Draw graphic or a Impress slide from any open presentation or drawing document.
Inserting Slides Using the Insert File FeatureYou can insert Draw and Impress files, which will be created as separate slides to the right of the current slide. For information on inserting HTML and text files into a selected slide, see Adding Charts, Pictures, and Objects on page 695.
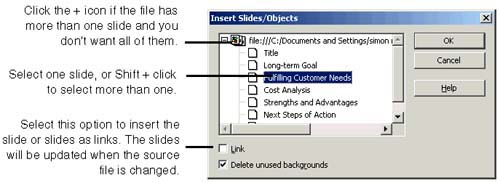
Inserting All the Slides in Another Presentation
Copying and Duplicating SlidesThe goals achieved by copying and duplicating are, of course, the same. Impress provides several ways to do this. Copying a Slide From Any Presentation in Slide ViewYou can copy a slide from the current presentation or another one, and paste it into the location you select.
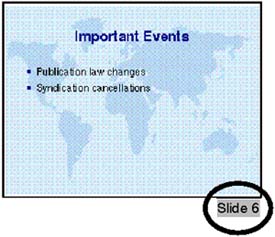
Duplicating a Slide in the Same Presentation in Drawing ViewThe new slide will be added immediately after the duplicated slide, and named "Slide n +1." (if you select the fifth slide and duplicate it, the duplicated one will be named "Slide 6").
Promoting and Demoting SubpointsPromoting subpoints (the bulleted items in each slide) is similar to the expand function on the Presentation menu, which lets you automatically create a new slide for each subpoint in a slide. Refer to Expanding: Creating a Slide for Each Subpoint on page 677 if you'd rather use that feature. Demoting a slide heading to a subpoint will delete all the items in the slide and any objects. Promote subpoints before you demote the slide heading they're under. Also, note that corresponding graphics are not preserved or moved when you delete a slide.
Expanding: Creating a Slide for Each SubpointYou can generate new slides based on the topics, or subpoints , in an existing one. This is useful if you find you're trying to cover too much in one slide. For instance, you might have a slide titled "Tourist Destinations of North Dakota" with five bulleted subpoints, then realize that this is far too big a topic to cover in one slide. Expanding the Tourist Destinations slide would delete it and create five new slides, one for each subpoint. When you expand a slide, the expanded slide is deleted, and one new slide is created for every paragraph you've applied Outline 1 style to. Outline 1 is a presentation style, listed in the Stylist (Format > Stylist) and defined in the Style Catalog (Format > Styles > Catalog). The slides must contain two or more Outline 1 elements to activate the Expand option. If you want to keep the main slide and expand it into multiple slides, duplicate it first. Also, note that graphics in the expanded slide are not preserved or moved with the subpoints.
The new slides will appear after (to the right of) where the expanded slide was. Showing and Hiding SlidesYou can temporarily hide a slide, without deleting it. Note If you often need to hide and show slides to customize presentations for different audiences, refer to Creating Custom Presentations on page 722.
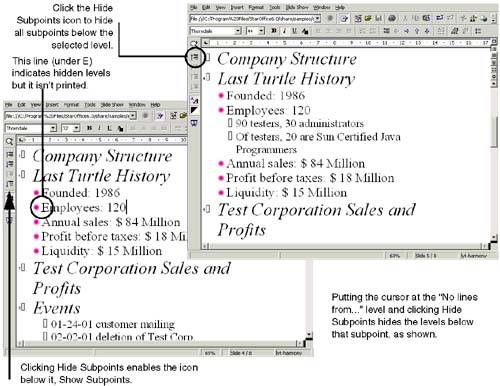
Showing and Hiding SubpointsYou can hide all bulleted items, or subpoints, at or below a particular level, using outline view. The subpoints will always be printed; there's no way to control printing hidden subpoints.
Creating a Summary SlideA summary slide functions as a table of contents of your slide titles. It's inserted at the end of your presentation. You can't update a summary slide if you rearrange slides; you can only delete the existing one and create a new one.
|

EAN: 2147483647
Pages: 407