Adding Text
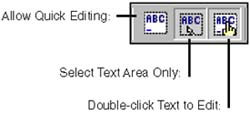
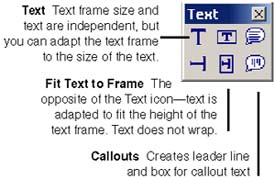
| Be sure you're in Drawing view, in the correct view (Slide or Background), and the correct layer, if you're using layers . (You can use text in Handout and Notes views, as well, but not to add to the slide contents.) You'll need to set text editing options, then add a text frame if necessary, and finally the text itself. Text Editing OptionsTo know how the text tools will work, you need to set your text editing options first. Use the text icons in the object bar below the work area to set text options. An option is on when it's dimmed and looks indented. In our experience working with Impress and Draw, we concluded that it's most convenient to choose only the Double-click Text to Edit option. Allow Quick EditingChoose this option if you want to be able to just click in text once and start adding to it or editing it. This option can be a little annoyingit makes it difficult to click on text in order to select the text frame. We recommend that you choose Double-click Text to Edit instead. Select Text Area OnlyThis option means that you can't click on the text in order to select the whole text frame, and move it, delete it or perform other actions. In order to select the text frame, you need to get into text edit mode first by clicking or double-clicking text. We recommend that you not use it, unless you don't think you'll be frequently selecting text frames . Double-click Text to EditThis option lets you quickly, but not accidentally , get into text edit mode for any text you double-click. We recommend using this option. Adding a Standard Preset Text Frame to Your SlideTo add an Impress preset text frame to a blank slide, see Selecting a Slide Layout for a New or Existing Slide on page 673. This is the best way to create the structure within which you'll add text. Using the Text Icons to Create Text FramesYou can create two types of text framesthe area defining where and how text is positioned in your presentation, as well as callout text frames, which include a line extending from the text box to an object. To activate vertical text, choose Tools > Options > Language Settings > Languages. Under Asian Languages, select Enabled. Use the tools available from the Text icon in the toolbar at the left side of the work area to create text. You also can double-click any object, such as a rectangle you've drawn, and type inside it. Don't Make Your Own Text Frames for PresentationsWe recommend that, for the main text of your presentations, you choose a slide layout that has a text frame in it already instead of using a blank slide layout and adding your own text frames using the text tool. Using a slide layout with text frames in it is the fastest , easiest , least frustrating way to make a professional-looking presentation, for the following reasons:
If you don't like the formatting for text in the preset slide layouts, you can change it much more easily than you can the text in your own text frames. See Creating and Modifying Styles on page 693. Horizontal or Vertical Text Icon: Drawing a Text Frame With a Specific SizeThis tool is best if you want to control how the text wraps: if you want to write a paragraph that is exactly four inches wide, for instance. Use this tool for most of the text in your presentation.
To set text frame options, see Setting Text and Text Frame Options on page 683. Horizontal or Vertical Fit Text to Size Icon: Sizing the Text to the FrameThis tool is best for short pieces of text, or if you want to quickly but roughly set the size of the text in the frame. The text will be approximately the same height as the frame you draw. (That's approximately ; the font shrinks somewhat when you deselect the text frame.) In addition, the text won't wrap; it will begin in the center of the text frame and, as you type, extend to the right and left, potentially completely out of the work area. (We generally found this frame annoying.)
To set text frame options, see Setting Text and Text Frame Options on page 683. Horizontal or Vertical Callouts IconThis tool draws a line and text frame.
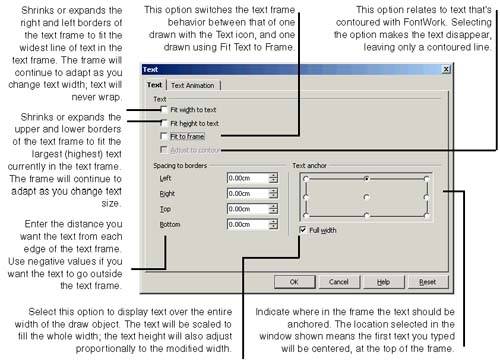
To set additional text frame options, see Setting Text and Text Frame Options. Setting Text and Text Frame OptionsUse these options for text in any text frame, including the ones provided in slide layouts, and the text frames. The options also apply to objects you've typed text in by double-clicking in the object.
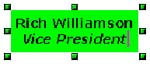
Adding Your Text Content to a PresentationThe most important part, of course, is getting what you want to say into the slide. Again, Impress offers a variety of ways to do this. TypingClick or double-click in the text frame, depending on the setup options you chose, and add your presentation's contents. Inserting a FileSee Inserting Text and HTML Files on page 696. PastingDon't overlook simply pasting in text from other documents. Unless it's from another presentation file, pasting in generally works better than importing or inserting a file. Position the cursor in the text frame before pasting. If you don't position the cursor in a text frame before pasting, a new Text icon type text frame is created for the pasted text. Writing Text Inside an ObjectDouble-click in the document and start typing. The text will expand out of the box, so keep an eye on font size. Or right-click and choose Text, then select Fit to Frame to make the text size and width match the size of the object. Moving the box around once it's got text inside can be a little tricky; the program thinks it's text and just wants to sit there happily typing away. Just move the mouse until the text pointer turns to a crosshairs, as shown at right, and you'll be able to move it around easily. Getting Into Text Editing ModeEven with the correct options selected, getting into text editing mode in Impress can be a little tricky. We've found a couple tricks that help:
To format your text, refer to Formatting Text on page 685. That section contains a few key tips that will keep your frustration level down. |


EAN: 2147483647
Pages: 407