Content Express
|
| Content Express (www.xexpress.org) is an advanced CMS that provides both a WYSIWYG (What You See Is What You Get) editing interface and the ability to import a number of different word processing formats. It is often used to replace the PostNuke article system, but it can also run as a separate enhancement to your site. The following overview is based on Content Express 1.2.7.5, which is available with the downloadable book materials. You can also download current versions of the module at the Content Express SourceForge site: sourceforge.net/projects/xexpress/. Tip To enable PostNuke searching in Content Express items, copy this file: /modules/ContentExpress/pnsearch/contexp.php to your site's /includes/search/ folder. To install the module, decompress the archive's contents into your /modules/ directory; it's completely self-contained in a folder labeled ContentExpress. Refresh your modules in Administration and click the links in the Content Express row to initialize and activate the module. Return to the Administration Menu and click the new Content Express icon or link. You are initially presented with a form used to add page content and a series of module navigation links at the top. There are five main content structures:
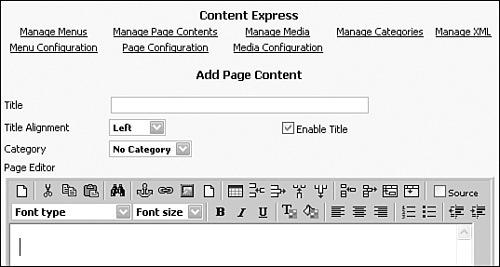
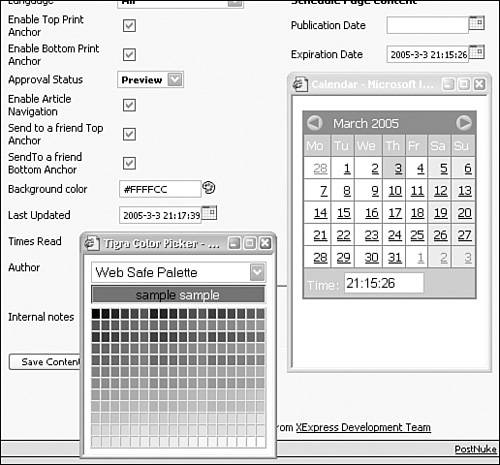
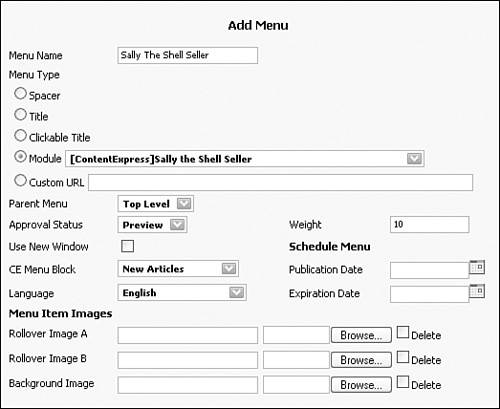
To review the basics of how Content Express works, you can enter some articles. The default screen when you enter Content Express from the Administration Menu is the Add Page Content form, shown in Figure 12.1. If you have browsed around the other pages, you can return to the start form using the Manage Page Contents link at the top. Figure 12.1. Adding a new page to Content Express. Enter a title in the first field. The check box by this field lets you toggle the display of the title to the public, but the page title is always used in the administration area to identify stories. You can also decide how the title should be aligned, to fit the layout style for your site. Note Content Express Configuration settings override those in individual items, such as the display of print icon anchors. You currently don't have any categories configured, so leave the drop-down set to No Category. In the large text area below the drop-down list box, enter in a paragraph of content for the page. The editor buttons include a variety of standard formatting options comparable to any word processor. The results of your visual formatting are applied to the content as Hypertext Markup Language (HTML). The Parent field is designed to let you group a series of articles in a hierarchy, creating a simple, multipage document or a complex article contribution structure. Standalone documents should always have Top Level selected. The collection of Media fields provides the controls to upload new media elements and apply them to a given page. You can define the size and position of a given media object. For the moment, leave these fields alone too. The Language option is just like any other PostNuke module, identifying when a given article should appear. If you are not using multiple languages, always leave this field set to All. Using the Schedule fields, you can program the appearance and disappearance of a Page article from your site. There is a built-in calendar component activated through the little icon to the right of the date fields (see Figure 12.2). Leave the Schedule fields blank to make an article immediate and permanent. Figure 12.2. Accessing pop-up windows for additional features. The check boxes toggle the appearance of the Print and Send to a Friend icons. You can set these images to appear at the top and/or bottom of a page. You can also display statistic information for your readers, including the number of times an article has been read and the date it was last changed. Provide an initial value for the Times Read field, such as 5. Set the Status drop-down list box to Posted to make the new article active without first previewing the content. Pages submitted with Preview are entered into the system, but are left deactivated until you manually turn them live. Use the color picker to set the background color of the article to something different from your theme. A light beige is shown in Figure 12.2. Click the Save Content button to submit your page. The page refreshes and a new administration section titled Manage Page Contents appears between the top navigation links and the Add Page Content form. The new area is where you will control most of your documents within Content Express. Use the Add Page Content form to create another half dozen articles. Try out different combinations of the form fields. Be certain at least one page is set as the Parent of another. Use the Management table to activate all your pages. Notice how the Child pages are indented under their Parent article. Tip Replace your general website navigation menus with Content Express blocks to access more menu features. Now, you can make a menu to make it easy for users to access the files. Go to the Blocks Administration page for your site. Add a ContentExpress/CE Menu Block with the title New Articles, or whatever title you like. Submit the block, and in the next screen check the Enable Dynamic Menu Feature check box; this enables the same kind of Parent/Child display in the menu. Commit your changes to the block. Browse to your Content Express Add Menu form using the Administration Menu and click the Manage Menus link, or alternatively, you can use the handy Edit link in your new side block. The thing to understand about the Add Menu form is you are not adding an entire menu with the one form submission; every time you submit the Add Menu form, you are creating one line in the menu. Every entry in the menu has all of the possible settings in Figure 12.3. Figure 12.3. Adding lines to your menu block. The general options and structure of the menu items are very similar to the Page forms. The Menu Type setting determines how the entry will work. To link to a page, select the Module option and choose the appropriate page from the drop-down list box. Menu items have Parent settings just like pages. You can, for example, have a multipage document be linked from a child-level menu entry. There are also other additional features, such as JavaScript rollovers and background image settings to add design elements to your menu. Add all of your pages to your menu. Make at least one entry the Parent of another. As you add active items, they automatically appear in your block. You can use the Categories and Media options to organize your pages further and enhance the content. The JavaScript Menu block even creates clean dynamic HTML (DHTML) menu options that can certainly be useful on many sites regardless of whether they use the module to store article content. Using the Website Configuration for your site, you can change the site's home page from News to Content Express, but the module's real power rests in how great it can be as a Sections replacement for PostNuke. Next, you look at a module that can easily become your site's new home page. |
|
EAN: 2147483647
Pages: 207


