17.2. Creating Keyboard Shortcuts Savvy Word workers know that taking time away from the keyboard to grasp the mouse wastes precious seconds every time. If efficiency is what you crave, take a cue from the power users and learn the keyboard shortcuts for the commands you use most often (you find them throughout this book). If there isn't a shortcut for one of your favorite commands, you can create one. Or, if you learned word processing on a different program, you may want to change Word's keyboard shortcuts to match the ones that your fingers are used to. Here's how to customize Word's keyboard commands: -
Choose Office button  Word Options. When the Word Options box opens, click the Customize button at left . Word Options. When the Word Options box opens, click the Customize button at left . The Customize window opens. (It's the same window used to organize commands on the Quick Access toolbar, as described in the preceding section, shown back in Figure 17-2.) -
At the bottom of the box, click the "Keyboard shortcuts:" Customize button . The Customize Keyboard dialog box opens. As you can see in Figure 17-4, it offers several lists, text boxes, and buttons . At top are two list boxes called Categories and Commands. 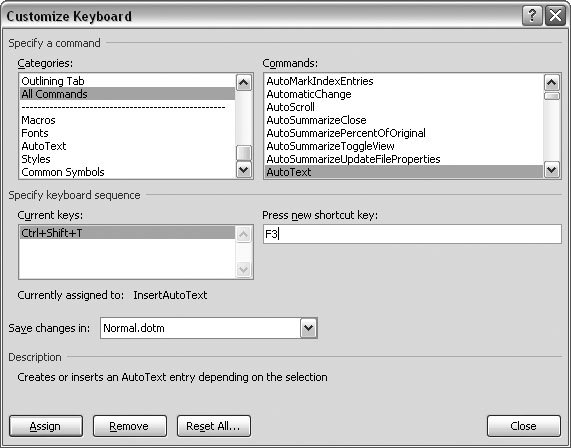 | Figure 17-4. Use the Customize Keyboard box to change the keyboard shortcuts for Word Commands. Choose a category from the box on the left, and then pick a command from the box on the right. Click within the "Press new short cut" box on the right, and then type the keystroke you want to use for your shortcut. | | -
On the left, choose from the Categories options to show commands in the Commands box on the right . When you make a selection in the Categories box, it changes the commands shown in the Commands box. Say you use tables a lot and want to assign a shortcut to the command to insert a table into your document. Choose the Insert Tab in the Categories text box, and the Commands box on the right shows a list of commands related to inserting objects in your document. -
In the Commands list, select the command you want to create a shortcut for . When you click, the command gets highlighted. -
Below the Commands, in the "Press new shortcut key" box, type the keys for your new shortcut . When you press keys on your keyboard, Word records them in the "Current keys" box on the left. You can use the Alt, Shift, and Ctrl keys in combination with other keys. (Pressing them without another key doesn't record anything.)
Tip: If you make a mistake, hit Backspace to remove it. The Delete key doesn't work, since it's considered one of the keystrokes. So if you press the Delete key, "Del" appears in the text box.
-
Below the "Current keys" box, examine the "Currently assigned to" text box to see if the shortcut interferes with another command you regularly use . It's important to look at the "Currently assigned to" message to learn if your shortcut is already assigned to a different command. So, for example, if you type Ctrl+F, you see a message that explains the shortcut is currently assigned to EditFind.
Note: Word has hundreds of commands and each command has a name . When it comes to commands Word doesn't place spaces between the words so you get words like EditFind. In previous versions of Word this shorthand indicated the Find command on the Edit menu. Now, of course those menus are gone, and the commands have been shuffled around, but Word still uses the original command names . Happy hunting.
-
In the "Save changes in" box, choose where to save the keyboard shortcut . You can create keyboard shortcuts that are available to all your Word documents or shortcuts that are available only to some documents. If you leave the "Save changes in" box set to Normal.dotm, your shortcuts are available to all Word documents. Or, click the drop-down menu, and then you can choose a specific document. Then the commands are available only in that document, or, if the document is a template, it's available to any documents based on that template (see the box in Section 5.2.1). You may want to limit the shortcut to, say, templates for your work documents if you share a PC with personal activities or other family members . -
To save the keyboard shortcut, click the Assign button . Clicking the Assign button saves the keyboard shortcut so you can start using it. -
Click the Close button to close the Customize Keyboard box, and then click OK to close the Word Options box . If later you decide the keystroke was a mistake, you can come back and change it by finding the command (as you did in step 3), and then clicking the Remove button at the bottom of the screen.
Tip: If you've really fouled things up, you can click the Reset All button to change all shortcuts back to their original settings.
|