17.1. Customizing the Quick Access Toolbar The Quick Access toolbar lives in the upper-left corner of all Office programs. Sometimes on the Internet you see it referred to as the QAT, because computer gnomes have a strong affinity for acronyms. New in Office 2007, the Quick Access toolbar is designed to put your most frequently used commands in one spot, no matter which Office program you're using. Best of all, you get to choose which commands you want in the toolbar. Microsoft made a guess at the commands that most people would want and put some choices on the Quick Access toolbar menu to get you started (Figure 17-1). 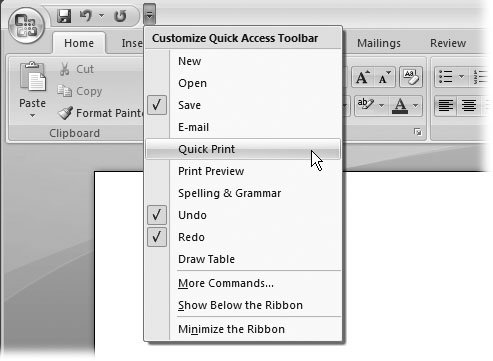 | Figure 17-1. Click the drop-down button (the tiny down arrow) next to the Quick Access toolbar to open a menu where you can add and remove the icons for common commands to the toolbar. If the command you want isn't on this menu, click More Commands to add it, as described in the steps below. | |
17.1.1. Adding Commands to the Quick Access Toolbar Suppose you'd like to add a couple more commands to the Quick Access toolbar. Perhaps you miss the menu in earlier versions of Word that let you quickly switch between open Word documents. Also, say you're a big fan of AutoText, which lets you assign long strings of text to a couple keystrokes (Section 1.4.3). You can add the AutoText button to the Quick Access toolbar, so you can quickly create and use AutoText entries. In this tutorial, you see how to add these two commandsSwitch Windows and AutoTextto the Quick Access toolbar: -
To the right of the Quick Access toolbar, click the tiny arrow button to open the drop-down menu . By checking the commands on this menu, you can add their icons to the Quick Access toolbar. Trouble is, the commands shows that the two commands you want to add aren't even on the menu, so: -
Near the bottom of the menu, click More Commands . The Word Options dialog box opens, showing the Customize options (Figure 17-2). The list box on the right shows the commands that are currently shown on the Quick Access toolbar. The box on the left contains commands that you can add to the Quick Access toolbar. The "Choose commands from" drop-down menu above the left box reads "Popular Commands." Evidently, the Switch Windows and AutoText commands aren't popular enough to make the cut, because they aren't on the list. Fortunately, you can use the "Choose commands from" menu to display more commands. 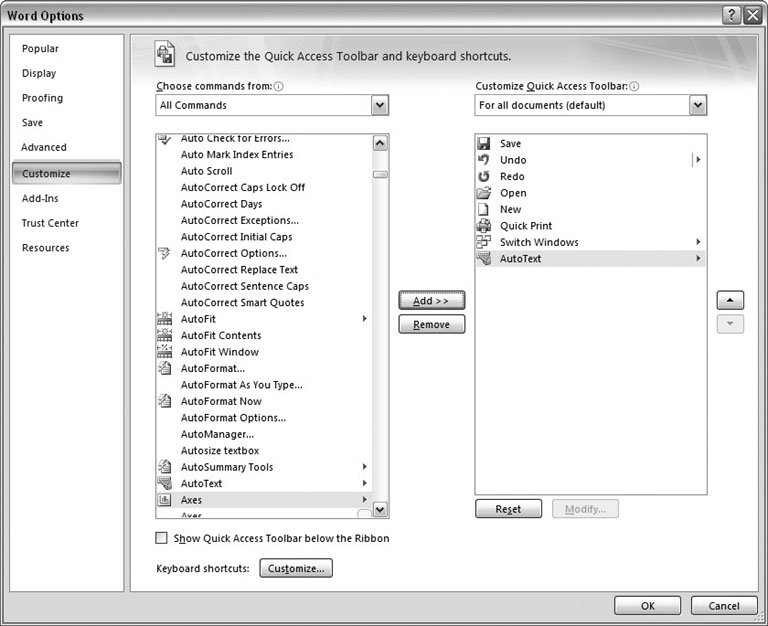 | Figure 17-2. The Customize Pane in the Word Options box lets you add commands to the Quick Access toolbar. Use the "Choose commands from" dropdown menu to show available commands in the box on the left. Double-click a command on the list to add it to the Quick Access toolbar, as shown by the list box on the right. | | -
From the "Choose commands from" drop-down menu, choose All Commands . The All Commands list is pretty lengthy, giving you an idea of just how many different commands Word has to offer. That's why the "Choose commands from" menu also lets you narrow down your choices by choosing commands from specific ribbon tabs. (The major tabs are listed closer to the top, and the submenu tabs, like those for chart tools and table tools, are listed near the bottom.) -
Scroll down the All Commands list to select AutoText, and then click the Add button between the two list boxes to add the command to the box with the Quick Access toolbar commands . You can use the Add button to add a command to the Quick Access toolbar list, or you can just double-click a command.
Tip: The first entry, <Separator>, isn't a command; it simply places a vertical line in the Quick Access toolbar to help organize the icons. If you have lots of commands in your Quick Access toolbar, you may want to group them between separator bars.
-
Scroll down to select Switch Windows, and then double-click to add the command to the Quick Access toolbar box . Press S to jump down to the commands that begin with S. That makes it a shorter scroll to get to the Switch Windows command. Now that you've filled the list with your desired commands, it's time to arrange them to your liking. -
In the Customize Quick Access toolbar list box, select a command, and then use the up and down arrow buttons on the right to arrange them in an order that works best for you . To make it easier to find your new commands, you can add one or two separators described in the previous tip. For example, you may want to group the related Save, New document, and Open document commands together. -
Click OK to close the Word Options box and admire your newly configured Quick Access toolbar . When the Word Options box closes , you see your new command on the Quick Access toolbar. Both the AutoText and Switch Windows commands are more than simple command buttonsthey're actually drop-down menus , which can save you a couple of ribbon clicks. For even greater time savings, you can use keyboard shortcuts to run the commands on the Quick Access toolbar. The commands are numbered from the left to the right, so you can choose them with the Alt key and the number (Figure 17-3). 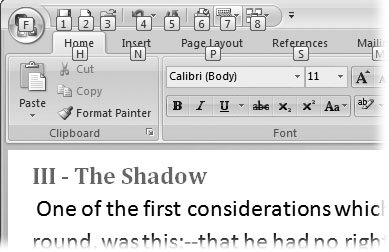 | Figure 17-3. Press the Alt key, and the commands on the Quick Access toolbar sprout little number badges. You can run a command with a keyboard shortcut by pressing Alt with the corresponding number. In this example, Alt+1runs the Save File command, and Alt+8 runs Switch Windows. | |
Tip: If you've used earlier versions of Word, you may not like the location of the Quick Access toolbar. So Microsoft lets you move it. Click the Customize Quick Access toolbar button, and then choose "Show Below the Ribbon" (it's near the bottom of the menu). The Quick Access toolbar moves to its own row between the ribbon and your document. In this location, it looks similar to the toolbars in earlier versions of Word.
|