Using AutoText
As you saw in Chapter 3, AutoCorrect can help you enter text items of up to 255 characters in any of the Office applications. In Word, you can create formatted AutoCorrect entries as well, which can contain not only formatted text but also graphics.
Word also lets you create AutoText entries for inserting boilerplate text and graphics in your documents. AutoText entries are very similar to AutoCorrect entries, but they re not triggered automatically, so you can use standard words in their names .
Creating New AutoText Entries
To create an AutoText entry, follow these steps:
-
Create the contents of the AutoText entry in a document, and then select the material for the entry.
-
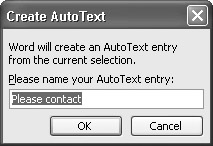
Press [Alt] - [F3] (or click the New button on the AutoText toolbar) to display the Create AutoText dialog box:
-
In the Please Name Your AutoText Entry text box, edit the default name that Word suggests. (The default name for AutoText entries you create this way consists of the first two words of the text ” assuming the text has at least two words.)
-
Click the OK button to close the Create AutoText dialog box and create the AutoText entry.
Deleting AutoText Entries
To delete an AutoText entry, display the AutoText tab of the AutoCorrect dialog box (Tools AutoCorrect Options, or Tools AutoCorrect in Word 2000). Select the entry and click the Delete button.
From the AutoText tab of the AutoCorrect dialog box, you can also create an AutoText entry from the current selection by clicking the Add button, but it s usually easier to use the Create AutoText dialog box, as described a moment ago.
The most important option on the AutoText tab is the Show AutoComplete Suggestions check box, which controls whether Word displays a ScreenTip showing an available AutoText entry when you ve typed enough letters to identify it. Clear this check box if you prefer to trigger your AutoText entries manually.
The Preview box helps you identify an AutoText entry that you can t identify by name. You can then click the Insert button to insert the entry at the insertion point.
Entering AutoText Entries
The standard way to enter an AutoText entry is to use the AutoComplete feature. When Word notices that you ve typed the first few characters in an AutoText entry s name, it displays a ScreenTip showing the first few words so that you can identify it:
You can press [Tab] to enter the AutoText entry and continue typing in the same paragraph, or press [Enter] to enter the AutoText entry and start a new paragraph.
If you prefer not to use AutoComplete, you can enter an AutoText entry by typing enough letters to identify it and then pressing [F3] . (If nothing happens when you press [F3] , you haven t typed enough letters to uniquely identify the AutoText entry.)
You can also insert AutoText entries by using the Insert AutoText submenu or the drop-down menu button on the AutoText toolbar.
Moving AutoText Entries from One Template to Another
AutoText entries are stored in templates. By default, Word stores all your AutoText entries in Normal.dot, the global template that s loaded whenever you start Word. But you can copy or move AutoText entries from one template to another if necessary. Having all your AutoText entries in Normal.dot is convenient because it means they re always available when you re working in Word, no matter which template the active document is attached to. But if your AutoText entries are large (for example, if they contain graphics), Normal.dot will grow to a large file size , which can make Word run more slowly. In this case, it s a good idea to move any AutoText entries that apply only to a certain template to that template so that they re not slowing down Word.
You ll also need to store AutoText entries in their own templates if you want to make different AutoText entries available for different templates. When you do this, the AutoText entries in the template to which the active document is attached take precedence over the AutoText entries in Normal.dot.
To copy or move AutoText entries from one template to another, follow these steps:
-
Choose Tools Templates and Add-Ins to display the Templates and Add-ins dialog box.
-
Click the Organizer button to display the Organizer dialog box.
-
Click the AutoText tab to display it.
-
If necessary, use the Close File button and the resulting Open File button on either side of the AutoText tab to open and close the templates you want to work with.
-
In the list box for the source template, select the AutoText entry.
-
Click the Copy button to copy it to the other template.
-
If you want to remove the AutoText entry from the source template, click the Delete button.
-
After copying or moving all the AutoText entries you want to affect, click the Close button to close the Organizer dialog box.
-
Save both templates involved.
EAN: 2147483647
Pages: 117