Performing Common Tasks
| < Day Day Up > |
| VBA is very flexible in conjunction with Access. This chapter can't hope to show you everything that you can do with VBA, but it can offer you a selection of techniques to get you started. This section looks at some of the things you can do with forms and VBA:
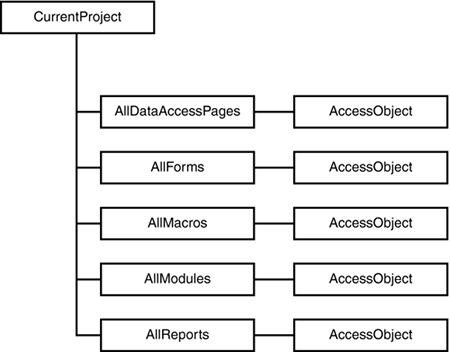
Checking for a Form's ExistenceYou might at some point want to know whether a particular form exists in the current database. This is especially useful if you're writing general-purpose code that you plan to use with many databases. Fortunately, Access provides you with a built-in way to determine whether a form exists. Figure 10.1 shows a portion of the Access object model that's useful in this situation. Figure 10.1. A portion of the Access object model.
As you can see, Access supplies a built-in object called CurrentProject. This object represents the user interface objects in the current database, and itself contains collections for each of the major classes of objects in the database. These collections contain AccessObject objects. For example, the AllForms collection contains one AccessObject object for each form in the current database. The AccessObject object is not itself a form; rather, it is an object that indicates the presence of a form. By combining the AllForms collection with error handling, you can easily tell whether a particular form exists: Function DoesFormExist(strName As String) As Boolean ' Check for the existence of a form On Error GoTo HandleErr Dim ao As AccessObject Set ao = CurrentProject.AllForms(strName) DoesFormExist = True ExitHere: Exit Function HandleErr: DoesFormExist = False Exit Function End Function This procedure starts by setting up an error handler, so that any errors cause VBA to jump to the code after the HandleErr label. It then attempts to create an AccessObject object corresponding to the form name that the user passed into the procedure. If this attempt succeeds, the form exists, and VBA sets the return value of the procedure to True. If the attempt fails, the error handler kicks in, and VBA sets the return value of the procedure to False. Either way, VBA next executes the Exit Function statement to return control to the caller. Figure 10.2 shows how you might use this procedure in the Immediate window. Figure 10.2. Checking for the existence of a form.
NOTE Sometimes procedures such as DoesFormExist seem to worry beginning developers. Isn't it bad to deliberately cause an error in your code? The answer is no. If you're causing the error to collect information and catching it in an error handler, it is a valuable and useful technique. Determining Whether a Form Is LoadedSometimes it's not enough to know whether a database contains a particular form. You might also want to know whether a particular form is open onscreen. In Chapter 8, you learned about the Forms collection, which contains only the open forms. By determining whether a form exists in this collection, you can tell whether the form is open. Here's the code to do this: Function IsFormOpen(strName As String) As Boolean ' Check to see whether a form is open On Error GoTo HandleErr Dim frm As Form Set frm = Forms(strName) IsFormOpen = True ExitHere: Exit Function HandleErr: IsFormOpen = False Exit Function End Function This code is almost identical to the code you just saw for checking a form's existence. The only difference is that it uses a different collection. Resizing a FormThe MoveSize method of the DoCmd object lets you change the position and size of the object that currently has the focus. This method has four optional arguments:
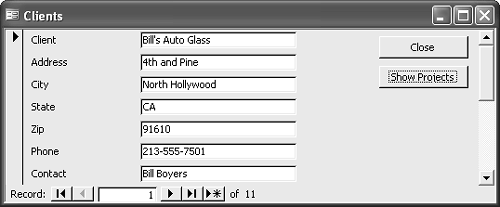
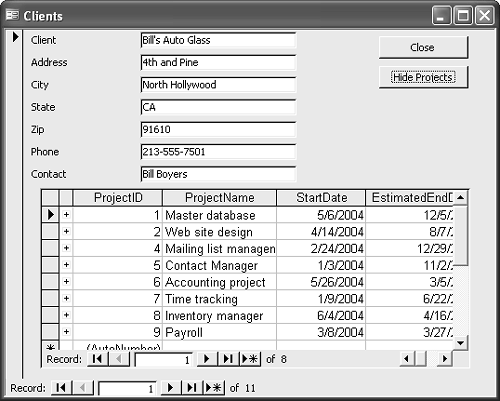
Because these arguments include the width and height of the form, you can use the MoveSize method to resize a form without moving it. Here's a practical example. The Clients form in the TimeTrack database currently shows both clients and their projects, a potentially overwhelming amount of information. You'll make use of the MoveSize method to display the projects only when the user clicks on a button.
There are a few things in this code worth pointing out. First, the form's Load event occurs when a form is opened and its records are displayed onscreen. You're calling the MoveSize method in this event to control the original size of the form. Second, the code that responds to the button's Click event checks the button's caption to know whether it should expand or contract the form. By using this technique, you don't have to track the form's mode in a separate variable. Passing Arguments Using OpenArgsOpenArgs is both an argument to the DoCmd.OpenForm method and a property of the form. The reason for this dual use is that it enables you to pass information into a form at the time that you open it. This section of the chapter concentrates on the syntax of OpenArgs and shows how you can retrieve the information that it contains. Later on, in the "Case Study" section of this chapter, you see a more practical example.
The idea behind OpenArgs is simple: you can use this argument of the OpenForm method to pass any arbitrary string data that you want into the form. The value of this argument is then available to any VBA code in the form's module. Here's a quick demonstration:
TIP To set most properties of a control, the control must have the focus. Each control that can receive the focus has a SetFocus method that you can call to ensure that it is the active control. In addition to the OpenArgs method, there's one other new bit of VBA to note in this example: the Me keyword. Me is a shortcut for "the object that contains this code." When you're running code in a form's module, the Me keyword refers to the form itself. Consequently, Me.OpenArgs retrieves the value of the OpenArgs property of the form. Populating the FormSo far you've been working with the appearance of the form, but you can also manipulate the form's data. Suppose, for example, you want to use the same form for more than one data set. As it stands now, the Timeslips form displays all the timeslips in the entire database, which is an overwhelming amount of data if you want to focus on what's happened lately. Let's combine the OpenArgs property with an extra query to restrict the data on the form:
Of course, you can also call these statements from the user interface[md]for example, you can add a new button to the Switchboard form to open the weekly timeslips. By reusing a form this way with multiple data sets, you can make your application easier to maintain. TIP It's good practice to supply a Case Else with reasonable default behavior. For this form, if the user supplies an unexpected argument, the form will just display all records.
The key to the data displayed on the form is the form's RecordSource property. You can set this property to a SQL statement or the name of a query, as you saw in this example. You can also set the property to the name of a table if you want to base the form directly on the table without an intervening query. As an alternative to setting the form's RecordSource property, you can apply a filter to the form after it's open. You can use the DoCmd.ApplyFilter method to take this approach. Let's modify the Timeslips form a bit more:
NOTE The DoCmd object's ApplyFilter method applies a filter, a query, or a SQL WHERE clause to a table, form, or report in order to limit or sort the underlying data. This method takes the form DoCmd.ApplyFilter [filtername][, wherecondition] Both arguments are optional, but you must specify at least one. If you use both arguments, wherecondition is applied. Note the modification to the Form_Open procedure in the case where the record source is already filtered. In that case, there's no point in even showing the new button to the user, because it won't do anything.
|
| < Day Day Up > |
EAN: 2147483647
Pages: 186


 Reports also have an OpenArgs argument, which you can read about in "Passing Arguments Using OpenArgs," p. 212.
 The RecordSource code is in the forms Open event procedure rather than in the Load event procedure. In the former, the records are not yet loaded, whereas in the latter it's too late to change the RecordSource. To learn more about the order of events, see "The Event Sequence for Forms," p. 167.