Adding Toolbars with the ToolStrip Control
Adding Toolbars with the ToolStrip Control
Parallel to the MenuStrip control, you can use the Visual Studio ToolStrip control to quickly add toolbars to your program's user interface. The ToolStrip control is placed on a Visual Basic form but resides in the component tray in the IDE, just like the MenuStrip control. In Visual Studio 2005, you can add a variety of new features to your toolbars, including labels, combo boxes, text boxes, and split buttons. Toolbars look especially exciting when you add them, but remember that as with menu commands, you must write an event procedure for each button that you want to use in your program. Still, compared with earlier versions of Visual Basic, it is amazing how much toolbar programming and configuring the IDE does for you. Practice creating a toolbar now.
Create a toolbar
Click the ToolStrip control on the Menus & Toolbars tab of the Toolbox, and then draw a toolbar control on your form.
Don't worry about the location—Visual Studio will create a toolbar on your form automatically and extend it across the window. The tool strip object itself appears below the form in the component tray. On the form, the default toolbar contains one button. Now you'll use a special shortcut feature to populate the toolbar automatically.
Click the tiny shortcut arrow in the upper-right corner of the new toolbar.
The shortcut arrow points to the right and looks similar to the shortcut arrow we saw in the PictureBox control in Chapter 2, “Writing Your First Program.” When you click the arrow, a window opens that includes a few of the most common toolbar tasks and properties. You can configure the toolbar quickly with these commands.
Click Insert Standard Items.
Visual Studio adds a collection of standard toolbar buttons to the toolbar, including New, Open, Save, Print, Cut, Copy, Paste, and Help. Your form looks similar to this:
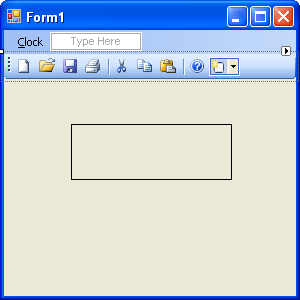
It is not necessary for you to start with a full toolbar of buttons as I have done here—I'm merely demonstrating one of the useful “automatic” features of Visual Studio 2005. You could also create the buttons on your toolbar one by one using the ToolStrip editing commands, as I shall demonstrate shortly. But for many applications, clicking Insert Standard Items is a time-saving feature. Remember, however, that although these toolbar buttons look professional, they are not functional yet. They need event procedures to make them work.
Click the Add ToolStripButton button on the right side of the toolbar, then click the Button item.
Add ToolStripButton adds additional items to your toolbar, such as buttons, labels, split buttons, text boxes, combo boxes, and other useful interface elements. You've now created a custom toolbar button; by default it contains a picture of a mountain and a sun.
Right-click the new button, point to DisplayStyle, and click ImageAndText.
Your new button displays both text and a graphical image on the toolbar. Visual Studio names your new button ToolStripButton1 in the program, and this name appears by default on the toolbar.
Change the ToolStripButton1 object's Text property to Color, which is the name of your button on the form, and then press Enter.
The Color button appears on the toolbar. You'll use this button later in the program to change the color of text on the form. Now insert a custom bitmap for your button.
Right-click the Color button, and then click the Set Image command.
Click Local Resource (if it is not already selected), and then the Import button.
Browse to the c:\vb05sbs\chap04 folder, click the ColorButton bitmap file that I created for you, click Open, then click OK.
Visual Studio loads the pink, blue, and yellow paint icon into the Color button, as shown in the following illustration:
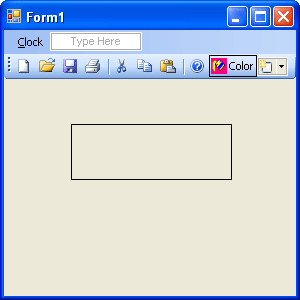
Your new button is complete, and you have learned how to add your own buttons to the toolbar, in addition to the default items supplied by Visual Studio. Now you'll learn how to delete and rearrange toolbar buttons.
Move and delete toolbar buttons
Drag the new Color button to the left side of the toolbar.
Visual Studio lets you rearrange your toolbar buttons by using simple click-and-drag movements.
Right-click the second button in the toolbar (New), then click the Delete command.
The New button is removed from the toolbar. With the Delete command, you can delete unwanted buttons, which makes it easy to customize the standard toolbar buttons provided by the ToolStrip control.
Delete the Save and Print buttons, but be sure to keep the Color and Open buttons.
Now you'll learn to use dialog box controls and connect them to toolbar buttons.
EAN: N/A
Pages: 168