Hack 71. Create a Shadow for a Green Screen Image
| < Day Day Up > |
|
Compositing someone or something into a scene is an accomplishment. But to make it believable, you might need to add a shadow. A green screen image is one where an image is captured with a background consisting of only one color, green. You can also acquire a blue screen image, where the background is blue, or just about any other color you can imagine. The essential ingredient is that your image is in front of a single, solid-colored background, and that your subject not have the same color as your background on it. It also helps if you are able to light and set the scene with compositing in mind [Hack #22]. When you composite a scene using a green screen, you might discover there is no shadow being cast from your subject. If you discover the scene you are attempting to composite needs a shadow, because it just doesn't look right, there is an easy solution to your problem. Even better than that, the solution can be found within the problem itself.
6.12.1. Creating a Copy of Your ImageThe first step in creating your shadow effect is to duplicate your video image. To do so, simply create another video layer on your timeline and drop a copy of your green screen video onto it. You will want to apply the same exact effect you used to initially composite your scene [Hack #70]. When prepared correctly, you should have two layers of video, with the same effects applied.
6.12.2. Layering Video to Prepare for Shadow CreationIn order for the effect to appear correctly, you will want your original image on a layer above the shadow image's layer. If you do not do stack the layers correctly, the shadow will appear in front of your subject. Figure 6-40 shows the difference between having the shadow layer above the original layer and below the original layer. Figure 6-40. The subtle but distinct difference in layering 6.12.3. Create the Shell of the ShadowNow that the image layers have been prepared, you need to remove the color from the image. By removing the color, you should end up with a black representation of your original image. To accomplish this:
6.12.4. Shear the Shadow Off of the SubjectOnce you have created the basic shadow element, you need to shear it away from your subject. If you don't shear the shadow image, your audience will never see it because it will always be behind your original image. To shear your image, you need to distort it:
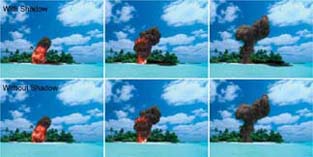
There are no specific rules I can provide to shear your shadow realistically because every shot will require different settings. If there are other shadows in your background, use them as a reference point to help evaluate how well your settings match the scene. 6.12.5. Add Subtlety to the ShadowDepending on your personal preference, as well as any preexisting shadows in your scene, you will possibly want to blend your new shadow. Blending the shadow is easy to do: just change its opacity. In order to add a little more realism, you can add a Blur effect to your shadow in order to soften it. If you want to adjust any of the parameters on your effect, simply edit the effects you've applied until you obtain acceptable results. Again, if there are any preexisting shadows in your scene, you should attempt to match your self-created shadow as much as possible. Figure 6-41 shows a series of images from a completed scene with and without a shadow applied. Figure 6-41. A completed scene with (top) and without (bottom) shadow applied 6.12.6. Hacking the HackThere will usually be final, small details that you need to pay attention to. You will more than likely have to perform some minor adjustments to your subject image, including changing brightness and contrast to match your background. You might also have to do some color correction in order to have your original image blend in correctly. When you've finished compositing your shadow, try toggling your shadow layer on and off, merely to remind yourself that you've created a shadow that follows your subjects…just like the real thing. |
| < Day Day Up > |
EAN: 2147483647
Pages: 158


 Effects Palette