Working with Linux User Management
| < Day Day Up > |
Working with Linux User ManagementTest Objective Covered:
The LUM component of NNLS serves as the link between the local Linux system and eDirectory. LUM represents a huge leap forward in eDirectory technology. eDirectory was actually ported over to Linux in 1998. I remember when the first version became available for beta testing. I went to a training session in a room packed with Linux administrators. All of us were waiting with baited breath to see eDirectory on our favorite platform. We all proceeded through the install portion of the class without incident. Shortly after that, things started to go wrong. The product itself worked fine ”it was the way it worked that caused consternation. As you probably know, Linux administrators tend to have an inquisitive nature. In accordance, after the install portion of the class, most of the students were off experimenting and tinkering with the eDirectory service instead of listening to the instructor (he wasn't terribly interesting to listen to anyway). As a result of this tinkering, all of us realized in a moment of group collective consciousness that the eDirectory and Linux authentication systems weren't connected to each other in any way. Because of our past experience with NetWare, we were fully expecting to be able to use eDirectory to authenticate Linux users. Instead, we found that Linux users were still being managed with the passwd, shadow, and group files. eDirectory and Linux were in no way connected. To authenticate to eDirectory, you had to log in using the Novell Client from a Windows or DOS workstation. To log in to the Linux server, you had to authenticate from the login prompt at the server console. Essentially, eDirectory used Linux as a platform to run on and wasn't used to actually manage the server itself. Needless to say, all the students in the class were very disappointed and called the instructor's attention to this issue. He looked at us in a funny way and said something to the effect of, "Well, of course it doesn't," as if we were expecting the impossible . Thankfully, Novell realized this fact and included LUM in NNLS. Note Novell actually started working on this problem prior to NNLS. LUM descends from Novell's Account Management product line. Having used both, LUM is considerably easier to use and works much more reliably. LUM makes eDirectory do exactly what we were expecting it to do back in 1998: tt redirects authentication to the Linux system through eDirectory. Linux users can authenticate to the system without an entry being required in the passwd file. This alone makes eDirectory worth its while on the Linux platform. Recall in Chapter 4, "Introduction to Novell Nterprise Linux Services (NNLS)," that we discussed the administrative challenge presented by synchronizing Linux user and group accounts on multiple servers. Previously, you had two options for this problem:
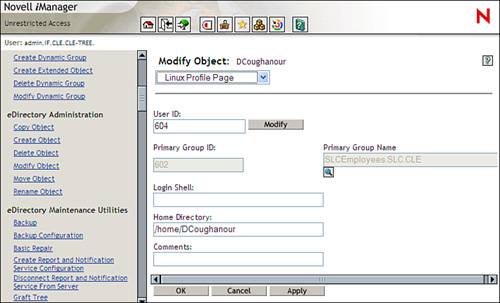
Either way, it wasn't an easy task. Using eDirectory to manage your Linux user accounts makes life much easier for the administrator. Instead of trying to synchronize accounts among multiple systems, eDirectory serves as a central repository for all network information. Tip It's important that you understand that eDirectory doesn't synchronize user accounts. With eDirectory, you only need a single user account for every user in your organization. You assign rights to the single user account to control what resources the user can and cannot use. Recall when we installed NNLS in the previous chapter. We configured NNLS to redirect authentication for PAM-enabled services. PAM stands for Pluggable Authentication Modules . PAM uses a series of shared library files to create a modular authentication system. It allows the administrator to customize the authentication mechanism a particular service, such as login or ftp, uses. Linux services such as ftp, login, and so on have been redirected to use eDirectory user accounts instead of the user accounts in the passwd file. This is particularly useful when implementing Samba. We'll discuss this topic in more depth in a later chapter. How LUM Works with eDirectoryWhen LUM is installed, it extends the eDirectory schema (if you're new to eDirectory, you may not know what this means). Recall in Chapter 5, "NNLS Installation and Administration," that I said the eDirectory schema defines objects that are allowed in the tree, defines the attributes they have, and specifies containment rules. The base schema installed when you implemented NNLS isn't static. You can add, delete, or modify object classes and attributes in your tree. LUM does exactly this when it is installed. It extends the schema and adds LUM-specific attributes to the default user, group, and template object classes. As you can see in Figure 6.11, the user object receives a new property page called Linux Profile . Figure 6.11. The user object Linux Profile page. The following attributes are added to the user object:
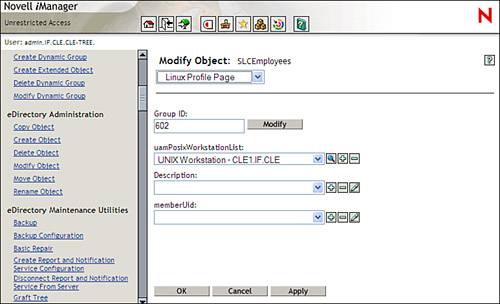
In Figure 6.12, you can see that the group object class also has a new property page named Linux Profile. Figure 6.12. The group object Linux Profile page. Group objects have the following attributes added:
LUM also extends the schema to add two new types of objects to the tree, as listed in Table 6.1. Table 6.1. LUM eDirectory Objects
Installing LUM also adds the components listed in Table 6.2 to your system. Table 6.2. LUM Components
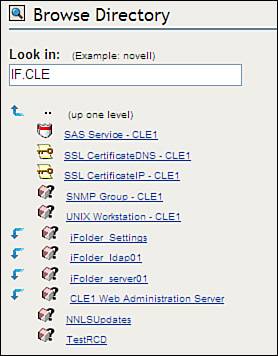
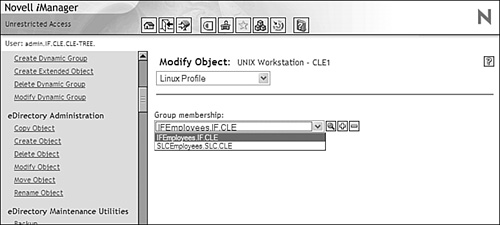
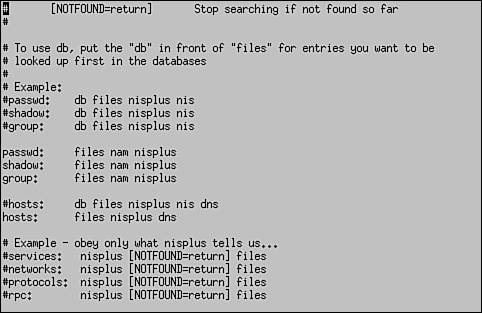
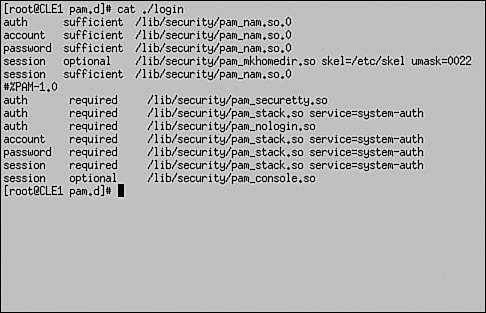
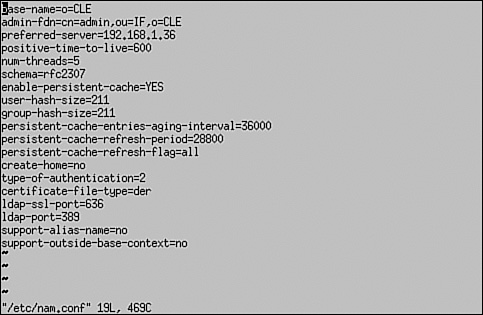
These new objects and modules play a critical role in LUM. One of the issues encountered when redirecting to eDirectory is that of context. Recall that eDirectory uses a hierarchical database structure. Objects are referenced by their username and their context (for example, DCoughanour.SLC.CLE). The Linux passwd file, on the other hand, is a flat file. User accounts are not arranged into a hierarchy. This brings up a new problem: How do you deal with the issue of context in a system that previously had no notion of the concept? To fix this problem, LUM provides Linux users with an authentication process called contextless login , which is just what it sounds like. Users can log in to the Linux system using a typical Linux username. The LUM nss_nam.so module resolves the contextless user name provided by the user during login to the particular system's workstation object in the eDirectory tree. This object is shown in Figure 6.13. Figure 6.13. UNIX workstation object. The workstation object contains a list of all the groups that have been given access to the Linux system. This is shown in Figure 6.14. Figure 6.14. Authorized groups. Only users who are members of these groups are allowed to authenticate to the Linux system. In Figure 6.14, only users who are members of the IFEmployees.IF.CLE group or the SLCEmployees.SLC.CLE group are allowed to authenticate to the CLE1 Linux system. The username supplied by the user is compared with the usernames in the associated LUM groups. If a match is found, the user is authenticated and his or her Linux profile is used to configure the system environment. Let's look at this redirection process in greater detail. How LUM Redirection WorksLUM redirection is based on the Name Service Switch (NSS) component integrated into Linux. NSS allows you to configure how you want authentication to occur in the system. The NSS configuration is controlled by the /etc/nsswitch.conf file. When you install LUM, the NNLS installation script modifies the nsswitch.conf file. This modified file is shown in Figure 6.15. Figure 6.15. LUM-modified nsswitch.conf file. Notice that the parameters for passwd, shadow, and group have been modified with the addition of the string nam . With the system configured in the way shown in Figure 6.15, it will first look in the passwd file for the user during login. This is configured by the files directive. If not found there, it will next use eDirectory for authentication. This is configured by the nam directive. This system is configured to use NIS+ after eDirectory (if we actually had it installed on the system). This is configured by the nisplus directive. The installation script also modifies the PAM files in the /etc/pam.d directory for services such as login, ftp, and ssh to use eDirectory for authentication. The modified file for the login service is shown in Figure 6.16. Figure 6.16. LUM-modified login file in /etc/pam.d . Notice in Figure 6.16 that login has been configured to use the LUM pam_nam.so module. This module redirects authentication requests to the nss_name.so module. When the nss_nam.so module receives a request, it contacts the LUM daemon, namcd . This service retrieves and caches information from your eDirectory tree. If the username of the user authenticating is already in the daemon's cache, it will return the distinguished name (which is the object name and its context) of the associated user object. Otherwise, it queries eDirectory for the information, returns the distinguished name, and stores the information in its cache. The namcd daemon can be configured using the /etc/nam.conf configuration file or by running the namconfig utility. A typical nam.conf file is shown in Figure 6.17. Figure 6.17. A typical nam.conf file. The parameters in this file are explained in Table 6.3. Table 6.3. The namcd Configuration Parameters
As you can see from Figure 6.17, the NNLS installation script automatically configures your system, and usually very little additional configuration is needed ” assuming you entered the correct information. Let's now look at how you enable LUM functionality on your system. Setting Up LUMLUM is a highly flexible product, allowing you to configure your system in a variety of different ways. For the CLE certification, you only need to know how to perform a basic configuration, and that is what we will focus on here. To perform a basic configuration of LUM on your system, you would do the following steps: Note This is a set of generic steps. We'll go through a detailed set of steps in the upcoming lab exercise.
Test the configuration by completing the following steps:
That's all there is to it! In Lab Exercise 6.2, you can configure LUM on your server. |
| < Day Day Up > |
EAN: 2147483647
Pages: 128
