10.5 Using InfoPath Design Mode
| By now you've probably noticed that this chapter is heavily biased toward the creation of solutions by hand. One of the reasons for this is that you can only use the full power of XSLT when creating a solution if you do it by hand, rather than through InfoPath design mode. Provided that you understand how InfoPath establishes implicit bindings from your stylesheet, you should be able to avoid potential pitfalls by writing your stylesheet in such a way that only the bindings you intend to create get created. You can do it, whether it means avoiding certain arrangements of XSLT instructions or invoking xd:disableEditing="yes" in the right places.
That said, there are a number of reasons InfoPath in design mode may be useful to you:
InfoPath design mode provides a WYSIWYG environment for creating forms meant to be run by InfoPath in editing mode. It has sophisticated support for the creation of HTML layout tables and lets you drag and drop different kinds of form controls onto the form view canvas. You can begin creating a form in one of three ways:
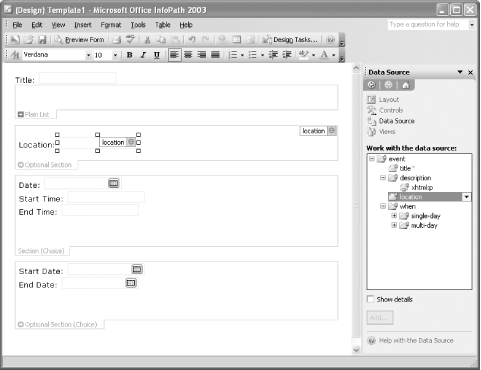
10.5.1 Creating a Simple Solution from an XSD SchemaIf we had decided to create our event form example from within design mode, rather than by hand, we would only need an example instance document, or better yet, a schema, to get started. Since we already have the schema (Example 10-10), let's take a quick look at what this would involve. Figure 10-10 shows a newly created form in design mode, not unlike the one we created by hand. Figure 10-10. Designing a form starting from an XSD schema "data source"
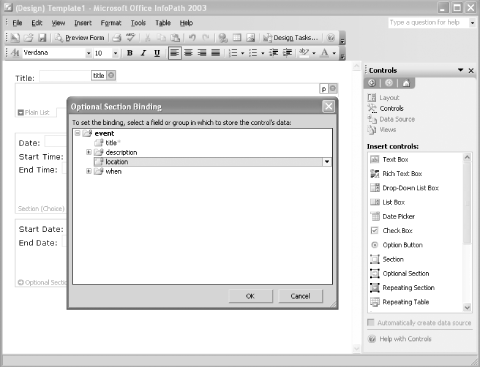
InfoPath design mode utilizes as much information as possible from the schema to aid you in creating your form. In fact, just by dragging and dropping from the Data Source task pane, shown on the right side of the window in Figure 10-10, we can create a functional form in just a few seconds. The Data Source task pane provides an Explorer-like view of the underlying XML schema for the form you are designing. Some icons signify groups, and others fields, in InfoPath's terminology. A field is an attribute or an element that can contain only text, or rich text in the case of XHTML content. A group is an element that can contain element children, i.e., other groups or fields. In XSD terms, fields (except for rich text fields) have simple content and groups have complex content. When you drag an element or attribute onto the canvas, InfoPath automatically creates an appropriate section (for a group) or form control (for a field). When more than one choice is equally appropriate, it immediately prompts you to choose which control or section type you want. In our example in Figure 10-10, the "Location" text box is selected. As a result, the corresponding location field to which it is bound is automatically highlighted in the Data Source task pane. Note also that the optional section in which the text box occurs is also bound to the location field. As you navigate through the form in design mode, you will see where the binding for each control is in the data source tree. When you want to have more control (no pun intended) over exactly what kinds of form controls or sections should appear in your form, you can switch to the Controls task pane, shown in Figure 10-11. Figure 10-11. The Controls task pane and the prompt to select a binding for the "optional section" being dragged onto the canvas When you drag a control or section onto the canvas from the Controls task pane, you are immediately prompted to choose what group or field in the data source to bind that control or section to. In the example shown in Figure 10-11, the location field is chosen as the binding for the optional section being dragged onto the canvas. The resulting XSLT view stylesheet created by InfoPath will include the "Click here to add" link for the location field when it is absent, and will display the optional section itself when the location element is present. However, this is an example of a structural binding, rather than a text binding, which means that, as such, the end user will not be able to edit the content of the location field, but will only be able to add or remove it. To provide editing support, we additionally need to create a text binding. We can do this either by dragging a Text Box control onto the canvas, inside the optional section, and then selecting the location field when prompted for a binding, or we can start from the Data Source task pane instead and simply drag the location field into the optional section we created for it. A corresponding Text Box control will automatically be created. Either way, we end up with the location field having two bindings, a text binding and a structural binding, just as was the case with the event form example we created by hand. Another thing to note about Figure 10-10 is that the entire form appears exactly as InfoPath in design mode created it, as a result merely of dragging-and-dropping fields, groups, sections, or controls onto the canvas. No additional edits were made. Thus, it not only makes reasonable choices about what controls or section types to use, but it also automatically tries to make the field names friendlier, so "location" becomes "Location," "start-time" becomes "Start Time," etc. We can relate some of these controls back to some terminology introduced earlier in the chapter under "The XSLT Stylesheet," for the event form solution created by hand. Specifically, the Text Box and Rich Text Box controls result in the creation of text bindings, and the various kinds of sections (optional, repeating, choice, etc.) result in the creation of structural bindings and corresponding editing control declarations (xsf:xmlToEdit elements) in the form definition file. Other kinds of bindings, such as those employed by the checkbox and radio button controls, can best be explored by perusing the sample forms that come bundled with the InfoPath application. 10.5.2 Creating a Form from ScratchWhen creating a new blank form rather than starting from a schema or instance document, InfoPath automatically creates a schema for you as form controls are added to the design. To disable this default behavior, uncheck the "Automatically create data source" checkbox in the Controls task pane. Table 10-2 shows the controls and the XSD declarations they create in the schema for the fields to which they are bound. These mappings reveal not only how this handy feature works, but, perhaps more importantly, it gives you some clues about how to design your own schemas and forms. Specifically, it shows which controls make sense to bind to which data types.
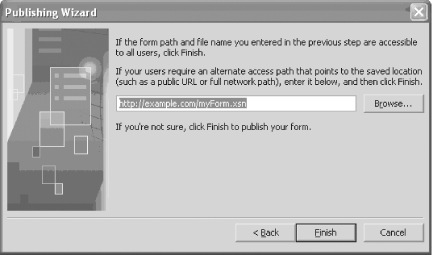
All of the controls that bind to automatically created element fields can also bind to attribute fields, with one exception. The Rich Text Box control binds to an element field that can contain XHTML elements. Since attributes cannot contain elements, Rich Text Box controls cannot bind to attribute fields. The Button, Hyperlink, and Expression Box controls can never have bindings. The Expression Box control is essentially a way for you to create an xsl:value-of instruction from within design mode. You specify the XPath expression whose value you want displayed. If necessary, editing will be explicitly disabled in the resulting stylesheet, through use of the xd:disableEditing annotation, because Expression Box controls are meant primarily to display derived information, such as a sum of numbers. They are not used to establish editing bindings. 10.5.3 The Layout and Views Task PanesThe Layout task pane provides a set of table-based layout templates to choose from and a set of table operations for manipulating them. The Views task pane allows you to manage multiple views in your form template, each of which corresponds to an instance of the xsf:view element in the form definition file. 10.5.4 Publishing a Form from Design ModeOnce you have finished designing your form, you have the option of publishing it through the InfoPath interface. Click on "Publish Form..." in the Design Tasks task pane, and a wizard will guide you through the process. You have a choice between three publication targets: shared folder, SharePoint form library, or web server. Publication to a web server requires that WebDAV be enabled on the server. All of the form's files will be packaged into an .xsn file and saved at the location that you specify. Once you've selected your publishing target and location, you'll be prompted to provide a user-accessible location (URL or network path) for your solution. This dialog is shown in Figure 10-12. The value of this field is used to populate the publishUrl attribute of the xsf:xDocumentClass element, i.e., the root element of the form definition file. It identifies the central location from which all users will initially retrieve the form and receive form updates. InfoPath uses the value of the publishUrl attribute in two ways:
You will want to modify this field only if the user-accessible URL or path is different from the URL or path where you originally put the file. Changing the value will be necessary, for example, if you need to publish the file to a web server using a network drive but require your users to download the file via an HTTP URL. Figure 10-12. Final step of the publishing wizard, where the publishUrl attribute is set 10.5.5 Developing Solutions That Play Nice with Design ModeThere are a number of alternative approaches to developing InfoPath solutions. How much work should you do by hand?[3] And how much work should you do in design mode? Table 10-3 lists possible alternative solution development strategies.
Options 1, 2, and 3 are safe because they never burden InfoPath design mode with having to read in a form template that it didn't itself create. Options 4 and 5 share the risk that InfoPath will have trouble opening your solution, because your dirty little fingers have been touching it. And if InfoPath opens your solution without complaining, you run the risk that parts of your solution will get overwritten. The primary problem is that, while the InfoPath XML editor will accept virtually any XSLT stylesheet you throw at it, the InfoPath form designer is much more finicky.
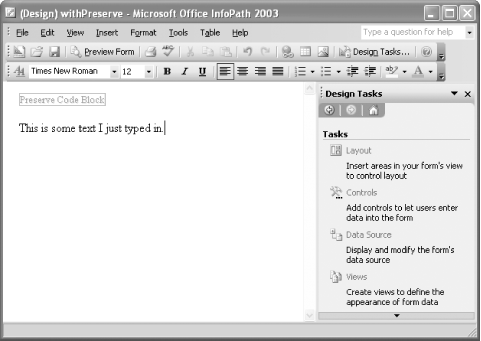
For example, the form designer requires the xd:binding and xd:xctname attributes to be explicitly present on all controls in the view stylesheet. Otherwise, it will not correctly identify all bindings or form controls, even though the editor has no problem identifying them. There are a number of other limitations that design mode imposes. For example, it chokes on common XSLT constructs such as xsl:call-template, but not without first displaying an error message specifying exactly what is not supported. Again, this is a limitation of design mode, not the InfoPath XML editor. If you build or modify a solution by hand, you can feel free to use any XSLT instruction you wish. Does this effectively mean that, once you skirt design mode with a manual modification, there's no going back? Well, it would, if it wasn't for another InfoPath feature called the preserve code block. This is a mechanism by which you can mark portions of an XSLT view stylesheet as untouchable regions, for your eyes only. Note that you won't be able to use the form designer to edit or customize the controls declared therein, and that's the whole point. This is done by wrapping your manual customizations in a template rule annotated with mode="xd:preserve". The template rules in the xd:preserve mode and the xsl:apply-templates instructions that invoke them will remain untouched. Note that all template rules and named templates that you invoke from within a preserved code block will also need to be preserved, using mode="xd:preserve". Otherwise, design mode will discard them, resulting in an invalid stylesheet, in the case of missing named templates. For named templates, you will also have to add an arbitrary match attribute, so that it will still be legal XSLT after you add a mode attribute. To ensure that your named-template-cum-template-rule doesn't match any nodes, you can use a pattern that is guaranteed to match nothing, such as @*/*. Example 10-20 shows our first example stylesheet (Example 10-3) with the entire view protected by the xd:preserve mode. Example 10-20. Using the xd:preserve mode to preserve manual stylesheet changes<xsl:stylesheet version="1.0" xmlns:xsl="http://www.w3.org/1999/XSL/Transform"> <xsl:template match="/announcement"> <html> <head> <title>Announcement</title> </head> <body> <xsl:apply-templates select="." mode="xd:preserve"/> </body> </html> </xsl:template> <xsl:template match="announcement" mode="xd:preserve"> <h1> <xsl:value-of select="headline"/> </h1> <p> <xsl:value-of select="body"/> </p> </xsl:template> </xsl:stylesheet> Figure 10-13 shows the result of opening the corresponding form template in design mode. We only see a red box that says "Preserve Code Block." This alerts us that custom stylesheet code is being skipped over. We can commence to drag and drop other controls onto the form canvas, add text before or after the block, or create layout tables around the block, moving it around as necessary. Figure 10-13. Preserve code block Example 10-21 shows the XSLT stylesheet as output by the form designer after making a small change (adding some text to the bottom of the form). We see that it's much more verbose, including all of its CSS and namespace declaration boilerplate. However, our template rule in the xd:preserve mode is indeed preserved unaltered, and our solution will continue to work as expected in InfoPath's editing mode. Example 10-21. Stylesheet output by InfoPath design mode, with code blocks preserved<?xml version="1.0" encoding="UTF-8"?> <xsl:stylesheet version="1.0" xmlns:xhtml="http://www.w3.org/1999/xhtml" xmlns:xsl="http://www.w3.org/1999/XSL/Transform" xmlns:msxsl="urn:schemas- microsoft-com:xslt" xmlns:xd="http://schemas.microsoft.com/office/infopath/2003" xmlns:x="urn:schemas-microsoft-com:office:excel" xmlns:xdExtension="http://schemas.microsoft.com/office/infopath/2003/xslt/extension " xmlns:xdXDocument="http://schemas.microsoft.com/office/infopath/2003/xslt/xDocument " xmlns:xdSolution="http://schemas.microsoft.com/office/infopath/2003/xslt/solution" xmlns:xdFormatting="http://schemas.microsoft.com/office/infopath/2003/xslt/formatti ng" xmlns:xdImage="http://schemas.microsoft.com/office/infopath/2003/xslt/xImage"> <xsl:output method="html" indent="no"/> <xsl:template match="announcement"> <html> <head> <style tableEditor="TableStyleRulesID">TABLE.xdLayout TD { BORDER-RIGHT: medium none; BORDER-TOP: medium none; BORDER-LEFT: medium none; BORDER-BOTTOM: medium none } TABLE { BEHAVIOR: url (#default#urn::tables/NDTable) } TABLE.msoUcTable TD { BORDER-RIGHT: 1pt solid; BORDER-TOP: 1pt solid; BORDER-LEFT: 1pt solid; BORDER- BOTTOM: 1pt solid } </style> <title>Announcement</title> <meta http-equiv="Content-Type" content="text/html"></meta> <style controlStyle="controlStyle">BODY{margin- left:21px;color:windowtext;background-color:window;layout-grid:none;} .xdListItem {display:inline-block;width:100%;vertical-align:text-top;} .xdListBox,.xdComboBox{margin:1px;} .xdInlinePicture{margin:1px; BEHAVIOR: url(#default#urn::xdPicture) } .xdLinkedPicture{margin:1px; BEHAVIOR: url(#default#urn::xdPicture) url(#default#urn::controls/Binder) } .xdSection{border:1pt solid #FFFFFF;margin:6px 0px 6px 0px;padding:1px 1px 1px 5px;} .xdRepeatingSection{border:1pt solid #FFFFFF;margin:6px 0px 6px 0px;padding:1px 1px 1px 5px;} .xdBehavior_Formatting {BEHAVIOR: url(#default#urn::controls/Binder) url(#default#Formatting);} .xdBehavior_FormattingNoBUI{BEHAVIOR: url(#default#CalPopup) url(#default#urn::controls/Binder) url(#default#Formatting);} .xdExpressionBox{margin: 1px;padding:1px;word-wrap: break-word;text-overflow: ellipsis;overflow- x:hidden;}.xdBehavior_GhostedText,.xdBehavior_GhostedTextNoBUI{BEHAVIOR: url(#default#urn::controls/Binder) url(#default#TextField) url(#default#GhostedText);} .xdBehavior_GTFormatting{BEHAVIOR: url(#default#urn::controls/Binder) url(#default#Formatting) url(#default#GhostedText);} .xdBehavior_GTFormattingNoBUI{BEHAVIOR: url(#default#CalPopup) url(#default#urn::controls/Binder) url(#default#Formatting) url(#default#GhostedText);} .xdBehavior_Boolean{BEHAVIOR: url(#default#urn::controls/Binder) url(#default#BooleanHelper);} .xdBehavior_Select{BEHAVIOR: url(#default#urn::controls/Binder) url(#default#SelectHelper);} .xdRepeatingTable{BORDER-TOP-STYLE: none; BORDER- RIGHT-STYLE: none; BORDER-LEFT-STYLE: none; BORDER-BOTTOM-STYLE: none; BORDER- COLLAPSE: collapse; WORD-WRAP: break-word;}.xdTextBox{display:inline-block;white- space:nowrap;text-overflow:ellipsis;;padding:1px;margin:1px;border: 1pt solid #dcdcdc;color:windowtext;background-color:window;overflow:hidden;text-align:left;} .xdRichTextBox{display:inline-block;;padding:1px;margin:1px;border: 1pt solid #dcdcdc;color:windowtext;background-color:window;overflow-x:hidden;word- wrap:break-word;text-overflow:ellipsis;text-align:left;font-weight:normal;font- style:normal;text-decoration:none;vertical-align:baseline;} .xdDTPicker{;display:inline;margin:1px;margin-bottom: 2px;border: 1pt solid #dcdcdc;color:windowtext;background-color:window;overflow:hidden;} .xdDTText{height:100%;width:100%;margin- right:22px;overflow:hidden;padding:0px;white-space:nowrap;} .xdDTButton{margin-left:-21px;height:18px;width:20px;behavior: url(#default#DTPicker);} .xdRepeatingTable TD {VERTICAL-ALIGN: top;}</style> </head> <body> <div> <xsl:apply-templates select="." mode="xd:preserve"/> </div> <div> </div> <div>This is some text I just typed in.</div> </body> </html> </xsl:template> <xsl:template match="announcement" mode="xd:preserve"> <h1> <xsl:value-of select="headline"></xsl:value-of> </h1> <p> <xsl:value-of select="body"></xsl:value-of> </p> </xsl:template> </xsl:stylesheet>One thing to note about the use of mode="xd:preserve" for a solution's default view is that InfoPath will not overwrite your stylesheet (and hence won't add any of the boilerplate shown above), as long as you do both of the following:
You may be asking yourself, "then why should I bother opening the solution in design mode at all if I'm not going to make any changes to the default view?" The answer is that there are plenty of other things about a solution that you may want to configure or change from within design mode besides the default view, e.g., submission behavior, secondary views, scripting, custom validation, custom error messages, secondary data sources, and solution packaging and publication. In fact, I recommend avoiding option 5 in Table 10-3, unless you employ this precise strategy. Unless you particularly want to learn how InfoPath design mode generates XSLT stylesheets and you have some patience for experimentation, you should avoid making changes within design mode to XSLT views that you created outside of design mode. Among the use cases for employing both design mode and hand-editing is the need to develop multiple views for a single solution. For example, you may already have an XSLT stylesheet that displays your document type in a particular way, e.g., on a web site, but you still haven't developed a form for gathering instances of that document type. You can use InfoPath design mode to rapidly develop the form as your default view, and you can then manually edit the form definition file (manifest.xsf) to add your existing stylesheet as an alternate view for your users to see, like a preview of how the document will look when published. Unlike a default view stylesheet, a secondary view stylesheet doesn't need to be annotated with mode="xd:preserve" unless you specifically open that view from within design mode. If you never switch to that view in design mode, you won't have to worry about the form designer choking on it, and it will survive in your solution unaltered. InfoPath's "preserve code block" feature is thus useful for both options 4 and 5 in Table 10-3. With option 4, you can isolate only the part of the stylesheet that you need to customize outside of design mode. With option 5, the safest approach, again, is to wrap your entire stylesheet (all but the root template rule) in a "preserve code block." Just to be sure that it's clear what it means to "wrap the entire stylesheet in a preserve code block." Example 10-22 shows an example of this technique. Example 10-22. Wrapping an entire stylesheet in a single preserve code block<xsl:stylesheet version="1.0" xmlns:xsl="http://www.w3.org/1999/XSL/Transform" xmlns:xd="http://schemas.microsoft.com/office/infopath/2003"> <xsl:template match="/"> <xsl:apply-templates select="/event" mode="xd:preserve"/> </xsl:template> <xsl:template match="/event" mode="xd:preserve"> <html> <!-- ... --> <xsl:apply-templates select="location" mode="xd:preserve"/> <!-- (All xsl:apply-templates instructions use mode="xd:preserve")--> </html> </xsl:template> <xsl:template match="location" mode="xd:preserve"> <!-- ... --> </xsl:template> <!-- ... --> <!-- (All template rules use mode="xd:preserve") --> </xsl:stylesheet> |
EAN: 2147483647
Pages: 135

 Design a Form...