Using the Selection Tools
| Each Selection tool has its own strengths and weakness along with a set of options to modify the tool's behavior. The mechanics of using these tools are straightforward; the hard partor at least the part that takes some experienceis knowing which tool to use and when. Some basic settings and techniques apply to all the tools. Presetting FeatheringBefore making a selection using a Selection tool, I recommend you set the feather radius to 0 in the options bar. It's always best to start with a clean, unfeathered selection. Feathering, once added, is hard to remove. There is no "unfeather" command. It's all too easy to forget that you have specified a feather amount only to find that you've made selections that are soft when you want them precise. Figure 1.7. In the options bar, it's a good idea to change your feather radius to 0 before making a selection. Adding to, Subtracting from, and Making Intersecting SelectionsWhen using the Selection tools, mixing and matching is the order of the day. Anything but the most straightforward of selections will require combining Selection tools as well as extending their capabilities with the modifier keys:
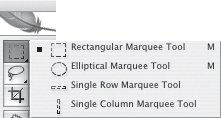
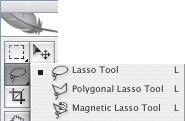
While adding to and subtracting from are techniques you use every day, intersecting a selection is something done once in a blue moon. And frankly, I can't think of anything it does that using add and subtract can't do more easily. (Although I do use it in Chapter 4 in the "Creating Panoramas" section as a way to intersect the overlapping pixels of two layers.) Figure 1.8. The red spade is selected (example A). Adding to the selection to include the green spade (example B). Subtracting from the selection to remove the areas inside the handles (example C). The Selection icons from left to right: New Selection, Add to Selection, Subtract from Selection, Intersect with Selection (example D).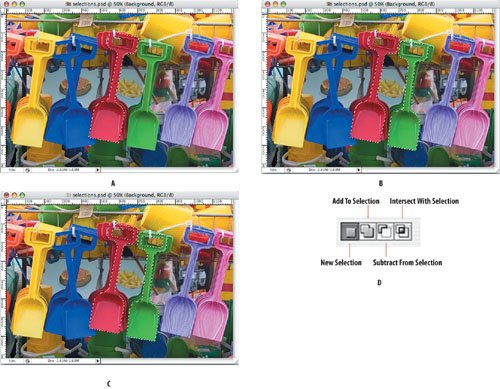 Moving and Viewing SelectionsIt's common to want to reposition an active selection without affecting the selection contents. You can do this by clicking and dragging within the selection borders using any of the Selection tools. Alternatively, you can choose a Selection tool and then nudge the selection 1 pixel at a time with the arrow keys; throw in the Shift key and the selection moves 10 pixels at a time. With marquee selections, i.e. selections made with the rectangular or elliptical marquee tools, you can move the selection while you're still making it by holding down the Spacebar while depressing the mouse button. To trace a selection edge you need to see it clearly, so view your image at a high enough zoom percentage. And while making a selection (and without releasing the mouse button) you can depress the Spacebar to access the Hand tool and move the image around within the document window. When a selection includes the edge of the image, it's helpful to see the edge of your canvas and extend your selection outline beyond it. Choose Full Screen Mode with Menu bar (f) and if necessary press Command/Ctrl- to reduce your view size until you see pasteboard around your image. Once outside the image you don't have to be accurate because the selection will snap to the canvas edge when you close the selection. Figure 1.9. Full Screen View mode. Making Geometric Selections with Marquee ToolsThe most basic of the Selection tools, the marquees are used for making geometric selections. Simply drag to select a rectangle or an ellipse. For a perfect square or circle hold Shift while you drag. To draw the selection outwards from the center, hold down the Option/Alt key. Press Shift-M to toggle between the Rectangular and Elliptical Marquee tools. Figure 1.10. The Marquee tools. The less frequently used Single Row and Single Column Marquee tools are used to fix anomalies with screen captures or when making repeating web backgrounds. If you ever need a row of a specific number of pixels you can begin with the Single Row tool, then choose Select > Modify > Expand and expand your selection by the required number of pixels. But frankly it would be easier to use a Fixed Size Marquee (see next page). Setting Marquee Tool OptionsUse the options bar to set the following Marquee tool options: Feather: For best results, set the Feather amount in the options bar to 0. After you've made your selection, add feathering as needed by choosing Select > Feather (Option/Alt-Command /Ctrl-D). Anti-alias (Elliptical Marquee only): Unless you have a nostalgic fondness for jagged, stair-stepped selections, always work with this option on. Figure 1.11. The Marquee tool options.Choose one of the following Style options: Normal: This option allows unconstrained selections. Fixed Aspect Ratio: This option constrains your selection to a specified width-height ratio. This is useful if you're preparing several images that you want cropped to the same aspect ratiosomething you can't do with the Crop tool without changing the image resolution. Draw your marquee and then choose Image > Crop. Fixed Size: This option lets you make a selection to a specified size. If the fixed size is bigger than the image dimensions, the selection outline will be outside the canvas. This is distinct from the Crop tool, which lets you crop to specific dimensions while at the same time resamplingthat is, adding to or removing pixels from the image. Selecting by Color with the Magic WandThe Magic Wand tool is a good choicethe obvious choicefor selecting backgrounds that are relatively flat and contrasting in color with the subject. Once you have the background selected, you can choose Select > Inverse (Command/Ctrl-Shift-I) to select the subject. Easy-peasy. The Magic Wand tool selects adjacent pixels based on how similar they are in color (or in shades of gray if you're working with grayscale images or alpha channels). The more similar the pixels, the bigger the selection. The attraction of the Magic Wand is that there's no need to trace a selection outline; just click on the background and all pixels similar in color value are selected. Don't expect too much from the Magic Wand. When it's good it's really good, but when it's bador, more accurately, when it's used badlythe Magic Wand can be a waste of time. If the background varies in color or the edge contrast is slight, the wand is distinctly unmagical. If you don't get the selection you want, it's tempting to increase the Tolerance setting or build the selection by Shift-clicking on the areas that didn't get selected to add them to the selection. Sometimes this will work; sometimes, however, the resulting selection will have ragged edges that result in fringing halos when you modify the selected area. I can't count the number of times I've tried to make a selection with the Magic Wand, hoping (because I'm lazy) that just a few clicks will do the trick, only to find half an hour later that my selection edges look liked they've been cut with a rusty saw. At such times I realize too late that I could have achieved a better result in half the time using the Pen tool (covered later in this chapter), a Quick Mask (Chapter 2, "Channels"), or both. Setting Magic Wand OptionsYou can set these Magic Wand tool options in the options bar: Tolerance determines how much of the image is selected, or, to put it another way, how similar other pixels need to be to the one you clicked. The higher the number, the more pixels are selected. If you don't get everything you want selected when using the Wand, try to set the tolerance higher. But higher tolerance settings (anything above the default of 32), more likely will cause your selection to spill into unwanted areas of your image. Rather than upping the tolerance value, try Shift-clicking with the Magic Wand on the unselected areas to add them to your selection. If you find you're doing this multiple times and you're still not getting what you're after, then the Magic Wand is probably the wrong tool in that situation. The Magic Wand's tolerance setting is based on the tonal values of the pixels on a scale of 0 (black)255 (white). With the default tolerance setting of 32, when you click on a pixel the Magic Wand tool selects 32 pixels brighter than that pixel and 32 pixels darker. For example, if you click on a pixel with a tonal value of 50, a range of tonal values between 18 and 82 will be selected. Because most images have more than one color channel (three for RGB, four for CMYK), the tonal value of the pixel is actually the median of all the color channels. Figure 1.12. The Magic Wand tool options. Figure 1.13. Choose the Eyedropper tool (i) to set the Sample Size. Contiguous selects only adjacent areas with the same color, that is, until dissimilar pixels are encountered. With this option turned off all pixels in the image with similar colors are selected. Figure 1.14. A Contiguous (example A) and a Non-Contiguous (example B) selection. The Magic Wand tolerance was set at 32, the default amount.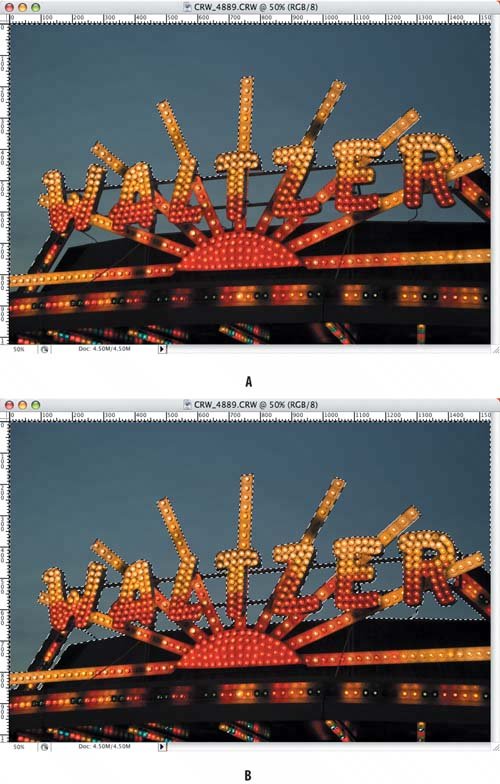 Sample All Layers allows you to select colors from all the visible layers whether they are above or below the active layer. When this is turned off, only colors from the active layer are selected. How the Magic Wand behaves is also determined by the Sample Size specified for the Eyedropper tool. To set the Sample Size, select the Eyedropper tool. With 3x3 or 5x5 Average selected, Photoshop determines the color values by averaging the pixels around the pixel you click. The Point Sample option uses the color value of the actual pixel you click. When working with medium- to high-resolution files, I prefer a 3x3 Average, because with Point Sample it's possible to click a pixel that's atypical of the area you are selecting. Figure 1.15. The sky is relatively flat, making this image a good candidate for a Magic Wand selection. Because there is some color variation in the sky I had to Shift-click with the Wand to add to the initial selection. The tolerance is set at 32. Figure 1.16. It only takes a few clouds in the sky to throw the Magic Wand tool for a loop. For this selection (example A) I had to Shift-click several times with the Wand tool. Even then, on closer inspection (example B) it's clear that the selection is far from accurate. Making Free-Form Selections with Lasso ToolsThe Lasso tools are used for making free-form selections of irregular-shaped subjects in images with lots of tonal variations or where the edge of a subject is well defined but the background varies in contrast. In such situations it would be challenging for the Magic Wand tool to make a color-based selection. The Lassos are also great for cleaning up selections. When you want to corral parts of an image that need to be added to or subtracted from an existing selection, the Lassoas its name suggestsis the tool for the job. To cycle through the tools, press Shift-L. Figure 1.17. The Lasso tools. Corralling Pixels with the LassoWith the regular Lasso tool you simply drag around the shape you want to select, making sure you finish where you started. It's possible to use the Lasso to make detailed and accurate selections if you have a graphic tablet and stylus (more affordable than you might think). But if you're using a mouse or laptop track pad, the Lasso is a blunt instrument, and you should consider a Lasso selection as starting point rather than a total solution. If you're spending hours trying to accurately trace complex selections with the Lasso, then you're working too hard. In fact, the Lasso can be so unwieldy that overusing it is a fast track to repetitive stress injury and frustration. Not to mention shoddy selections. Think of the Lasso as a fast way to get most of the way there. When it comes to accurate tracing along selection edges, you're better off with the Pen tool. But that's just my opinion and there's many a seasoned Photoshop user who would disagree. You'll make faster, better selections if you know what you intend to do with those selections. Sometimes accurately tracing along an edge isn't necessary. In this example, I wanted to accentuate the flower by darkening its background. Because I knew the selection would be heavily feathered, I could get away with a vague selection shape. I made a rough Lasso selection around the shape and then inversed the selection (Select > Inverse) to select the background. Next, I feathered the selection by 50 pixels (Select > Feather), then darkened the selected area using a Levels Adjustment layer (see Chapter 5, "Adjustment Layers"). Figure 1.18A. A rough Lasso selection.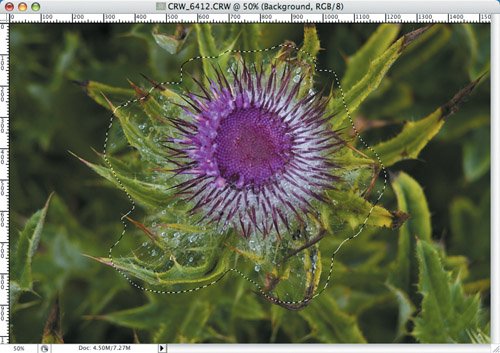 Figure 1.18B. The result of inversing, feathering, and darkening that selection.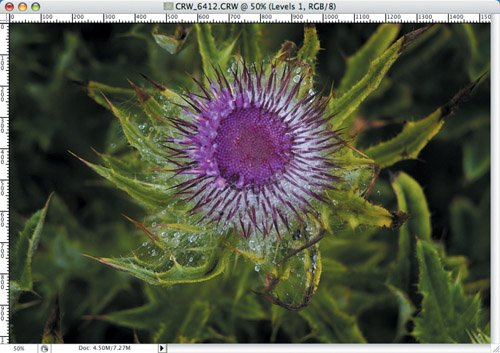 The Lasso comes into its own when cleaning up selections that have either spread beyond the intended selection border, or of areas within the intended selection that did not get selected. Figure 1.19. Selecting this leaf should be straight-forward because there is good contrast between subject and background (example A). But because the leaf and background vary a lot in tone, a simple Magic Wand selection (example B) is only partially successful. In example C, the Lasso tool is used to surround the stray pixels. Holding down the Shift key adds them to the existing selection. Example D shows the finished selection.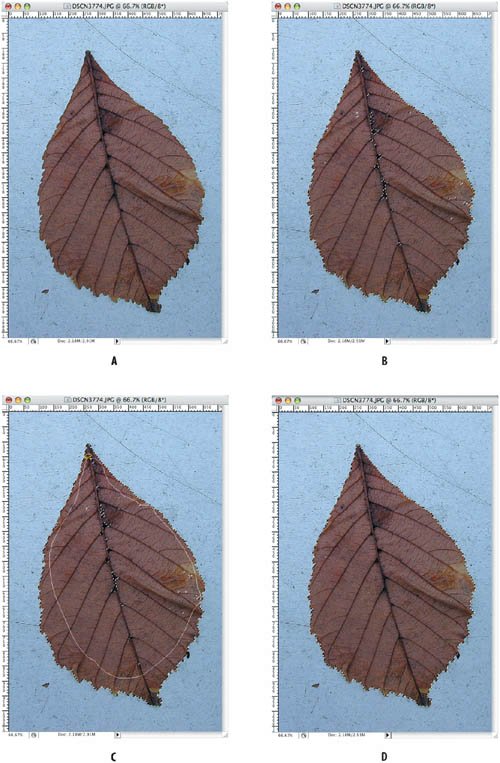 If you release the mouse button before tracing all the way around an object with the Lasso tool, the selection is completed with a straight line. Sometimes this can be timesaving if it's unnecessary to draw around the whole object shape. Often, however, this a mistakeand one that may result in a selection line through the center of the object. If that happens, hold Shift and use the Lasso tool again to add to your existing selection and finish drawing around the shape. Making Straight-Edged Selections with the Polygonal LassoUse the Polygonal Lasso tool to draw straight-edged segments of a selection border. You simply position the pointer where you want the first straight segment to end, and click. Continue clicking to set endpoints for subsequent segments. Click back to where you started from to finish the selection; when you position the Polygonal Lasso tool over your starting point a circle appears next to the cursor as an indicator that you're about to finish the selection. Alternatively you can double-click or Command/Ctrl-click from wherever you are to end the selection with a straight segment. The nice thing about the Polygonal Lasso is that you can hold Option/Alt to switch to the regular Lasso at any time, drag the freehand portion of the selection, then release the Option/Alt key and you're back in Polygonal Lasso. (This toggle also works in the Lasso tool, switching you to the Polygonal Lasso tool.) To draw straight lines at 45° angles, hold down Shift as you move to click the next segment. To erase recently drawn straight segments, press the Delete key. To cancel your selection press Esc. Figure 1.20. The shape of this subject makes it a good candidate for the Polygonal Lasso tool, toggling as necessary to the Lasso by holding Option/Alt to negotiate the non-straight edges.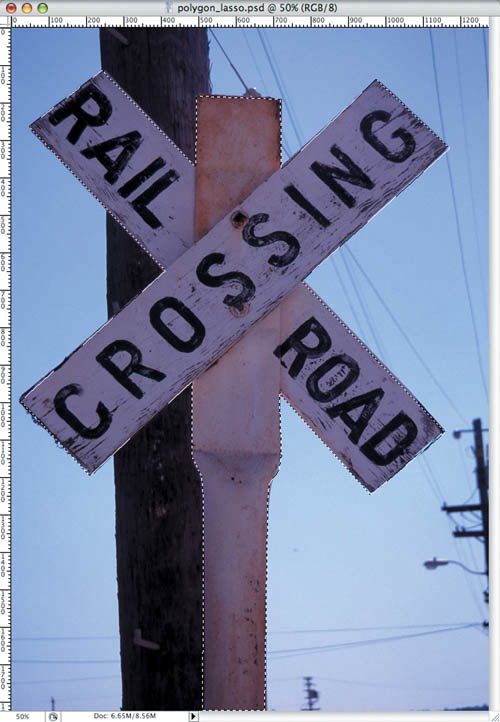 Figure 1.21. In this image (example A), I wanted to open up the shadows in the ceiling and along the left wall. In example B, because I wanted the brightened areas to blend seamlessly with the rest of the image, I knew I needed to feather the selection a lot, so I didn't worry about drawing around every detail. Just a few clicks were enough to get the selection I needed. In example C, this selection became a layer mask for a Curves Adjustment layer, used to bring out the shadow detail in the ceiling. The layer mask was then blurred heavily with the Gaussian Blur filter to blend it in with the image. The same steps were repeated (with slightly less brightening) for the wall. See Chapters 4 and 5 for information on layer masks and adjustment layers.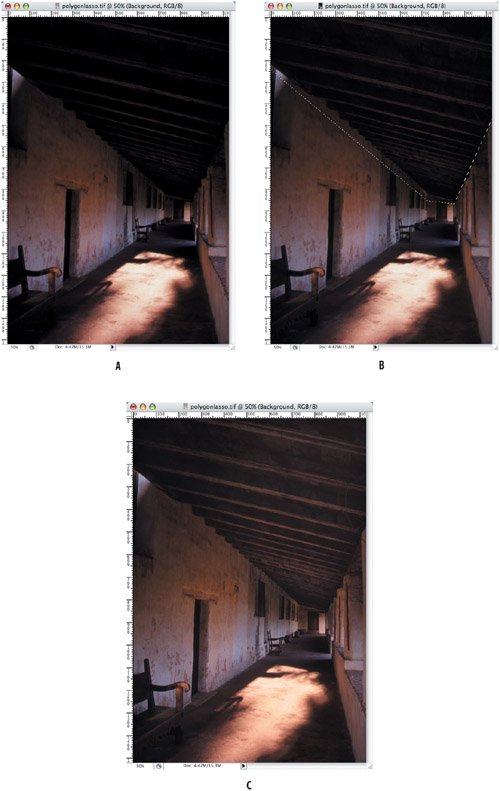 Snapping to Edges with the Magnetic LassoIt's pure speculation, but I don't think the Lasso tool was designed to make detailed freehand selections. When the folks at Adobe realized that that's what a lot of people were doing, they decided to help them out with the Magnetic Lasso. This tool snaps to the edges in your image, those areas of your image where there is a discernible difference in the color of the pixels. Sharp edges are easier for the Magnetic Lasso to find; softer, diffused edges are more of a challenge, but you can adjust the tool's options to determine how it "sees" the edge. You just need to gently guide it around the edgeno need to hold down the mouse button. The Magnetic Lasso does the hard work for you, putting down fastening points as you move around the edge. To complete the selection, either click back where you started or double-click to close the endpoints. Because the Magnetic Lasso tool sometimes has a mind of its own, you'll need to tell it who's boss: At places where the edges lack contrast, clicking to manually add fastening points. You can toggle to the regular Lasso tool by holding Option/Alt and dragging. (Holding Option/Alt and clicking will toggle to the Polygonal Lasso.) Should you go wrongand you willpress Delete to erase your last fastening point and segment. Each time you press Delete you erase one more fastening point. If things get beyond salvation, press Esc and start from scratch. Figure 1.22. A good candidate for the Magnetic Lasso tool. The edge of the subject is well-defined but the background is of varying contrast. After going around the subject, I made some minor refinements to the selection edge using the regular Lasso tool and using the Magic Wand to subtract pixels where the selection had spilled over the edge.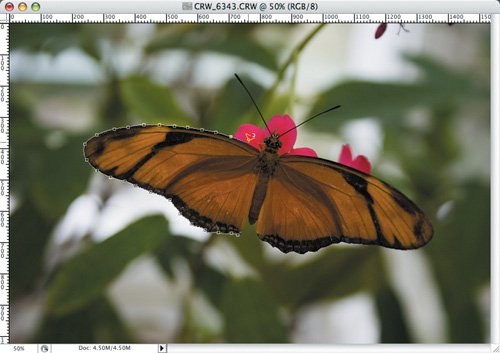 Setting Magnetic Lasso OptionsYou can set these options in the options bar: Feather and Anti-alias As mentioned earlier, I recommend that the feathering for all selection tools be 0 and that anti-aliasing be checked. (These two options are discussed earlier in this chapter). Width sets how far from the pointer that the Magnetic Lasso tool detects edges. Use a large pixel value width for smooth areas and a small width for more detailed areas. You can vary the width while you're using the tool by pressing ] to go bigger, and [ to go smaller. If you press Caps Lock before you start drawing the selection, the pointer changes to reflect the width of your edge. Alternatively, you can choose Precise Cursors in your Display & Cursors preferences (Command/Ctrl-K). Edge Contrast determines the Lasso's sensitivity to edges on a scale from 1% to 100%. The less well-defined the edge, the higher (more sensitive) the setting should be. Frequency determines how many fastening points are added to the path. For subjects with detailed edges, use higher settings; for less detailed edges, use a lower setting. Pen Pressure allows you to change the Width if you are using a graphics tablet and stylus. Figure 1.23. The Magnetic Lasso tool options. |
EAN: 2147483647
Pages: 93

