Filmstrip Mode
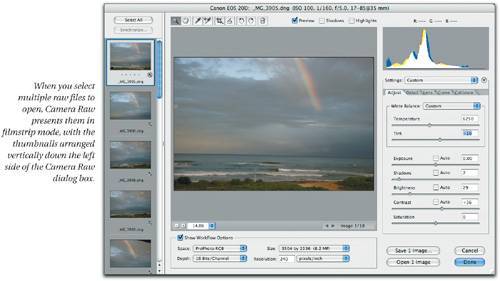
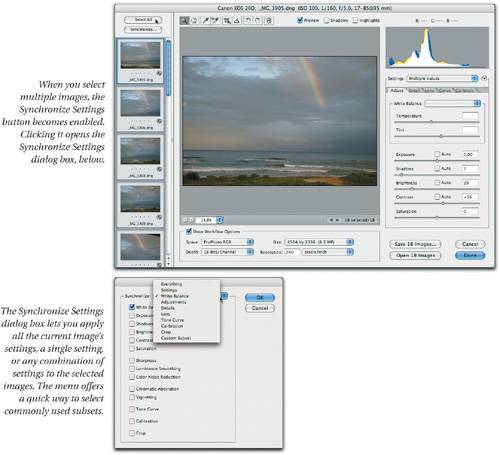
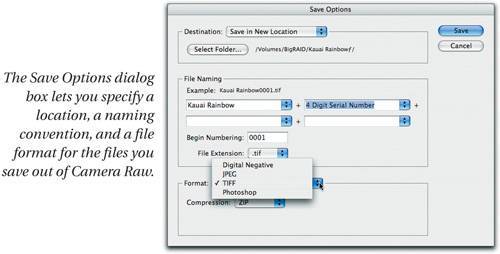
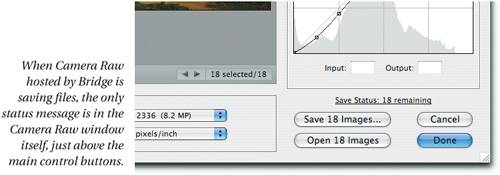
| If you had to adjust every slider on every image, you might conclude that Camera Raw was an instrument of torture rather than a productivity tool. Fortunately, the combination of Camera Raw, Bridge, and Photoshop offers several ways of editing multiple images. One of these is built right into Camera Raw itself: When you select multiple images to open, either by selecting them in Bridge or in the Photoshop's Open dialog box, Camera Raw opens them in filmstrip mode (see Figure 11-36). Figure 11-36. Filmstrip mode Camera Raw's filmstrip mode offers a great deal of flexibility when it comes to editing multiple images. You can select all the open images using the Select All button, which makes all your edits apply to all the selected images. You can also select contiguous ranges of images by Shift-clicking, or discontiguous by Command-clicking. When the focus is on the filmstrip, you can navigate through the images using the up and down arrow keys, or select them all by pressing Command-A. Tip: Match Zoom Percentage If you want to view the images at a zoom percentage other than Fit in View (the default view), select all the images in the filmstrip, then choose the desired zoom percentage from the zoom menu or using the zoom tool. Then as you navigate through the images, each one is displayed at the zoom percentage you specified. Synchronize SettingsWhen you select more than one image, the Synchronize Settings button becomes available. Synchronize Settings lets you apply all the settings or any subset of the settings for the image that's currently being previewed, to all the selected images. This feature is of most use when you open a series of images that need similar corrections, but within that general mandate you have a great deal of flexibility in how you choose to work. In Figure 11-37, we applied the same white balance to all the images in the seriesthe changing light and the varying amounts of whitecaps require different tonal adjustments. On a different series of images, we may synchronize the tonal adjustments, or the noise reduction, all the settings, or whichever combination of settings is most applicable. A general rule of thumb is to start out by applying the settings that are applicable to the largest number of images, then whittle them down to smaller groups that can take the same corrections. Figure 11-37. Synchronizing settings If you're willing to spend a little extra time planning your corrections, consider sorting the images in Bridge so that images that require identical corrections are grouped in order. That way, you can very quickly zip through large numbers of images, applying general corrections quickly, and doing fine-tuning only on those that require it. Filmstrip mode also offers a quick way to examine raw images at actual pixels view without performing conversions. And since Camera Raw can be hosted by both Photoshop and Bridge, you can even open two separate Camera Raw sessions, one in Photoshop, one in Bridge, for those times when you need to see two images side-by-side at actual pixels view. It's not a particularly elegant or intuitive solution, and in the longer term we'd much prefer it if Bridge could show images at full resolution, but it's certainly better than nothing. Saving Images in the BackgroundOne of the major enhancements to Camera Raw 3.0 is the ability to save converted images directly to disk without having to first open them in Photoshop. Notice that when you have more than one image selected, Camera Raw's Open and Save buttons change to read "Open x images" and "Save x images," (where x is the number of images). When you click the Save x images button, the Save Options dialog box appears (see Figure 11-38). Then, when you click Save, Camera Raw goes to work processing the images. When Photoshop is hosting Camera Raw, you can continue to work in the Camera Raw dialog box during the save. But if you dismiss the dialog box, you'll see a Save Status dialog box, and you won't be able to do anything else until the save is completed. Figure 11-38. Save Options dialog box When Bridge hosts Camera Raw, the images are processed in the background. You can continue to work in the Camera Raw window, or you can dismiss it and do other work in a Bridge window (including launching a new Camera Raw session). While Camera Raw hosted by Bridge is saving files in the background, the only status message that appears is in the Camera Raw window itself (see Figure 11-39). Figure 11-39. Camera Raw Save Status message We'll discuss the workflow implications of Camera Raw's saving abilities under both hosts in more detail later in this chapter. For now, we'll simply point out that Camera Raw 3.0 offers much more workflow flexibility, with many more options, than did its predecessor. |
EAN: N/A
Pages: 220
- Understanding SQL Basics and Creating Database Files
- Using SQL Data Definition Language (DDL) to Create Data Tables and Other Database Objects
- Using Keys and Constraints to Maintain Database Integrity
- Working with SQL JOIN Statements and Other Multiple-table Queries
- Retrieving and Manipulating Data Through Cursors