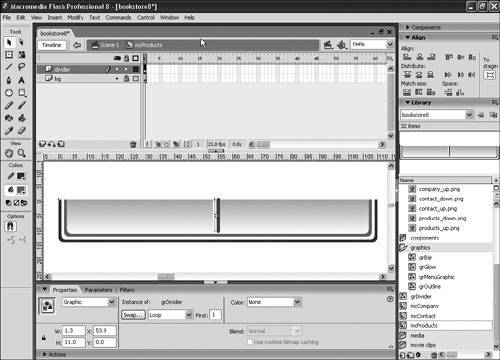
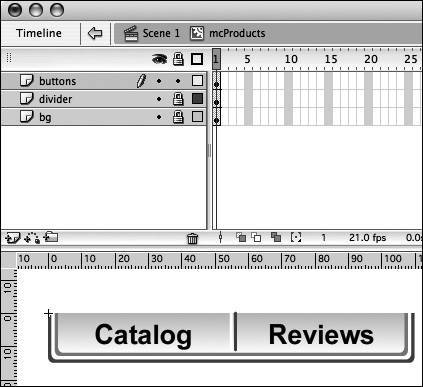
| You already created the background graphic for the menu in Lesson 2, so you have a good start on creating the menus for the Tech Bookstore. The next steps include nesting grMenuGraphic into a movie clip symbol, adding a few more graphics, and nesting the text buttons. 1. | Drag the grMenuGraphic instance onto the menu layer and insert it into a new movie clip symbol; then drag two more instances of grMenuGraphic onto the Stage and also insert them into two new movie clips.
The menu background graphic should be in the graphics folder in the library, named grMenuGraphic. Drag three instances of the graphic symbol onto the masked layer called menu in the Timeline.
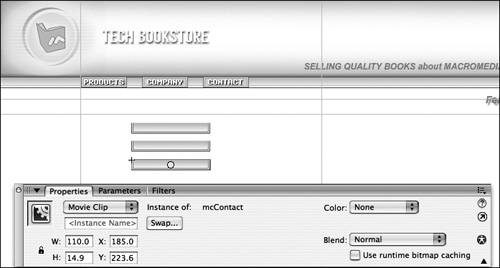 Select the first instance and press F8 to insert the graphic instance into a new symbol. Type mcProducts into the Name field, select the Movie clip radio button, and click OK. Convert the second instance into a movie clip named mcCompany and convert the third instance into a movie clip named mcContact. You should now have three movie clips created for each menu, sharing a graphic symbol for the background image. Select the first instance and press F8 to insert the graphic instance into a new symbol. Type mcProducts into the Name field, select the Movie clip radio button, and click OK. Convert the second instance into a movie clip named mcCompany and convert the third instance into a movie clip named mcContact. You should now have three movie clips created for each menu, sharing a graphic symbol for the background image.
| 2. | Open the mcProducts movie clip by double-clicking the instance on the Stage and rename Layer 1 to bg. Insert a new layer and create a vertical line that is 11 pixels high and colored #666666.
The menus need a division down the middle of the background to divide the text buttons on either side. After you rename Layer 1 to bg, insert a new layer inside the mcProducts movie clip and name it divider. Select the Line tool in the Tools panel and change the stroke color to #666666. Create a straight vertical line on the Stage. With the line selected, open the Property inspector and change the height to 11.
| 3. | Create a second vertical line on the Stage that is white (#FFFFFF) and also 11 pixels tall.
Change the color in the stroke color control and then create a second line of the same length on the Stage to the right of the one you just created. Select the line and use the Property inspector to change the height to 11.
| 4. | Move the two lines together to be next to each other and select both lines. Convert the lines to a new graphic symbol called grDivider and move the symbol to the center of the grMenuGraphic.
Move the lines on the Stage so they are directly next to each other; then select both lines by pressing Shift while clicking each line. Press F8 to convert the lines into a symbol. Type grDivider into the Name field, click the Graphic radio button, and click OK to create the symbol.
Select grDivider using the Selection tool and move it to the middle of the menu. The symbol should be placed at about 55 pixels to the right of 0 on the ruler.
 | 5. | Add grDivider to the mcCompany and mcContact movie clips. Align grDivider so it is in the middle of each movie clip.
Click Scene 1 to return to the main Stage and open the library. Double-click mcCompany to open it up and rename Layer 1 to bg, as you did earlier. Then add a new layer called divider. Drag an instance of grDivider from the library onto the divider layer and align it in the center of the menu.
Do the same for mcContact.
In the next part of this exercise, you will insert the text buttons that you created earlier in the lesson into the menu.
| 6. | Open the library and add the text buttons to each menu.
Find the text buttons you created for the menus in the library within a folder called buttons. Open mcProducts, insert a new layer above the divider layer on the Timeline, and rename it buttons. Drag btnCatalog to the left of grDivider and then drag btnReviews to the right of grDivider. Center btnCatalog between the left edge of mcProduct and grDivider. Similarly, center btnReviews between grDivider and the right edge of mcProduct.
 Repeat this step with the other two movie clip menus. Add a new layer to mcCompany and rename it buttons. Drag btnTour and btnNews to the left and right of the grDivider. Finally, repeat these steps with mcContact. Drag btnFeedback and btnMap to the left and right of grDivider and align them on either side of grDivider, as you did with the other menus.
Return to the main Stage. You should now have three menus on the menu layer, each containing two text buttons.
| 7. | Clean up the library and save the FLA file.
You should now have several movie clips in the library. Drag the movie clips into the folder called movie clips you created in Lesson 2. Move the grDivider into the graphics folder. Save the changes you made to the FLA file by choosing File > Save from the main menu.
In Lesson 5, you will animate the menu so it appears to be opening and closing, and in Lesson 9 you add ActionScript to make it work when you play the SWF file.
|
|
 Select the first instance and press F8 to insert the graphic instance into a new symbol. Type