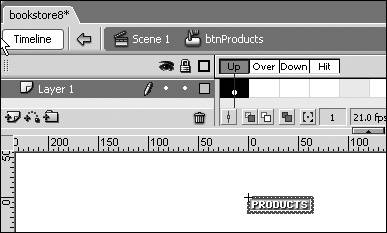
| Buttons are used to make your Flash application interactive. As you'll learn in Lessons 6 and 9, buttons can be used to submit forms or execute ActionScript code that controls your Flash document. Buttons also have events that are broadcast when something happens in the SWF file. An example of an event is a user clicking a button. Using ActionScript, you can write a small script that then responds to that event. That response is generally termed an event handler, but that's too complex for now. You'll learn more about that in Lesson 9. The first buttons you need to create for the bookstore are three basic buttons that go under the title area. Each button will reveal a menu below it and will be built using the six PNG bitmap images that you imported into the FLA file during Lesson 2. Every button symbol has four states that determine how the button will look when someone interacts with it in the published SWF file.  The graphic that you put in the button for the Up state displays when the button is not being interacted with; it's just hanging out, being a button. The Over state displays when the mouse cursor hovers over the button's hit area. The Down state displays when the mouse is clicked within the hit area. Any image or drawing that's placed in the Hit state determines the hit, or clickable, area of the button. The Hit state more or less is the button because the Up, Over, and Down states are strictly aesthetic and don't need to be used. The graphics in the Hit state are also not visible, which gives you a way to create an invisible hot spot to use. Note In most SWF files, the cursor will change to a hand in this clickable region, notifying the user that the graphic can be clicked and something will happen. The cursor can be changed using ActionScript.
1. | Open bookstore7.fla from your TechBookstore folder, and save a new version of the document as bookstore8.fla. You can also open bookstore7.fla from the lesson04/start folder on the CD-ROM.
Use the Save As command under the File menu and click OK to save a new version of the file to start the lesson with.
| 2. | Select Insert > New Symbol to create a new button symbol called btnProducts.
The Create New Symbol dialog box opens. Type btnProducts into the Name field and select the Button radio button. This procedure names the button symbol in the library. You will put it on the Stage later on and also give it an instance name (which is different from the library name, remember). Click OK, and symbol-editing mode opens. The symbol can also be found in the library.
Tip You are prefixing the symbol name with "btn" simply to make it easier to organize your library. You can use any naming convention that you want in everyday life, as long as you stick with it! | 3. | Open the library and find the bitmaps that you put into in the media folder.
Double-click the media folder's icon to open it up so you can find the bitmap files. The bitmaps should still be called products_up.png, products_down.png, company_up.png, company_down.png, contact_up.png, and contact_down.png. These bitmaps will be used for different button states in the bookstore.
| 4. | Select the Up state and add the products_up.png bitmap to the button. Set the x and y position of the graphic to 0 and 0.
After you open the button symbol, notice in the Timeline that there are four states that you can give the button. These four frames represent the Up, Over, Down, and Hit states discussed at the beginning of this exercise. Select the Up frame on the Timeline and drag products_up.png from the media folder in the library into the button symbol.
 Select the graphic on the Stage, and in the Property inspector, set the x and y position both to 0 and 0.
| 5. | Add the products_down.png bitmap to the button symbol's Over state.
Just like anything else, all assets inside of a button Timeline have to live in keyframes. Select the frame Over frame in Layer 1 and insert a blank keyframe using Insert > Timeline > Blank Keyframe. You want a blank keyframe so that the bitmap in the Up frame isn't copied to the new keyframe. You'll place a different bitmap in the Over frame.
Drag the products_down.png bitmap from the media folder into the button for the Over state. This is the image seen by visitors when they hover the mouse over the button. So when they move the mouse over the button, the button changes its appearance. Using the Property inspector, place the bitmap at x and y of 0, so that it matches the graphic in the Up frame.
Tip A crosshair shows you where the registration point of the symbol is located. Sometimes you want to change the registration point of a button or movie clip, particularly if you are using ActionScript. When you want to change the position of the symbol, you assign the x and y coordinates. The registration point is placed at those assigned coordinates. | 6. | Select the Hit frame and press F5 to add frames to the Down and Hit frames.
Pressing F5 applies the products_down.png bitmap to both the Down and Hit states, while making sure the bitmap position is the same for each of the frames. The Hit state defines the area where you click the button. Because it is the same image at the same location (which you already set), you know that the clickable area will exactly match the other areas of the button.
 Note Remember, the hit area is not visible on the Stage. You could substitute a bright lime green rectangle in place of the bitmap image, and it wouldn't be visible to your visitors when they see the SWF file. In this case though, it's easiest to just use the existing graphic already on the Timeline, which is sized and positioned correctly, to serve as the hit area for the button. Tip Text is not suitable for defining a hit area. The reason for this is that the graphic portion of text is the letters themselves. Spaces between letters, the center of an "o" are all background and therefore not clickable. If you have text in a button Timeline, you should place a graphic like a rectangle in the Hit frame and size it so that it covers the whole text box. If you don't, you'll get lots of hate mail about your button not working correctly. | 7. | You need to create two more buttons and add the symbols to the button folder in the library in order to organize the new buttons you created.
You need to create two more buttons for the area beneath the main title area for company and contact buttons. Repeat Steps 2 through 7 to create the btnCompany and btnContact. When you finish, open the library and move the three button symbols into the buttons folder. Just leave the buttons in the library for now; you will add the buttons to the Stage in the next exercise.
| 8. | Save your file before moving on to the next exercise.
Select Ctrl+S or Command+S to save the file. You do not need to create a new version of the file.
|
|


