100. Create Custom Motion for Text  BEFORE YOU BEGIN BEFORE YOU BEGIN
29 About the Timeline and Video Tracks 67 About Keyframing 69 Add Motion to a Still 95 About Titles
 SEE ALSO SEE ALSO
93 Show Your Video Through a Shape or Text 103 Create a Title from Scratch
Sometimes you want something more than a simple rolling or crawling title. You might want the title to move like an old Pong game, or maybe you want the text to move diagonally. Premiere Elements gives you the tools you need to accomplish this task. Using keyframes, you can make a title change size or direction easily. By adjusting title size and movement, and adding additional effects, the number of title possibilities is unlimited. 100. Create Custom Motion for Text 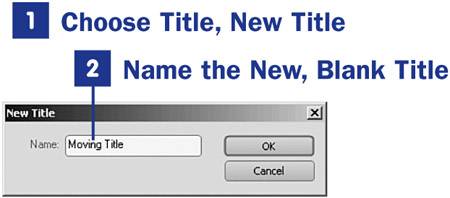
1. | Choose Title, New Title
From the menu bar at the top of the screen, choose Title, New Title, and then select your title type (Default Still, Default Roll, or Default Crawl) to open the New Title dialog box. For this task, I selected the Default Still Title; we will add the motion later.
 NOTES NOTES
Alternatively, you can access the New Title dialog box in a more roundabout fashion: In the main taskbar at the top of your screen, click the Titles button to open the Title Templates dialog box. Click the Cancel button to dismiss the Templates dialog box and instead open the New Title dialog box. Alternatively, you can click and hold the Titles button to access a submenu with an option for a New Title. | 2. | Name the New, Blank Title
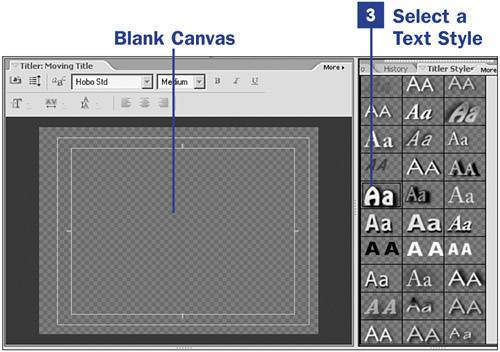
In the New Title dialog box, give your title a name. Click the OK button; the Titles workspace opens with a completely blank title in the Titler panel.
| 3. | Select a Text Style
From the Titler Styles panel, select the text style you want to use for the title by clicking it.
| 4. | Enter the Title Text
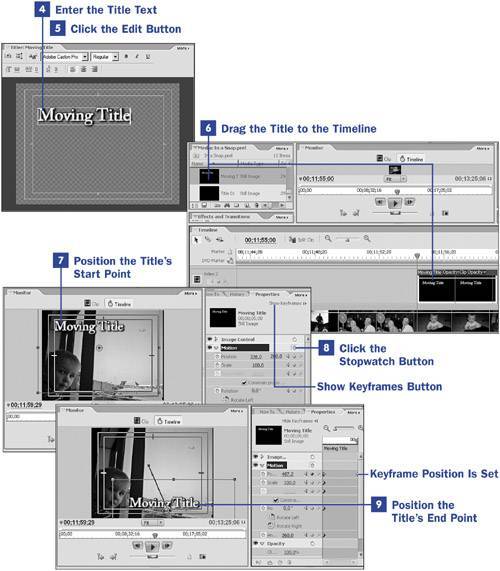
Click the location in the Titler panel where you want to add the text. This action opens a text box to hold the text you are typing. For this example, I added text to the upper-left area in the Titler. Be sure to keep your text within the safe title margin.
In most cases, you want to limit your text to a single line or even a single word. With the text moving around, you don't want to make it difficult for your audience to read.
| 5. | Click the Edit Button
When are done entering your text, click the Edit button on the main taskbar at the top of your screen. The Edit workspace opens, where you can start to put motion to your title.
 NOTE NOTE
It is possible to complete this task from within the Titles workspace. The Effects and Transitions panel, along with the Timeline and Monitor, are visible in the Titles workspace. And the Properties panel can be opened as a free-floating window by choosing Window, Properties from the main menu. The only problem with working from the Titles workspace is that space gets even more limited than normal. With video editing, space is very important, and the Edit workspace is designed for just that: editing. | 6. | Drag the Title to the Timeline
The title you just created has been automatically added to the Media panel. To add the title to your current project, just drag the title from the Media panel and drop it on the Timeline. This particular title, as well as many others, has a transparent background. Video shows through the title when it is placed on a track above an image or clip on the Timeline. If the title is placed on Video 1, the background is black.
| 7. | Position the Title's Start Point
Position the CTI at the first frame of your title. You might have to zoom way in on the Timeline to make sure you get the very first frame; view the title in the Monitor. Make sure that the title is still selected on the Timeline and look at the Properties panel.
| 8. | Click the Stopwatch Button
In the Properties panel, click the arrow in front of the Motion listing to open up the control panel for that property. For this moving-title effect, you are interested in the title's opening Position and Scale keyframe options. In the Monitor, drag the title to the position where you want it to appear when the title clip starts playing. When the title text is where you want it, click the stopwatch icon next to the Motion listing in the Properties panel to set the keyframe markers.
 NOTE NOTE
If you don't see the timeline in the Properties panel, click the Show Keyframes button at the top of the panel to display it. | 9. | Position the Title's End Point
Position the CTI in the main Timeline at the very last frame of the title. You might have to zoom out and back in on the Timeline to ensure that you have selected the last frame of the title. You should still be able to see the title in the Monitor.
Click the title in the Monitor and drag it to the position you want it to be at the end of its movement. Because you have already set keyframe markers for this clip in step 8, the markers for this new position are set for you automatically.
The only thing left to do is render the Timeline and play the title. If you don't quite like the movement, go back to the first frame of the title clip and make adjustments; then make adjustments to the final frame of the title clip. Continue tweaking the positions of the title until you have the exact movement for which you are looking.
|
 TIP TIP
Use the Scale option in the Properties panel to make your title shrink or grow as it moves. Simply adjust the scale up (more than 100) to make it larger, or down (less than 100) to make it smaller. Try setting it very small on the first frame and very large on the last frame. Not only will the title text move across the screen as you've plotted it, it will grow in size as it does.
|


 BEFORE YOU BEGIN
 SEE ALSO
 NOTES
NOTES