| Besides alignment, there are several other properties that you can set for images using the Property Inspector ( Figure 8.16 ): -
Name lets you name the image. This name is used to refer to the image in scripts, and you must enter a name for scripts to be able to manipulate the image, as you might want to do for a rollover. You cannot use spaces or punctuation in an image name. -
W (for Width) is the width of the image in pixels. -
H (for Height) is the height of the image in pixels. -
Src (for Source) shows the path to the image file on your site. -
Link shows the destination if the image has a link to a URL. -
Alt shows the alternate text for the image. -
Class shows the CSS class, if any, that has been applied to the image. -
Edit is a group of tools that allows you to make adjustments to the image. -
Map is a field and four tools that allow you to name and add an image map to the image. See "Creating Image Maps" later in this chapter for more information. -
V Space allows you to put vertical margins, in pixels, above and below the image. -
H Space allows you to put horizontal margins, in pixels, to the right and left of the image. -
Target specifies the frame or window in which the destination of a link should load. The pop-up menu next to the Target field shows the names of all the frames in the current frameset. There are also four other target possibilities. The _blank target loads the linked file into a new browser window. The _parent target loads the linked file into the parent frameset, the window of the frame that contains the link, or the full browser window. The _self target loads the linked file into the same frame or window as the link. This is the default choice. The _top target loads the linked file into the full browser window and removes all frames. -
Low Src allows you to specify a lower resolution image that will appear in the browser until the full image has finished loading. With the widespread use of broadband connections, this option has fallen out of favor. -
Border allows you to add a colored border, in pixels, around the entire image. 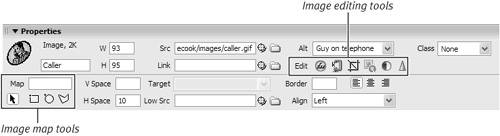
To set image properties: | 1. | Click to select the image to which you want to apply one or more properties.
| | 2. | In the Property Inspector, apply the property you want.
The property is immediately applied.
|  Tips Tips -
If you don't want to apply an interactive effect like a rollover to an image, you can leave its Name field blank. -
The pop-up menu next to the Alt field has one choice, <empty> . You can use this attribute for images, such as spacer GIFs, that don't need to be read by screen readers for the visually disabled. Because accessibility guidelines state that all images should have alternate text, it's a good idea to apply this attribute to any images that are literally just taking up space. -
Though you can add whitespace around images using the V space and H space properties, you'll have more control (and have valid XHTML pages) if you use CSS to provide margins for images. -
You should also use the CSS border properties, rather than the Border option in the Property Inspector. You'll have more control over the kind and color of the border.
|