Creating New Sites in SharePoint


Although SBS provides the predefined Companyweb, you can actually create additional SharePoint sites, either as new top-level sites or as subsites below Companyweb.

Creating New Subsites Under Companyweb

There are many benefits to having subsites under your Companyweb site. A prime example is to have a separate subsite devoted to each of several different projects. SharePoint provides native functionality for easily creating subsites, as shown in Figure 14.7.

Figure 14.7. The New SharePoint Site creation page.


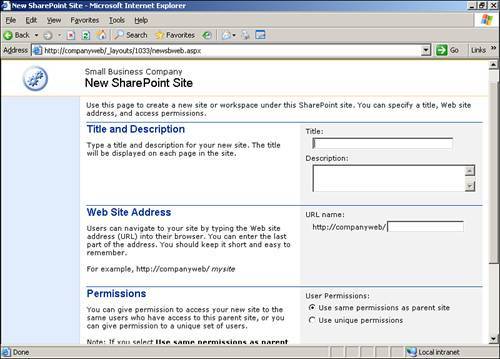
Creating a new subsite is simple. From your Companyweb page, follow the Create link. At the bottom of the list of available objects, follow the link for Sites and Workspaces, which takes you to the page shown in Figure 14.7. Here you can specify the title and description as well as the URL and permissions for the subsite. The title and description appear on the main page of the subsite and can be changed at any time from within the subsite's Site Settings. The URL is obviously how you and your users will access the subsite. Finally, you have the option to use the same permissions as the parent site, or use unique permissions. The default option is to use the same permissions from the parent site. This option results in the subsite inheriting permissions from the parent site. As a result, the subsite will not have its own user list or site group list. If you want to restrict access to the subsite, you'll want to choose to use unique permissions. In that case, you then need to explicitly grant users permissions to the subsite and create any site groups you may want.

To access subsites you have created, you have several options. First, you can directly access a given subsite by entering its URL (for example, http://companyweb/mysubsite). Alternatively, you can access a listing of all your subsites from your Companyweb. To do this, follow the link for Documents and Lists. In the left-hand pane under See Also, follow the Sites link. Depending on how many subsites you create, and how long you keep them, you may want to consider creating a new Links list for your subsites. In the long run, this is going to be the easiest way to maintain your site listing if you are creating many subsites and keeping them for archival purposes. For example, you may want to create a new subsite for each major project and keep those subsites alive even after the project has completed. However, on a daily basis you only need to access active projects. By creating a new Links list for your subsites, you could add a custom column that would indicate whether the subsite is inactive. As a result, you could customize list and web part views to show only active subsites by default.
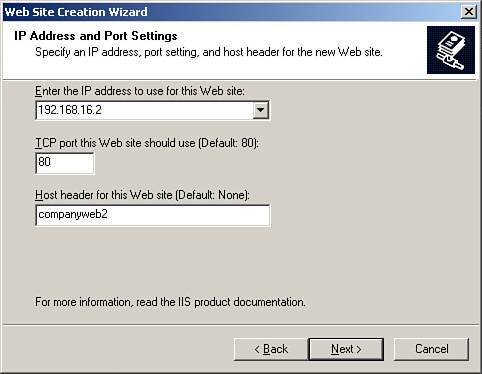
Best Practice: Use Site Templates to Streamline Creation of Companyweb Subsites

An added benefit of WSS is the ability to save a WSS site as a template. Continuing with the example of creating a subsite for each project, you will most likely have a certain set of objects that you want each subsite to have, such as a document library, contact list, events calendar, task list, and links list. Instead of creating each of these objects every time you create a new project subsite, you can use an existing subsite that already contains these objects to create a new site template. To create a site template, open the site you want to use as a template. Follow the Site Settings link and then the Go to Site Administration link, as shown in Figure 14.8.

Figure 14.8. The Save Site As Template page.


When saving a site as a template, you need to specify a filename for the template. This must be unique but can be any arbitrary name. The template title should be meaningful, and an accurate description should be entered. When you are creating a new subsite and get to the Template Selection page, the template title you enter here appears in the template list. Likewise, the description you enter is the description displayed when the template title is selected.

Finally, you will notice that, when creating a site template from an existing site, you have the option to include content. This is particularly useful if you have many documents that each project needs. For example, if you are using a checklist to track when certain tasks common to each project are completed, you could upload the blank checklist document to the document library before creating the site template. As a result, that document will be present in the document library for each new site you create using this site template.


Creating New Top-Level SharePoint Sites

In addition to creating subsites below your Companyweb site, you can also create additional top-level SharePoint sites. To create a new top-level site, the first thing you need to do is to create a new blank website:

1.

Log in to your SBS server and open the Internet Information Services MMC (select Start, All Programs, Administrative Tools, Internet Information Services [IIS] Manager).

2.

In the IIS MMC, expand <your_servername> and click on Web Sites.

3.

From the Action menu, select New, Web Site

4.

Click Next to start the New Website Creation Wizard. Enter a description for the new site and click Next to continue.

5.

As shown in Figure 14.9, change the IP Address from (All Unassigned) to the internal IP of your SBS server (192.168.16.2 by default).

Figure 14.9. The Web Site Creation Wizard IP Address and Port Settings page.


6.

Enter the host header value for your new website and click Next. The host header value should match the URL you want to use to access the new site. Figure 14.9 shows companyweb2 as a host header value. As a result, you would enter http://companyweb2 into your browser to access this site.

7.

Click the Browse button to select an installation path for your website. Expand C:\Inetpub and click on Make New Folder to create a new folder under C:\Inetpub. For simplicity, use your host header value from step 6 as your folder name.

8.

Uncheck Allow Anonymous Access to This Web Site and click Next.

9.

Click Next to accept the default permissions; then click Finish to complete the Web Site Creation Wizard and close the IIS MMC.

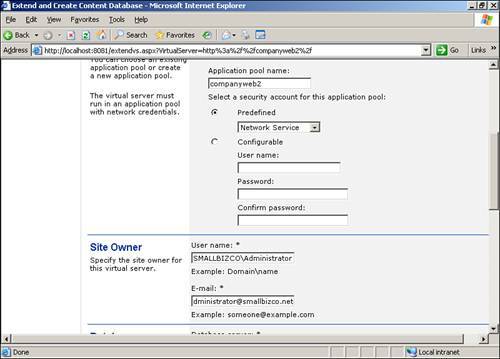
Now that you have created a new blank website, you need to extend WSS so that the new website will be a SharePoint site:

1.

On your SBS server, open SharePoint Central Administration (select Start, All Programs, Administrative Tools, SharePoint Central Administration).

2.

When SharePoint Central Administration opens, follow the link to Extend or Upgrade Virtual Server.

3.

Click on the website you just created.

4.

Click on the Extend or Create a Content Database link.

5.

The Extend or Create Content Database page appears, with several option groups for the new SharePoint site. Under the Application Pool group, select to Create a New Application Pool. Enter a name for the new application pool and select the Predefined Network Service for the security account (see Figure 14.10).

Figure 14.10. The Extend or Create Content Database page with recommended values.


6.

In the Site Owner section, enter the required user account and email address for the site owner.

7.

In the Database Information section, verify that Use Default Content Database Server is selected. This uses the default <servername>\SHAREPOINT MSDE database instance but still creates new configuration and content databases for the new site.

8.

Accept the default values for the Custom URL and Quota Template sections. In the Language section, select the language you want the new site to use. Note that by default, the only language available is the language represented by the version of SBS. As a result, if you have an English version of SBS, by default English is going to be the only language available. However, you can add language packs, which is discussed later in this chapter.

9.

Click OK to extend WSS to the new website. Click OK to acknowledge the message that WSS was successfully extended.

Now that you have created the new website and successfully extended WSS, you need to create a new DNS alias mapping the host header value (for example, companyweb2) to the internal IP address of the SBS. For specific steps on how to create a new DNS alias, see Chapter 5, "DNS, DHCP, and Active Directory Integration." After you have created the necessary DNS alias, you can access your new top-level site and begin customizing to meet your needs.

It is also important to note that creating a new site (whether a subsite or another top-level site) results in the creation of a new content database. By default, this database is created in the data directory of the SHAREPOINT instance's installed location, which by default is on the C: drive. As a result, consider moving this content database to prevent site content from consuming valuable free space on your system partition.


Microsoft Small Business Server 2003 Unleashed
ISBN: 0672328054
EAN: 2147483647
Year: 2005
Pages: 253

flylib.com © 2008-2017.
If you may any questions please contact us: flylib@qtcs.net