Installing MySQL
|
|
Installing MySQL is relatively painless. First, you need the installation program for MySQL, which is available on the companion CD. You can also download the latest version from http://www.mysql.com.
| Note | If you choose to install MySQL in a different folder than the default (C:\MYSQL) or you wish to start MySQL on NT/Win2000 as a service, you need to create a file named MY.CNF in the root of your C:\ drive with the following information in it (or append the following information to either \Windows\my.ini or \winnt\my.ini, depending on your OS): [mysqld] basedir=E:/installation-path/ datadir=E:/data-path/ After you have installed MySQL, the directory will contain the my-example.cnf file. You can use this as a template to create your own my.cnf file. |
Once you start the installation, it will first ask you which type of setup you would prefer: typical, compact, or custom installation. Here we will select the Typical option, as it will install all the components that we require in order to work with MySQL.
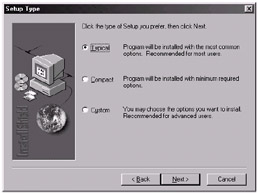
Figure 15-1: Select the typical install option.
After selecting Typical, press the Next button and the installation process will be automatically completed.
Now that we have MySQL installed, we will first browse the directory so we can see what it has installed for us. If we open the directory to which you installed MySQL (typically c:\mysql), we can see the following directory structure:
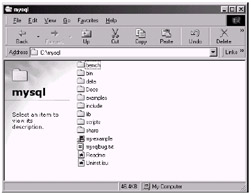
Figure 15-2: The MySQL directory structure
All we really have use for here (with respect to Java) is the bin directory, which contains the MySQL server and client executables, and the docs directories, which contain the HTML version of the MySQL manual.
| Note | An Adobe PDF version of the MySQL manual has also been supplied on the companion CD-ROM. We find this easier to read, but you will also require the free program Adobe Acrobat Reader to view this manual, which is available to download at http://www.adobe.com/products/acrobat/readermain.html. |
Let's now take a look in the bin directory and see what is of use to us there. The contents can be seen in the following image:
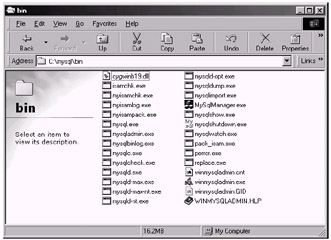
Figure 15-3: The contents of the bin directory
As you can see, there are many executables in this directory; some are daemons (i.e., the MySQL server), and some are console-based clients to access the MySQL server with.
| Note | A daemon is simply a program or process that sits idly in the background until it is invoked to perform its task. |
mysqld.exe is the best server to use when developing software. The others are used more to adjust speed and support extra features. Here are each of the different server versions and their uses:
-
mysqld—Compiled with full debugging and automatic memory allocation checking, symbolic links, and InnoDB and BDB tables
-
mysqld-opt—Optimized binary with no support for transactional tables
-
mysqld-nt—Optimized binary for NT with support for named pipes. You can run this version on Win98, but in this case no named pipes are created and you must have TCP/IP installed.
-
mysqld-max—Optimized binary with support for symbolic links and InnoDB and BDB tables
-
mysqld-max-nt—Like mysqld-max, but compiled with support for named pipes
If you do not fully understand the meaning of the different versions, simply stick to using mysqld.exe, as you probably will not require the others.
The executable mysql.exe is a console-based client, which is used to interact with the MySQL server by means of the SQL language of which we had a brief overview in the previous chapter. We will cover SQL in much greater depth in this chapter; however, we are going to put this to the side for now, as it is not relevant to the current situation.
So if we try and run the console client (mysql.exe) now, the following screen will appear for a couple of seconds and then disappear:
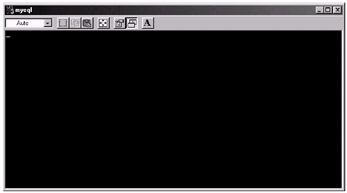
Figure 15-4: A blank window?!
Why? The reason the window appears and promptly disappears is because there is currently no MySQL server to connect to (i.e., there is no MySQL daemon running for the client to interact with).
So the obvious thing to do now is run a MySQL server so we can access it via the client. The executable we want for this is called mysqld.exe. There might be cases when the debug version of MySQL is better (information about errors, etc.). But in general, one version is as good as the other for running the MySQL server in the background. If you now execute this, a black window will appear for a very short period of time and disappear. You can check that the MySQL server is running by hitting Ctrl, Alt, and Delete at the same time to bring up the list of tasks that are currently running in Windows. This can be seen in Figure 15-5.
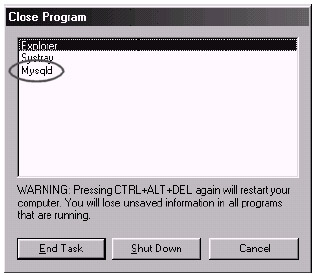
Figure 15-5: Viewing the current running tasks
| Note | In Windows NT and Windows 2000, Ctrl+Alt+Del produces a different window than in Windows 98. Windows XP also has a different view. Windows NT and Windows 2000 have a slightly different approach when starting the MySQL server. This can be seen in the following "Starting the MySQL Server Automatically" section. |
Note that you may have more on this list if you are running other programs. Also, the Mysqld daemon may not be at the bottom of the list.
Now, if we try to run the MySQL console client (mysql.exe), we can see that it will connect to the MySQL server and display a welcome message and then await input. This can be seen in the following figure.
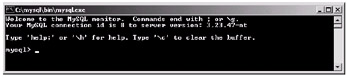
Figure 15-6: The MySQL console client
Now we are able to connect to the MySQL server from the MySQL console client. One problem is that every time we restart Windows, the MySQL server will not be restarted, meaning we would have to manually go to the directory and run the mysqld-opt.exe every time we start Windows. This can be solved by adding the MySQL server as a service that is started every time Windows is loaded up. See the following section for how to do this.
|
|
EAN: 2147483647
Pages: 237