Timing in Java
|
|
In the animations example in this chapter, all of the animation frames were changed in sequence with the running of the main loop. That is, the animations were updated based on the timing of the main loop. In those examples, we were aiming at around 25 frames per second. This means that the program's display will refresh itself with a new display 25 times every second, at least in principle. In Java, this is not exactly the case, at least not to a respectable accuracy, as we will look at shortly. But in general, animation and the updating of the game world should be handled independently from the frame rate, based on the real time that has elapsed. For our StickWalker example, the program running on a fast enough computer will run at around 25 frames per second (ignoring the low timer accuracy issue for the moment). However, a slower computer that cannot keep up with the expected frame rate will run with the animation updating at a slower rate. Not only this, however, but the character will not walk as fast across the screen. Both of these occur because the animation and movement code is executed per frame, in timing with the speed of the frame rate. A frame rate could lag on a faster computer also if other programs are taking up processor slices. Ideally, the change in the game world, which can consist of updating player positions, animation, AI elements etc., should be performed based on real time instead of the frame rate, as we mentioned before. It's true that this might not be required at all if you are just interested in making a little applet game and are not too bothered that the game actually runs a little slower if a particular computer cannot keep up (perhaps your game will run very efficiently or have little to do, decreasing this likelihood with the speed of computers today). But this is an important topic for professional gaming, especially for multiplayer online games, where computers of any speed are your players, everyone is moving about in everyone else's programs, and they will need to be moving at the same rate in real time. This is generally known as updating the game world in real time.
The problem in Java is that the available time getters (such as the method currentTimeMillis that we have been using for frame rate synching so far in this book) are not accurate enough at the moment for us to be able to do this to a tolerable level, generally ranging in accuracy from about 10 milliseconds on most platforms. The resolution of the time read is different from platform to platform and with no means of querying the accuracy. In terms of the accuracy being, say, 10 milliseconds, this means that if we calculate the elapsed time in one main loop cycle as lasting 20 milliseconds, the real elapsed time might actually be 15 milliseconds but the timer was not accurate enough to give us the correct time. Note that the timer value will usually be a great big number that is useful when compared to an older great big number, hence working out the time that elapsed. A basic scenario for updating the world, based on the real elapsed time per main loop cycle, would be to say that your character moves 4 pixels in 30 milliseconds, with the expected frame rate being 30 milliseconds. If the real time recorded for the time it took to execute one frame was 30 milliseconds, the character will move 4 pixels. If the recorded elapsed time was 60 milliseconds, the character will move 8 pixels. This is a very basic example, and we can use very basic math to work this algorithm, as we will see shortly
Typically for Windows games, for example, the high-resolution timer has accuracy in the microseconds (even to one millisecond is generally accurate enough) with the opportunity to find out the frequency of the timer that is available, which we will look at a little later. Note that the accuracy of a timer used inevitably depends on the hardware of the computer, but most modern computers will be amply sufficed.
High-resolution timing is also important for things like benchmark testing parts of your code to see how fast the code runs. This is especially useful for executing small segments of code thousands of times and seeing how long all of it took for comparing the speed of different algorithms. When the time frame between two comparative sections of code might be negligible, the higher the resolution of the timer, the more accurate the results will be. Oh, and it's essential if you want to simulate real-time physics also.
Using a Native High-Resolution Timer in Windows
In this section, we look at using a native high-resolution timer for the Window's platform using JNI (Java Native Interface) and C code. This is quite an advanced area, but we will narrow the code down to a high-resolution time-getting method in Java to get the current time and discuss how it would be used to update the world. We will also show you the full process of gaining the native high-resolution timer but cannot go into detail about JNI and the C/C++ programming language in this book. We apologize to any users who are not on the Windows platform, as the actual code here can only be used on that platform. The theory is still there, and gaining a high-resolution timer for your platform will be done using the same techniques (i.e., through the JNI).
About the JNI
JNI stands for Java Native Interface and is a requirement if you need to use platform-specific code not available in pure Java. The term "pure Java" or "100% Java" is the general term for code that is all Java and will execute on a Java Virtual Machine independent of the platform on which it is running. When using the JNI to allow your program to make use of platform-specific code, your program will be incompatible with platforms other than the one to which your code relates. The code is therefore known as native code. For the high-resolution timer example, we will use Windows (Win32 API) methods to gain the high-resolution time, which means that the program will only run on Windows machines, losing the platform independence of a program coded in "Pure Java." This is an obvious disadvantage to using native code, but if we need this functionality to make games, this is more important in the long run. Creating many native high-resolution timer implementations, one for each of the target operating systems on which your game is going to run, is better than trying to handle poor-resolution timing. Hopefully, high-resolution timer support will be available using pure Java in the future, but for now, we can use native methods.
Creating a Java Timer
In this book we cannot assume that you know anything about C/C++ code, so the idea here is to make this as painless as possible; we just want to get the time in Java by calling a simple getTime method. As an overview to how this all works, we begin by creating a .dll file containing Windows high-resolution timer code. DLL stands for Dynamic Link Library, and it is the library structure that we can access from Java through the JNI. However, the C/C++ code that is added to the DLL needs to be converted through the JNI to make it compatible with Java. If the following "native" section is a complete mystery to you, or you are not too interested in how to create the .dll file for yourself, do not worry, as the .dll file you will need for running the high-resolution timer example is available on the companion CD. Eventually, all we will need once the .dll file is creating is that file and our Java code, which will load in its functionality at run time. To begin with, we need to define the Java code in order to outline the basis for using the native code. The structure of the Java side will revolve around the BaseClock class. This class is as follows:
public abstract class BaseClock { public abstract long getTime(); public abstract int getDefaultUnit(); public abstract void stampTime(); public abstract long getElapsedTime(); public abstract long getElapsedTime(int unit); public long stampTime; public static final int UNIT_SECONDS = 1; // 10^0 public static final int UNIT_MILLIS = 1000; // 10^3 public static final int UNIT_MICROS = 1000000; // 10^6 public static final int UNIT_NANOS = 1000000000; // 10^9 } The BaseClock class is simply a template super class for two more distinct classes, StandardClock and NativeWinClock, that both extend the BaseClock. The method getTime will return the current counter time of the clock (e.g., the StandardClock implementation will return the System.currentTimeMillis value). The getDefaultUnit method will return the default unit in which the clock's time is returned (e.g., the StandardClock time value is in milliseconds, where the NativeWinClock will return its default counter value in seconds). This method is needed so that you know which format the time retrieved is in. However, these two abstract methods are supplied more for completion because the class defines some more specific abstract methods for measuring what we want—the elapsed time.
The stampTime method saves the current counter time in a variable within the class. The getElapsedTime methods return the time difference between the current time and the value stored in the save time method. The idea is simply to stamp the time, which is like starting a stopwatch, and then get the elapsed time, which is like stopping the stopwatch (except in reality we are pulling the time distance out of the watch rather than stopping it altogether). The default getElapsedTime method will return the time in milliseconds for both the StandardClock and NativeWinClock subclasses of BaseClock. The getElapsedTime(int unit) method returns the elapsed time in the given unit. So by passing UNIT_MICROS into this method, we can get the elapsed time in microseconds; whether the timer class instance used can deliver this value to an accurate level will vary between the two classes in question (i.e., the StandardClock should not, but the NativeWinClock should be pretty accurate).
The StandardClock simply uses System.currentTimeMillis to retrieve its counter value, which is of course in milliseconds and designed to provide a clock in the event that a high-resolution timer is not available. The code for StandardClock is as follows:
public class StandardClock extends BaseClock { public long getTime() { return System.currentTimeMillis(); } public int getDefaultUnit() { return UNIT_MILLIS; } public void stampTime() { stampTime = System.currentTimeMillis(); } public long getElapsedTime() { return System.currentTimeMillis() - stampTime; } public long getElapsedTime(int unit) { return ((System.currentTimeMillis() - stampTime) * unit) / UNIT_MILLIS; } } Because the default time unit for the time retrieved is in milliseconds, we need to divide the elapsed time specified by the unit parameter back by 1000; we are working in a format where a second is "1", whereas by default in this class, a second is in the format of 1000 milliseconds.
The NativeWinClock works quite differently than the StandardClock implementation. We have to do a little more work ourselves, even when we get the native counter values. The native calls give us a counter value and a frequency value. The counter value is a large number, which changes through time but means nothing to us without the frequency. The frequency gives us the number of counts per second of the high-resolution counter. This value cannot change during run time, so we only need to retrieve it once during initialization.
Therefore, we can obtain a counter value in seconds by dividing the counter value retrieved by the frequency. Note this does not mean that we are limited to seconds; we can simply multiply the initial counter by 1000, for example, before dividing by the frequency to get the counter value in milliseconds. Here is the code for the NativeWinClock class:
public class NativeWinClock extends BaseClock { public NativeWinClock() { frequency = getFrequency(); } public long getTime() { return getCounter() / frequency; } public int getDefaultUnit() { return UNIT_SECONDS; } public void stampTime() { stampTime = getCounter(); } public long getElapsedTime() { return ((getCounter() - stampTime) * UNIT_MILLIS) / frequency; } public long getElapsedTime(int unit) { return ((getCounter() - stampTime) * unit) / frequency; } public static boolean isAvailable() { return available; } private native long getFrequency(); private native long getCounter(); private long frequency; private static boolean available; static { try { System.loadLibrary("WinClock"); available = true; } catch(UnsatisfiedLinkError e1) {} catch(SecurityException e2) {} } } In the constructor, we retrieve the frequency for the high-resolution timer and store it in the variable frequency. This only needs to be done once, as the frequency does not change from here on, as we mentioned before. When we return the elapsed time, we can convert the time into an understandable format by working out the elapsed time in the counter's default format first and then divide this elapsed counter value by the frequency. Note that the default getElapsedTime method returns the time in milliseconds to conform to the StandardClock class's return format.
The native methods that require native functionality are the methods getFrequency and getCounter, defined in the NativeWinClock class as follows:
private native long getFrequency(); private native long getCounter();
As you can see, all we need to do is include the keyword native in the method declaration and not include a code body for the methods, similar to abstract methods, which in a way they are. In the static block seen at the bottom of NativeWinClock, we actually load the native methods from the .dll file that we are to create. Note that this file is available for use on the companion CD if you are unable to make your own from the next section. If the native library could not be loaded, the variable available will remain its default value of false. This can be used to test the high-resolution timers availability in your program. The static block will be invoked when the class is loaded, so this will be determined before the main method is entered.
Creating WinClock.dll
In order to create the DLL, we first need to generate a C++ header file, which will contain function prototypes for the native methods for which we can then define the implementations in our C++ source file. Creating the header file, which has a .h file extension, is very simple. All you need to do is run the javah.exe utility with the class file that defines the native methods in the command line, as follows:
javah -jni NativeWinClock
Note that the javah.exe utility can be found in the bin directory of the Java SDK installation directory (where javac.exe and java.exe are found) and the NativeWinClock parameter refers to the NativeWinClock.class file and not its .java source file (hence you need to compile the .java file first). Once this is done, a new NativeWinClock.h file should have been created. This file will look similar to the following:
/* DO NOT EDIT THIS FILE - it is machine generated */ #include <jni.h> /* Header for class NativeWinClock */ #ifndef _Included_NativeWinClock #define _Included_NativeWinClock #ifdef __cplusplus extern "C" { #endif /* Inaccessible static: available */ /* * Class: NativeWinClock * Method: getFrequency * Signature: ()J */ JNIEXPORT jlong JNICALL Java_NativeWinClock_getFrequency (JNIEnv *, jobject); /* * Class: NativeWinClock * Method: getCounter * Signature: ()J */ JNIEXPORT jlong JNICALL Java_NativeWinClock_getCounter (JNIEnv *, jobject); #ifdef __cplusplus } #endif #endif Then the actual C code implementation for obtaining the high-resolution time is as follows. This code was entered into the file WinClock.cpp, also available on the companion CD.
#include <windows.h> #include "NativeWinClock.h" JNIEXPORT jlong JNICALL Java_NativeWinClock_getFrequency (JNIEnv *, jobject) { LARGE_INTEGER freq; QueryPerformanceFrequency(&freq); return freq.QuadPart; } JNIEXPORT jlong JNICALL Java_NativeWinClock_getCounter (JNIEnv *, jobject) { LARGE_INTEGER counter; QueryPerformanceCounter(&counter); return counter.QuadPart; } To compile the code into a DLL, you will also need important JNI header files, which can be found in the include and include\win32 directories of the Java SDK installation directory. Once this is done, the C++ file, along with the NativeWinClock.h header file and the JNI header files, can be compiled into the DLL using a compiler such as Microsoft Visual C++.
Sadly, we cannot go into more detail about the use of JNI or C/C++, as it is beyond of the scope of the book, but at least we have the compiled DLL and a high-resolution timer.
Using the High-Resolution Timer
When updating the game world based upon real time, we need to determine important parameters based on time. In previous examples where objects have moved about the screen, the movement has been defined in pixels per frame (e.g., the object might have been moving to the left at a rate of 4 pixels each frame—main loop cycle). If the object is going to move in real time, the movement must be defined in pixels over time. So, we can say that an object will move at a rate of 160 pixels per second along the x-axis. This means that if the frame rate is running at 25 frames per second, the object would move 160 / (1000 / 25) = 4 pixels every frame. Of course, the updating of the game world is now running independently of the frame rate, so this is just an observational comparison. We can put this into practice in an example to see the numerical movement of an object using the high-resolution timer. Note that for those of you who cannot use the Windows high-resolution timer, this example will still run, using the StandardClock if the native one is not available, and is still worth a look. Here is the code for the class HiresTimeExample, which must be compiled along with the BaseClock, StandardClock, and NativeWinClock classes. The DLL (if used) can be placed in the same folder as the class files.
Code Listing 12-3: HiresTimeExample
public class HiresTimeExample { public static void main(String[] args) { BaseClock clock = null; if(NativeWinClock.isAvailable()) { System.out.println("Using native clock"); clock = new NativeWinClock(); } else { System.out.println("Using standard clock"); clock = new StandardClock(); } // movement vector defined in pixels per microsecond // 160 and 240 represent pixels per second double xPixelsPerMicrosecond = (double)160 / BaseClock.UNIT_MICROS; double yPixelsPerMicrosecond = (double)240 / BaseClock.UNIT_MICROS; // current position to update with movement double posX = 0; double posY = 0; long elapsedTime; int counter = 0; int secondsCounter = 0; clock.stampTime(); while(secondsCounter<10) // if not passed 10 seconds { // get elasped time elapsedTime = clock.getElapsedTime (BaseClock.UNIT_MICROS); // stamp clock clock.stampTime(); // increase counter counter+=elapsedTime; // update world posX += (xPixelsPerMicrosecond * elapsedTime); posY += (yPixelsPerMicrosecond * elapsedTime); if(counter >= BaseClock.UNIT_MICROS) // if 1 second elapsed { System.out.println("Counter = "+counter); counter -= BaseClock.UNIT_MICROS; System.out.println("Pos = "+posX+", "+posY); secondsCounter++; } try { Thread.sleep(5); } catch(Exception e) {} } } } To begin with, we create the clock we are going to use for timing using the NativeWinClock if available; otherwise we use the StandardClock, which simply uses System.currentTimeMillis. The variables xPixelsPerMicrosecond and yPixelsPerMicrosecond define the amount of pixels an object should travel in one microsecond about the x- and y-axis, respectively, as a basis for real-time movement. Note that there are a thousand milliseconds in a second and a thousand microseconds in a millisecond. The variables xPos and yPos simply store the current position of an object. The reason we have the movement vector values stored in pixels per microsecond is because we are using microseconds as the base for the high-resolution time. Therefore, the object can then be moved by the recorded elapsed time multiplied by the respective x and y movement values, as seen in the code. The code terminates execution after ten seconds. Now take a look at the screen shot of an expected outcome when using the native high-resolution timer:
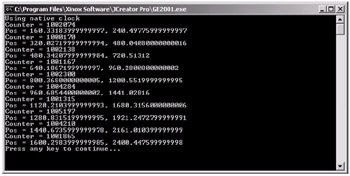
Figure 12-8:
The position of the object is printed to the screen at one-second intervals for a total of ten seconds. Notice that the object's current position is not very accurate at each interval. Should the position after one second not be almost exactly (160, 240) and not (160.33, 240.5) approximately? After all, we are using the high-resolution timer. Well, it is not actually the high-resolution time that is the problem but the Thread.sleep command. By calling the sleep command, the thread will sleep for that duration, or at least roughly that duration, as the sleep is not high resolution. Therefore, during this sleep we cannot test to see if the "one-second lapse" has passed accurately enough. Ideally, we would just remove the sleep command altogether and poll at full speed, checking over and over until the time had elapsed. This is how we may implement a frame rate limiter, by polling the main loop and only updating the game world and rendering when the counter has passed, say, 40 milliseconds. As the main loop is polling without a sleep, the time elapsed check is picked up almost right away. The problem is that Java is a multithreaded language, with (most notably) the garbage collector and the Event Dispatch Thread also needing processor time to run alongside the main loop. So the main loop simply cannot just take over and with "brute force" run forever; the sleep is needed.
It is important to note that the position of our imaginary object is being updated at great accuracy with the high-resolution timer in the previous example, so that is nothing to worry about.
|
|
EAN: 2147483647
Pages: 237