Tuning for Maximum Performance
| In this section you'll learn some specific settings you can make to tune Windows for peak performance. Of course there are always trade-offs to be made, and you'll have to make personal judgments as to whether a feature is worth its cost in computer time, or whether it should be disabled to gain speed, or whether you should spend more money to speed your computer with better hardware, or gain speed through software settings and feature sacrifices. Installing Sufficient Memory (RAM)The most important thing you can do to make sure your computer runs at top speed it to make sure that you have enough main memory (RAM) installed. Here's why: Windows uses a system called virtual memory to let applications use as much memory as they want, even if they want to use more memory than the system has available. The shortfall is made up by using space in a hidden disk file called the page file to store data that won't fit into main memory. When a program wants more memory than is currently free, Windows freezes the application, finds a block of memory that hasn't been recently accessed, writes its contents to the page file ( pages it out ), and then lets the frozen application use this block of memory. When the application whose memory got shuffled off to the disk drive gets its turn to run again, and tries to read or write to the memory block that got taken away, Windows has to repeat the process, shuffling some other application's memory off to disk and paging the first application's data back in. This decades-old technique lets multiple applications share limited memory, lets an application run even if it needs more memory than the computer has, and it's been made as efficient as possible, but it has a cost: Reading and writing to the hard disk is thousands of times slower than reading or writing data from RAM. Each time Windows has to stop to move memory in or out of the page file, it delays the frozen application by several tens of milliseconds at least, and if this happens several dozen times a second, the application slows to a crawl. There's even a technical term for this: thrashing , which means expending a lot of effort and getting little done. If you ever used Windows 95 or 98 on an old computer with 32MB of memory, you know well what this is like. And even a current computer with 512MB of memory can start thrashing if you load in a big video clip for editing. The good news is that even while Windows and applications have bloated to the point that they require hundreds of megabytes just to boot up, memory has gotten so cheap that there's virtually (ha!) no reason to suffer with a computer that's having to page data to disk. How Much Memory Is Enough?So how much memory is enough? You can actually do some calculations to find out. After going through a demanding work session, type Ctrl+Alt+Del to open the Task Manager, and view the Performance tab. Under the graphs are some numbers the list amounts of memory in K (thousands of bytes). This is what they mean:
Now, here's how to use these numbers:
Here's an example. From my computer, I recorded the following numbers:
The interpretation is:
Now, if my computer had only 512MB (524,288K) of memory installed, the results would have been different:
In this case, the indication would be that I would have to add at least 192MB of memory to prevent memory paging from slowing me down. You can live with some paging, of course, but it definitely drags performance down. This is why, despite Microsoft's recommendation of a 256MB minimum, 512MB is a functional minimum memory size for Windows XP. Placing the Page FileIf the preceding calculation shows that you need to increase the size of your page file, consider where you should put the page file for best performance. Paging needs to be as fast as possible. You can configure Windows to put page files on more than one drive, and you can set maximum and minimum page file sizes or let Windows manage the size automatically, as discussed earlier in this chapter. Here are the things you should consider to make the most efficient page file setup:
Defragment the DiskAnother key factor in achieving top performance is the speed at which data can be moved between your computer's CPU and its hard disk. Having the latest high-speed disk interface hardware won't help you if your files and data are widely scattered across the disk. Disk data gets scattered, or fragmented, over time, and to maintain peak disk performance, you should periodically run a disk defragmenting utility. Windows XP comes with a defragmenting tool that is discussed under "Defragmenting for Greater Speed" in Chapter 5. However, it's not the sharpest knife in the drawer , so to speak, and you can get much better disk performance improvements if you buy a better "defragger" and run it on a regular schedule. Check out Raxco's PerfectDisk (www.raxco.com) and Diskeeper Corporation's Diskeeper (www.diskeeper.com, with just one k).
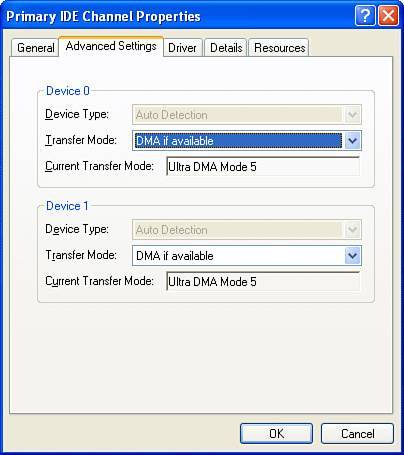
Note To help Windows XP meet its goal of keeping its boot time under 30 seconds, there is a special service that automatically runs every few weeks or so, which identifies the files Windows uses when it boots, and reorganizes them on the disk so that they're placed in the order in which they're used, in consecutive unfragmented disk blocks. This helps reduce boot time but doesn't speed up subsequent disk operations. Disk Interface TuningHaving data neatly organized on disk won't help if the pipeline between the disk and the CPU is restricted. Hard drives can achieve the highest transfer rates if they transfer data directly into the memory on your motherboard using Direct Memory Access (DMA), but they can be prevented from doing this if they share a controller cable with a slower Zip Disk, optical, or other ATA disk device. To verify that your disk drives are using DMA transfers, log on as a Computer Administrator, right-click My Computer and select Manage, and open the Device Manager. Select View, Devices by Connection and locate the entries for any IDE-type disk controllers. You will have to open the items in the tree view to find them (see Figure 6.28). Figure 6.28. Verify that your disk controller channels are using DMA. Find the channel entry that connects to your Windows hard drive, such as "Primary IDE Channel"; double-click it and select the Advanced Settings tab, shown in Figure 6.30, and examine the Current Transfer Mode for each device. Disk devices should be using a DMA mode, not Programmed I/O (PIO), which requires the CPU to intervene in transferring every byte to and from the device. Higher DMA transfer modes are faster. Transfer modes and rates for standard parallel ATA devices are listed in Table 6.6. If a disk is listed as using a mode that is slower than the disk drive's peak transfer rate, you may have incorrectly arranged or cabled disks, or an inadequate disk controller. Table 6.6. IDE Disk Transfer Modes and Rates
Repeat this check for any other channels that connect to hard drives. If DMA transfers are prevented by a slower device on the same channel as a disk, you may want to reconfigure the hardware so that slower devices are on a separate channel. What to Enable and DisableEarlier in the chapter you read about ways to eliminate unwanted startup programs run when you log on and when you start Internet Explorer. In addition, you can disable some Windows services and graphical functionality to gain additional performance. There aren't many such items that make the trade-off worthwhile, but we'll cover a few of them here. Graphical NicetiesYou can make Windows' responses to menu operations somewhat snappier by disabling some of the shading, shadows, and smooth scrolling features that have crept into the Windows user interface. You can see a list of optional graphical effects in the Display Properties dialog, Settings tab, and Effects button, and the TweakUI PowerToy discussed earlier in this chapter also has check boxes that you can use to disable graphics effects. On my computer, I've disabled the fade-in of pop-up submenus, which occasionally seems to take more time than I would like it to, and font smoothing, which I personally don't like. Unnecessary ServicesYou can eke out some small gains in performance by disabling system services that aren't necessary. This will decrease the time it takes Windows to boot, will free some memory (usually not enough to have been worried about), and will prevent these services from running and taking CPU cycles away from your interactive work. The only truly egregious CPU and disk hog in the Services list is the Indexing service. If you don't use the search for keywords within files option in the standard Windows Search utility, or if you use a more advanced search tool like Google Desktop Search instead, you can disable the Indexing service using the Services management utility discussed earlier in the chapter. If you do need to use the Indexing service because you use search functions in web pages hosted by Internet Information Services on your computer, you can restrict Indexing Service so that it searches only web content and not your entire disk. As a Computer Administrator, open the Computer Management window, open the Indexing service entry under Services and Applications, and dig down to System, Directories. Delete the entry for C:\ and for any other drive root folders. This will prevent the indexing of your disks for general searches. Leave the other entries, and all entries under the web branch, alone. If you installed the Internet Information Services (IIS) web server suite out of curiosity but don't use it, this is another candidate to be disabled. |
EAN: 2147483647
Pages: 128
- Chapter III Two Models of Online Patronage: Why Do Consumers Shop on the Internet?
- Chapter VII Objective and Perceived Complexity and Their Impacts on Internet Communication
- Chapter VIII Personalization Systems and Their Deployment as Web Site Interface Design Decisions
- Chapter IX Extrinsic Plus Intrinsic Human Factors Influencing the Web Usage
- Chapter XI User Satisfaction with Web Portals: An Empirical Study