Intensify Action
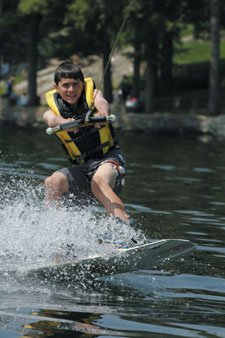
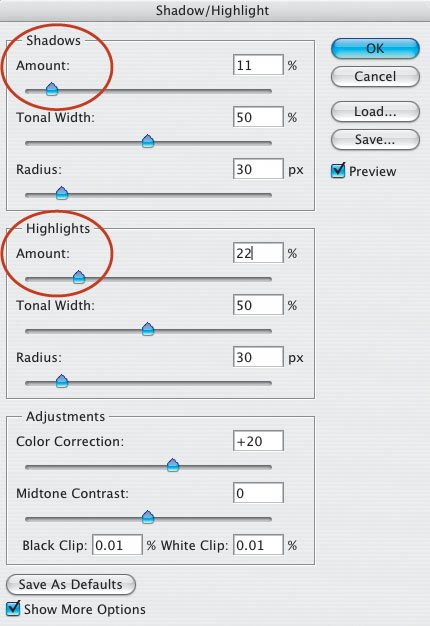
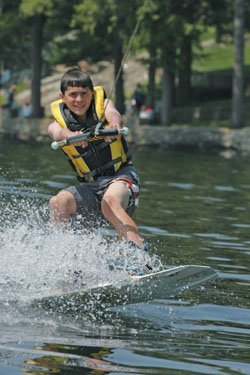
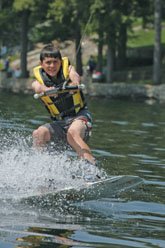
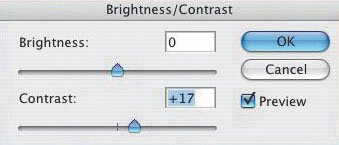
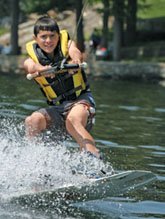
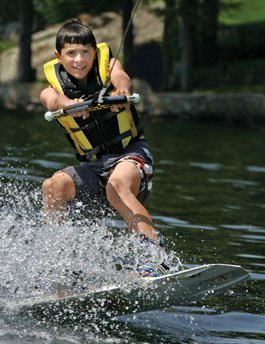
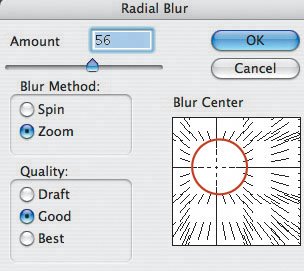
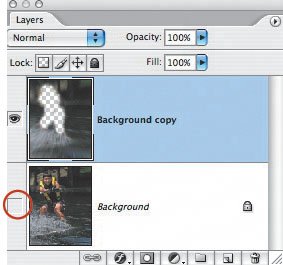
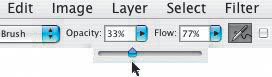
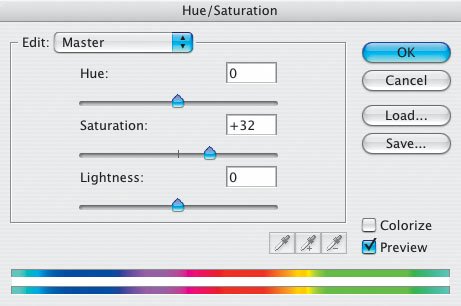
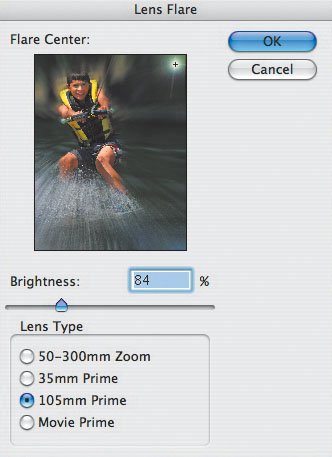
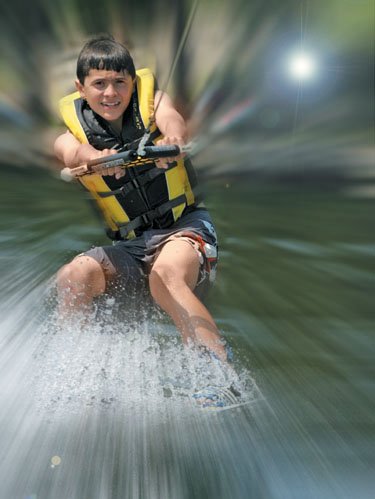
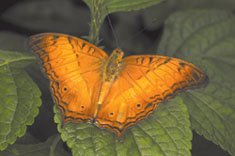
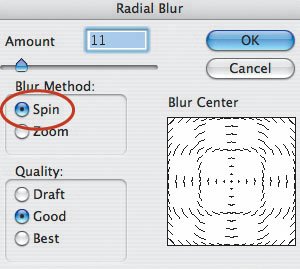
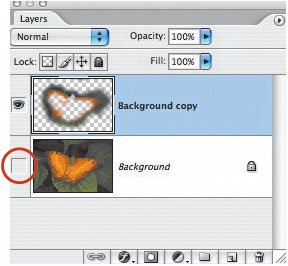
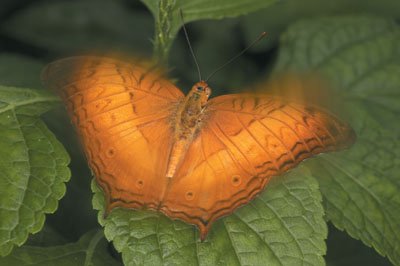
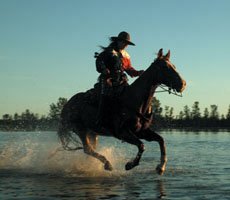
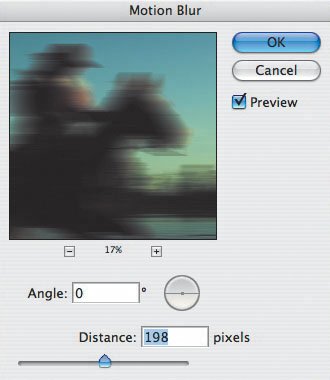
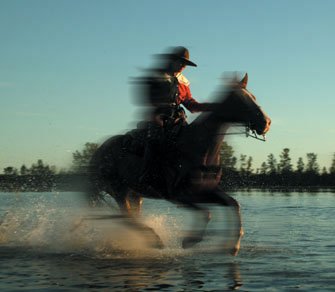
| Getting a good sports action shot of a subject moving at relatively high speed requires choosing the correct shutter speed, selecting the correct aperture, carefully focusing and composing the picture, and then releasing the shutter at precisely the correct moment (or selecting rapid frame advance for a series of shots with the hope of getting a few keepers). Having followed the correct techniques, I captured the opening picture for this lesson. (Hey, I know it needs some work! That's why I'm using it!) I'll begin by presenting some conventional digital enhancements of the picture, because that's part of the creative process (usually the first part). Then, you'll learn how you can intensify the action in a picture. Sounds like fun. Let's go! Here's a straight out-of-the-camera shot of Marco wake boarding (Figure 4.80). Figure 4.80.Tech info: Canon EOS 1D Mark II, 100-400mm IS lens @ 320mm. Exposure: 1/500 sec. @ f/8. ISO 400. To independently darken the shadow areas of the picture and lighten the subject, I used the Shadow/Highlight control (Image > Adjustments > Shadow/Highlight) (Figure 4.81). Figure 4.81. Now Marco's face is brighter (Figure 4.82). You'll also notice that the picture is cropped. After opening a picture, saving it, and working only on a copy of the picture (you should never work on an original), it's a good idea to crop it. That way, when you're experimenting with adjustments, areas of the picture that you'll eventually crop out won't influence those adjustments. So, I cropped the picture as my first step. Figure 4.82. Marco has a nice tan on his lower arms and legs, but not where his t-shirt and shorts covered his body while he was in the sun. I thought it was time to give him an even tan. To do that, I first selected the Eyedropper tool and clicked the tanned part of his leg. Doing so set the Foreground Color to the tanned skin tone (Figure 4.83). Figure 4.83. The next step was to add a color layer, just as I did in the previous lesson. (I needed to add a color layer because I couldn't color (paint) directly on a layer without blocking out details.) Next, I selected a brush from the Tool Bar and painted in the tan color on the lighter part of the boy's arms and legs. After giving the boy a tan, I flattened the layers (Layer > Flatten Image). The picture was a bit flat (Figure 4.84). So, I boosted the Contrast (Image > Adjustments > Brightness/Contrast) to liven up the image (Figure 4.85). Figure 4.84. Figure 4.85. Check out how the image looks after the boost in contrast (Figure 4.86). This is an improvement over simply using the Shadow/Highlight command. Figure 4.86. I wasn't done with my basic enhancements. Next, I used the Burn tool to darken parts of the background and the Dodge tool to lighten Marco's face (even zooming in to lighten the white area of his eyes and his teeth). I also used the Clone Stamp tool to remove some of the distracting background objects (Figure 4.87). Figure 4.87. To intensify the action of the picture, I first made a duplicate layer. Then, I applied the Radial Blur filter (Filter > Blur > Radial Blur), with the Zoom Blur Method selected, to the duplicate layer (Figure 4.88). I moved the center point of the blur directly over the point in the image area where Marco was positioned. Figure 4.88. Next, I selected the Eraser tool and erased the blur over his body on the top layer (Figure 4.89). To see if I was doing a good (or bad) job with my erasing, I turned off the bottom layer by clicking the eye icon on that layer (Figure 4.90). As you can see, I needed to do more work! Figure 4.89. Figure 4.90. The key to getting a smooth transition between the clear area and the blur area is to reduce the opacity of the Eraser tool on the Menu Bar as you move outward from the center of the subject (Figure 4.91). That reduction makes the transition between the blurred and sharp areas less noticeable. Figure 4.91. Next, I used another traditional enhancement: I increased the Saturation (Image > Adjustments > Hue/Saturation) (Figure 4.92). Figure 4.92. Here's the result (Figure 4.93). Compare this image to the opening image in this lessonthat's a big difference. Figure 4.93. Continuing on my creative explorations for this image, I imagined a sunburst behind the subject. I use the Lens Flare filter (Filter > Render > Lens Flare) to create the effect of the sun shining through the trees in the background. With the Lens Flare dialog box open, I positioned the point of light by clicking it and then dragging it around the frame (Figure 4.94). Figure 4.94. Finally! Here's the result of all that working and playing in Photoshop (Figure 4.95). Figure 4.95. Hey, I know it's not nice to fool Mother Naturein this case, placing the sun behind a front-lit subject. If I were submitting a picture for publication to the North American Nature Photography Association (www.nanpa.org), where honesty and integrity are important, I wouldn't do that. But I'm just having fun here. Earn Your Photoshop WingsLet's move on to adding just a touch of action to an image, this time using one of my butterfly photographs (Figure 4.96). My goal was to create the effect that the butterfly was just beginning to move its wings to take off. Figure 4.96.Tech info: Canon EOS 1Ds Mark II, 50mm Macro lens. Exposure: 1/60 sec. @ f/16. ISO 200. As I did previously, I first created a duplicate layer. To it I applied the Radial Blur filter. In the Radial Blur dialog box, I selected Spin as the Blur Method. I played around with the Amount value to see which degree of the spinning effect I liked (Figure 4.97). Figure 4.97. As before, I selected the Eraser tool; then I erased the blur effect over most of the image. I left just a touch of blur on the leading edge of the butterfly's wings. Again, it's a good idea to turn off the bottom layer by clicking the eye icon to check on your erasing skills (Figure 4.98). Figure 4.98. The blur is very subtle, but that was my goal in this case (Figure 4.99). In the next example, I'll be a little more extreme. Figure 4.99. Saddle Up for More ActionTo freeze the action in this photograph, I used a shutter speed of 1/500 of a second (Figure 4.100). I like the picture, but I wanted to see how intensifying the action would affect the image's impact. Figure 4.100.Tech info: Canon EOS 1D Mark II, 100-400mm IS lens @ 400mm. Exposure: 1/500 sec. @ f/8. ISO 400. Once again, I applied a Blur filter to a duplicate layer, but this time I selected Motion Blur instead of Radial Blur. In the Motion Blur dialog box, I set the Angle to 0° because that was the angle at which the horse and rider were moving in my picture. I set the Distance to 198 pixels to create a dramatic effect (Figure 4.101). Then I carefully erased the area on the top layer where I didn't want any blur. Because the horse and rider were moving left to right in the frame, I erased the blur in the background and foreground and on most of the horse and rider's body, leaving only a speed trail behind them. Here's the final result (Figure 4.102). Figure 4.101. Figure 4.102. Now it's your turn to have some fun. Get moving! |


EAN: 2147483647
Pages: 72