Hand-Color a Black-and-White Image
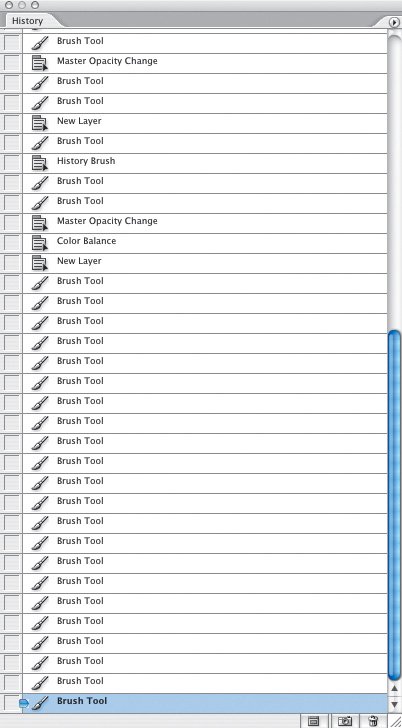
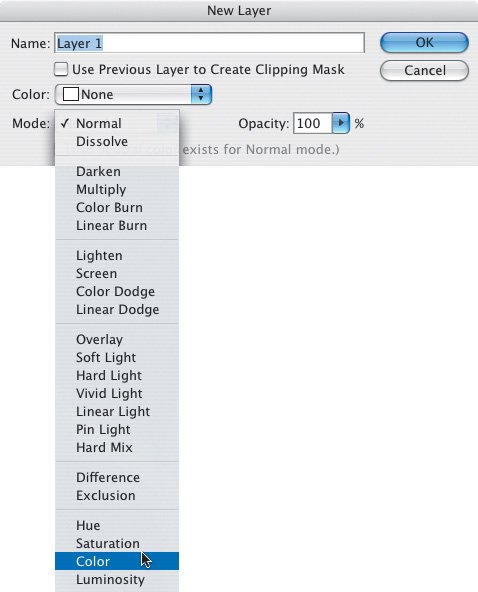
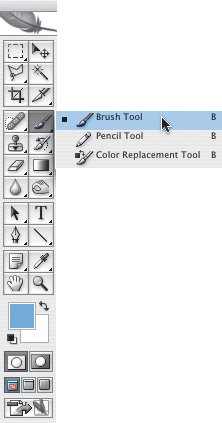
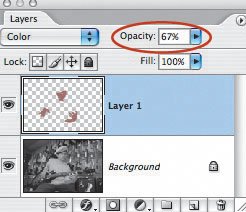
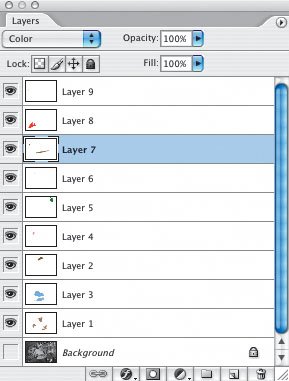
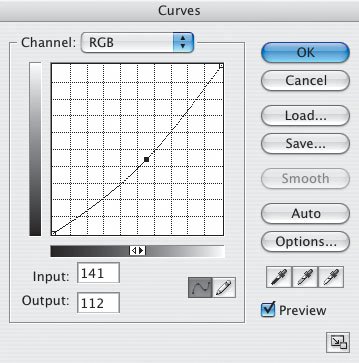
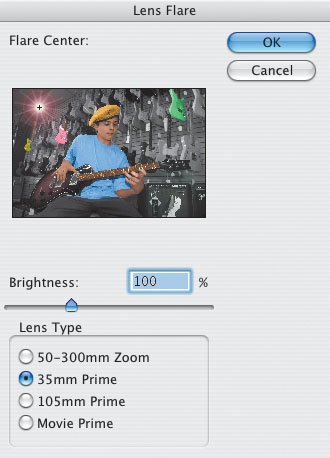
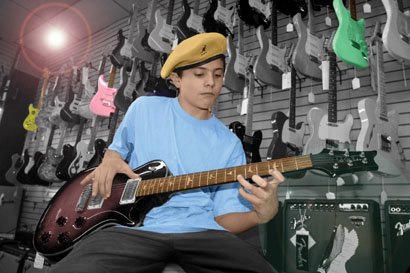
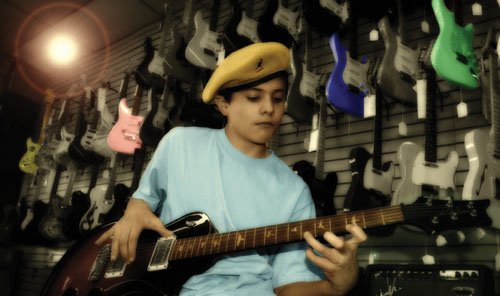
| When I was kid, my mother hand-colored my dad's black-and-white photographs using a fine brush and small tubes of oil paint. Before my eyes, grayscale images that had been developed in our basement darkroom were turned into colorful, artistic, one-of-a-kind creations. In Photoshop CS2, you can simulate the popular and satisfying hand-coloring technique of the 1950sbut more quickly, and with endless colors from which to choose. Plus, if you make a mistake, you can fix it immediately by using the History palette to go back in time. What's more, even after you finish your masterpiece, you can repair a mistake or change your mind about a color by deleting a color layer and adding a new one. Before you begin exploring these techniques, a word of advice: Try them when you have plenty of time. Put on some music. Relax. Enjoy the process. Let your creative juices flow. For this lesson, I'll use a picture I took of my son, Marco, playing a guitar in a local music store (Figure 4.63). Although it looks like a grayscale file, it's actually an RGB file taken with my digital SLR set to the black-and-white mode. Note that you must work with an RBG or CMYK file when you're hand-coloring; adding a color layer isn't an option when you work on a true grayscale file. Figure 4.63.Tech info: Canon EOS 1Ds Mark II, 16-35mm lens. Exposure: 1/30 sec. @ f/5.6. ISO 800. My first step in this process, as it is in any process that involves many steps, was to increase the number of History States in Photoshop's Preferences (Photoshop > Preferences > General). I entered 300 in the History States field (Figure 4.64). I went a little nuts here, because I knew I was going to spend a lot of time on the image. Figure 4.64.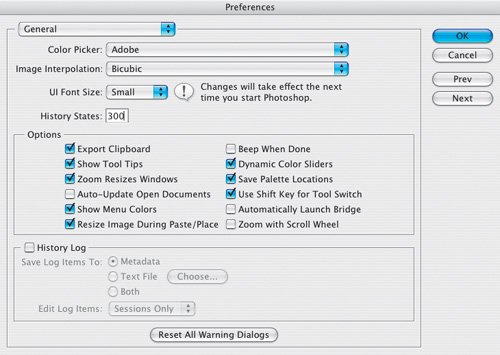 Once my History States were set, I opened the History palette (Window > History) so I could keep track of each step and go back if necessary. My History palette looked like this after I worked on the image for just a few minutes (Figure 4.65). Figure 4.65. Here's the key to hand-coloring a picture: I added a color layer by choosing Layer > New > Layer, and, in the New Layer dialog box that appears, selecting Color from the Mode pop-up menu and leaving the Opacity at 100% (Figure 4.66). If you try to paint on a standard layer, you'll cover all the detail in the area you paint over. Now the color layer was on top of the Background layer in the Layers palette. It looks blank at first; it only has color in it when you paint in the color. Figure 4.66. Next I selected a brush from the Tool Bar (Figure 4.67). I used the bracket keys on my keyboard to make the brush smaller (left bracket key) or larger (right bracket key). Figure 4.67. It was almost time to start hand-coloring my picture. I knew that getting the color for the face would be a challenge. Here's how I did it. I opened another picture of Marco and used the Eyedropper tool in the Tool Bar to pick up the color from his face in that picture (Figure 4.68). The foreground color was now set to the color of my son's face. Figure 4.68. The color wasn't exactly right, just as a skin tone from one of your pictures may not be perfect for use in another one (Figure 4.69). Applied to this image, the color of the skin was too saturated and too dark, and it needed a touch of yellow. Figure 4.69. I fine-tuned the chosen color by reducing the Opacity of the color layer and by adjusting the colors in the Color Balance window (Image > Adjustments > Color Balance) (Figures 4.70 and 4.71). After I played around with these adjustments, the skin color was more natural, as you'll see in a bit. Figure 4.70. Figure 4.71. With the skin tone dialed in, I began to hand-color the picture. After I finished hand-coloring my son's face and arms, I clicked the Foreground Color at the bottom of the Tool Bar to open the Color Picker, from which I chose my color (Figure 4.72). Then, I colored the guitar he was holding, his beret and shirt, and some of the guitars on the wall. Figure 4.72.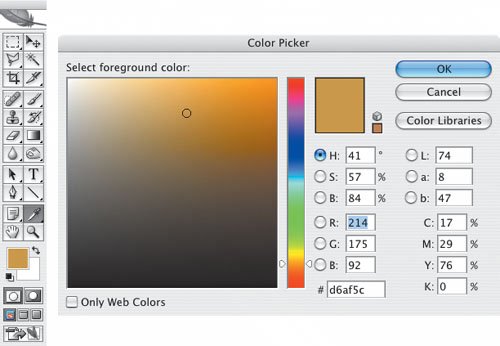 Tip You can also choose a color from the Swatches palette (Window > Swatches). You should keep the Layers palette open as you work. As you can seeand this is importanteach color is on a different layer (Figure 4.73). If you change your mind about a color or make a mistake, you can trash that layer and create a new color layer without affecting the other colors and layers of your picture. Figure 4.73. In the previous screenshot, you may have noticed that the eye icon on the Background layer (bottom layer) was turned off. Turning off that layer from time to time is a good idea because you can see whether you're doing a good job of hand-coloring your pictureor whether, as in this case, more work needs to be done (Figure 4.74). Figure 4.74. After completing my hand-painting process, I thought the picture looked too bright. So, I used Curves (Image > Adjustments > Curves) to darken the image by pulling down the Curve from the midpoint (Figure 4.75). Figure 4.75. Here's my almost-finished image (Figure 4.76). I share this with you for the reason I stress repeatedly to my workshop students (and in this book): A picture is never finished in Photoshop, because there are endless creative possibilities. Figure 4.76. My next step was to use Lens Flare (Filter > Render > Lens Flare) to simulate a bright light on the boring ceiling (Figure 4.77). Then, to reduce the brightness of the annoying white tag on the neck of the guitar, I selected that area with the Magic Wand tool on the Tool Bar and filled it with gray. Figure 4.77. On the next page is my final hand-colored image (Figure 4.78). I wonder what my mother would think? Figure 4.78. I've also included another version that I ran through the Midnight filter found in Nik Software's Color Efex Pro 2.0 (Figure 4.79). This picture is probably more to my son's likingit looks as though he's playing in a way-cool guitar store with the lights turned down low. Figure 4.79. |


EAN: 2147483647
Pages: 72