Using the Permission View Tool
|
Configuring the environment to support an assembly properly is just fine if you know what the assembly needs. However, you may never meet the network administrator who adds your application to a network environment. This lack of communication can cause problems because the network administrator might not have any clue as to what your program needs. (This is another good reason to declare security requirements in your code.) Fortunately, the Permission View Tool (PermView.EXE) can help.
The Permission View Tool meets two different needs. First, you can use it to detect PermissionSetAttribute declarations such as the ones shown here:
// Security declarations. [assembly:PermissionSetAttribute(SecurityAction.RequestOptional, Name=”FullTrust”)] [assembly:PermissionSetAttribute(SecurityAction.RequestMinimum, Name=”Execution”)] [assembly:PermissionSetAttribute(SecurityAction.RequestRefuse, Name=”SkipVerification”)]
Second, you can use the Permission View Tool to check the declarative security within a program. Listing 4.4 shows a simple program containing declarative security. (You can find this code in the \Chapter 04\C#\Declarative or \Chapter 04\VB\Declarative folder of the source code located on the Sybex Web site.)
Listing 4.4 Using Declarative Security Definitions
[System.Security.Permissions.FileIOPermission(SecurityAction.Deny, All="C:\\Temp.txt")] private void btnDeny_Click(object sender, System.EventArgs e) { Stream FS = null; // A test file stream. // Try to access the file. try { FS = new FileStream("C:\\Temp.txt", FileMode.Open, FileAccess.Read); } catch(SecurityException SE) { MessageBox.Show("Access Denied\r\n" + SE.Message, "File IO Error", MessageBoxButtons.OK, MessageBoxIcon.Error); return; } // Display a success message. MessageBox.Show("File is open!", "File IO Success", MessageBoxButtons.OK, MessageBoxIcon.Information); // Close the file if opened. FS.Close(); } [System.Security.Permissions.FileIOPermission(SecurityAction.Assert, All="C:\\Temp.txt")] private void btnAllow_Click(object sender, System.EventArgs e) { Stream FS = null; // A test file stream. // Try to access the file. try { FS = new FileStream("C:\\Temp.txt", FileMode.Open, FileAccess.Read); } catch(SecurityException SE) { MessageBox.Show("Access Denied\r\n" + SE.Message, "File IO Error", MessageBoxButtons.OK, MessageBoxIcon.Error); return; } // Display a success message. MessageBox.Show("File is open!", "File IO Success", MessageBoxButtons.OK, MessageBoxIcon.Information); // Close the file if opened. FS.Close(); } Declarative syntax relies on attributes. The attributes can appear at the assembly, class, or member levels, and they can request, demand, or override the security options currently in place. Applications use requests to change their current security settings. A request can ask for more or less access to objects. Demand and overrides appear within library code. A demand protects the object from caller access, while an override changes the default security settings.
| Note | Even if you include declarative security in your program, it can never request more rights than the network administrator is willing to allow. In short, if the network administrator decides to deny access to the C drive, then your program can’t access it even if it makes the request. Using declarative security does make it easier for the network administrator to know your application needs and means that the application will fail immediately, rather than later when the system can meet specific security needs. |
The btnDeny_Click() method in Listing 4.3 will always fail because the FileIOPermission attribute it set to deny all access to the file. The Assert() or Demand() methods would allow access to the same file (the example uses the Assert() method). As you can see, the result of this code is that CLR protects the TEMP.TXT file, even if the user would normally have access to it. This is an example of how CLR can transcend the limitations of the operating system when conditions are right.
The Permission View Tool won’t locate imperative security entries. For example, you can’t use it to locate a security demand such as the one shown here:
public FrmMain() { // Required for Windows Form Designer support InitializeComponent(); // Demand that users have the FileIOPermission. FileIOPermission RequiredIO; RequiredIO = new FileIOPermission(FileIOPermissionAccess.AllAccess, @”C:\”); RequiredIO.Demand(); } This imperative security entry demands access to the C drive. The application will fail if the environment doesn’t meet the need. However, the Permission View Tool won’t display this entry for the network administrator because imperative security doesn’t appear within the assembly manifest in a manner that allows access.
You can use the Permission View Tool in several ways. In general, you’ll want to output the results to a text file for easy viewing in a program such as Notepad, so you’ll always want to include the /Output argument. Type PermView /Output OutputFileNameExecutableName at the command prompt to detect just the assembly level security information (where OutputFileName is the name of the text file you want to create and ExecutableName is the name of the executable file, such as Declarative.EXE). Figure 4.3 shows the assembly level output for the example in this section.
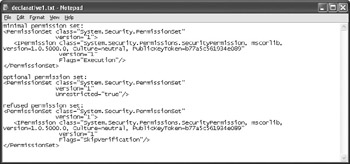
Figure 4.3: Add assembly level information to your application for general security needs.
The output file contains a plain text header, followed by XML entries for each security requirement. Notice that the Permission View Tool outputs three sections of information:
Minimum Permission Set Contains the minimum rights the program can accept for normal execution. The program must have these to do anything at all, even if it’s at a reduced operating level.
Optional Permission Set Defines the rights the program would like to have, but doesn’t necessarily need. Your program may need these rights to perform ancillary or enhanced functionality tasks.
Refused Permission Set Includes all of the permissions that the operating system could bestow on the program, but you don’t want the program to have. For example, you might not want the program to have the right to skip verification or allow the user to access the program from the Internet.
When you want the output file to also include all of the declarative security information, you need to include the /Decl argument. In this case, you’d type PermView /Decl /Output OutputFileNameExecutableName at the command prompt. Figure 4.4 shows the output from the example in this section.
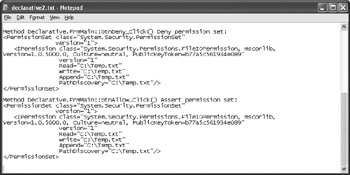
Figure 4.4: Include declarative elements in your code when you want to control access to individual elements.
This file contains all of the same information as the file in Figure 4.3, but it also contains the additional declarative security shown in Figure 4.4. Every method or other element that includes some kind of declarative security appears in this list. Using declarative security lets you define how users can access individual methods within a class or use properties. The Permission View Tool helps the network administrator understand how you’ve set security so that any new security conditions can work with, instead of against, the program.
|
EAN: 2147483647
Pages: 168