Managing a Website in Dreamweaver
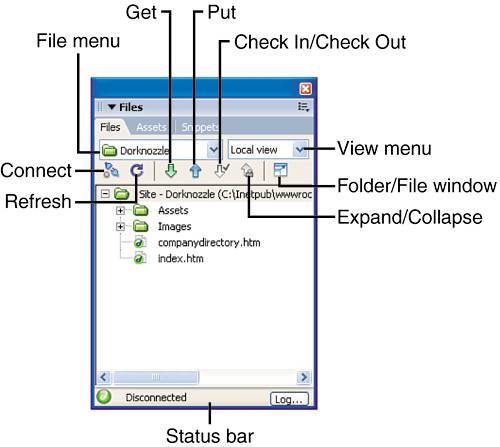
| Defining a site is the first step to managing a website within the framework of Dreamweaver. Now that you've learned about the site definition features built into both the Basic and Advanced screens, let's take a look at the features built into Dreamweaver to help you manage your website. Managing a site in Dreamweaver begins with the Files panel. Shown in Figure 4.20, the Files panel outlines folders and files in your defined site, allows you to manipulate filenames and placement as you would be able to within your operating systems file explorer, features views for local, remote, and testing server, allows you to quickly Get and Put files, and even check out files if working in teams. Figure 4.20. The Files panel outlines various features for working with a defined site.
A complete list of features outlined within the Files panel is detailed here:
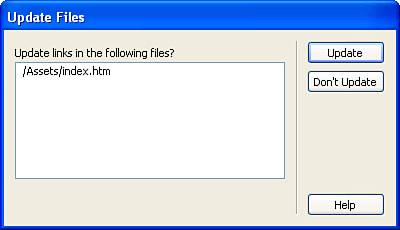
Now that you've seen the feature list in this panel, let me offer a taste of the power behind site management in Dreamweavermore specifically, link validation. To see this in action, try selecting an important file from our list (such as index.htm) and drag it into the Assets folder. Immediately, the Update Files dialog appears similar to Figure 4.21. Figure 4.21. Dreamweaver detects that a file is being moved to a new folder and immediately asks you to update all references to and from that file.
As you can see from the dialog, Dreamweaver detects that you're trying to move a file from one location to another. Because references exist to and from that file, Dreamweaver detects this and asks you to update all files that make references to and from index.htm. Because all these files assume that index.htm is in the root directory, if this feature didn't exist, references to this file would be broken or we'd have to manually open all files in our site, search for all references on each page, and manually correct them. By clicking the Update button, Dreamweaver scans all the files in the list and fixes all the references to and from that file automatically. To move the file back to the root, simply drag it back from the Assets folder into the root of the defined site. The same process of detecting and fixing the references occurs. CAUTION After you've defined a site, it's important that file movement be done through the Site File list as opposed to the operating system's file explorer. Doing so ensures that file references are automatically updated by Dreamweaver. If you move files using the operating system's file explorer, Dreamweaver never gets a chance to detect reference changes and you'll ultimately end up with broken links/references in your files. Of course, this is only the tip of the iceberg. You can see more options available from the Site Management window by selecting the Expand/Collapse icon to expand the Files panel into the Site Management window. As you can see from the callouts in Figure 4.22, new features become available. Figure 4.22. The Site Management window provides advanced features for managing a defined site.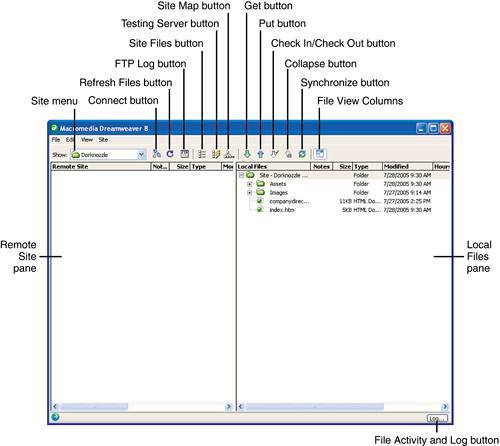 The list of new features is highlighted here:
Also notice the file view columns we configured when we defined the site. As you can probably tell from Figure 4.22, our Checked Out By column is hidden. If you decide that you want to view the column again, you can revisit the File View Columns category for the defined site by simply choosing the File View Columns option from the View menu. Uploading Files to a Remote ServerAlthough the Site Management window includes advanced features for managing your defined site, its true power lies in the fact that it's actually a built-in FTP client. Because this is the case, we can easily connect to our remote server and transfer files by simply dragging from the local pane and dropping the files into the remote pane. Although it's possible that you might not have a remote server defined, I'll attempt to demonstrate the functionality here:
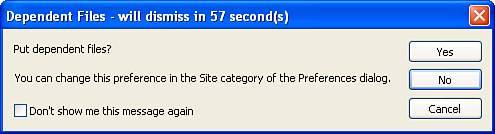
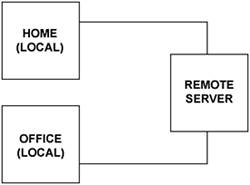
Of course, the reverse process (selecting files from the Remote Site pane and dragging them into the Local Files pane) is also possible. For the simplicities this built-in FTP client offers, it's still somewhat of an involved method. The next section introduces you to the same process of transferring files, but this time we'll use the Get and Put options. Getting and Putting FilesThe downside to using the Site Management window is that you have to manually connect to your remote site and then drag and drop files over. Its distracting to your workflow because you have to expand the site management window first, essentially taking you away from your work. A simpler method of transferring files from your local computer to your remote computer is that of getting and putting files. By using the Get and Put (Ctrl+Shift+D and Ctrl+Shift+U) options located in the File Management submenu in the Document bar, you can easily transfer files you are working on to and from your remote server with the simple click of a button. As an example, I'll open the index.htm file. Next, I'll select the Put option from the File Management submenu in the Document bar, as shown in Figure 4.25. Figure 4.25. Use the Put option to quickly transfer an open file without disrupting your workflow.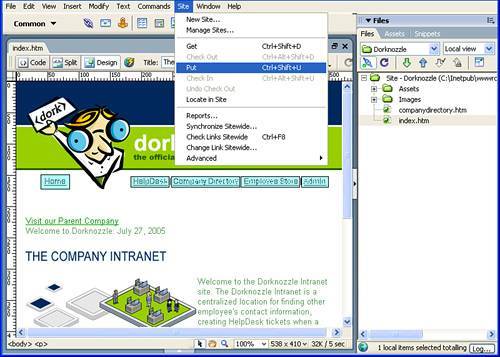 As you'll notice, Dreamweaver automatically connects to your remote server and then presents the same dialog asking if you want to upload dependent files. Choosing Yes uploads index.htm as well as all files associated with index.htm. Also, Dreamweaver remains connected to your remote server. You can see that this is the case by the green connect icon in the Files panel. Of course, you can use the Get and Put options directly from the Files panel as well. By simply selecting a file and clicking the Put icon (represented by the up arrow button) in the Files panel, the same functionality can be achieved. Synchronizing Local and Remote FilesAlthough it's great to be able to transfer files from your local computer to your remote computer, the truth is, most people work in an environment where a local computer can actually be represented by two computers. In this scenario, keeping accurate folder and file structures between two local computer instances can be extremely difficult. For instance, earlier in the chapter I used the example of having two working locations. Assuming that you do work at home and at the office, you would have two local computers: One for your office and one for your home (see Figure 4.26). Figure 4.26. Your workflow could be such that you work from home and the office.
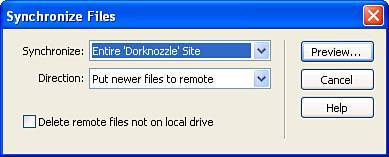
You could potentially do work from home, upload your files to the remote server, go to the office, do some more work, and then accidentally upload over files you had done work on from home. To prevent any such disasters from occurring, use the site synchronization feature built into Dreamweaver. Available from either the Files panel menu or the Site menu when the Site Management window is expanded, the Synchronize Sitewide option launches the Synchronize Files dialog similar to Figure 4.27. Figure 4.27. The Synchronize Files dialog facilitates the synchronization process between the local and remote computers.
The Synchronize Files dialog displays the following features:
Because I've uploaded only the index.htm file and associated images, I'll choose the Entire "Dorknozzle" Site option from the Synchronize menu, choose the Put Newer Files to Remote option from the Direction list, and click Preview. Dreamweaver then scans the folder and file structure on both the local and remote computers, compares the two, and then presents a list in the Synchronize window, similar to Figure 4.28, of newer files that need to be uploaded to the remote computer. Figure 4.28. Dreamweaver presents a list of newer files that need to be transferred.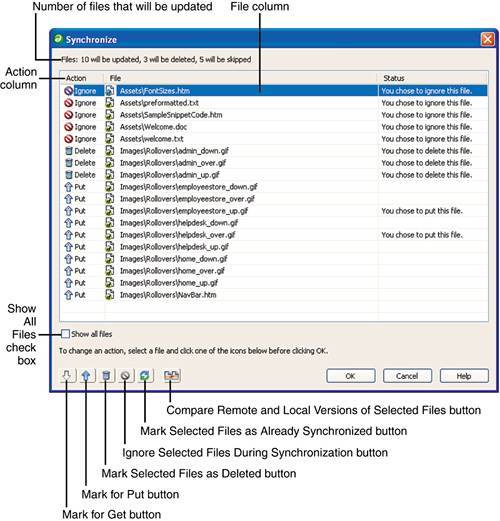 As you can see from the callouts in Figure 4.28, the Synchronize window includes numerous features for managing the synchronization of files including:
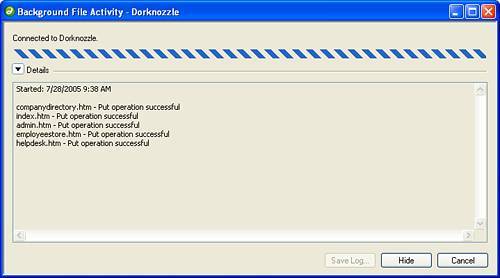
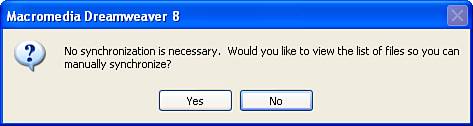
When you're happy with the options in the Synchronize window, click OK to begin the update. Immediately, the Synchronize window closes and the Background File Activity window opens displaying the status of the transfer. When the update completes, click the Close button to close the Background File Activity window. To see the successful transfer of files, try running the site synchronization feature one more time. This time when you run it, a dialog stating that a synchronization is not necessary appears similar to Figure 4.29. Figure 4.29. If no synchronization is necessary, a dialog stating that appears.
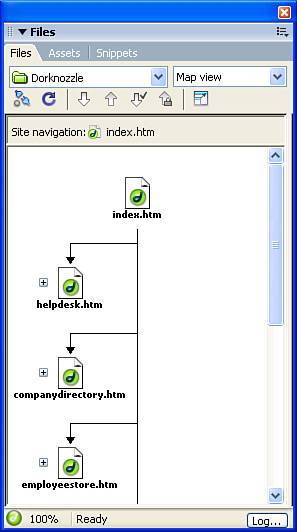
Cloaking FilesCloaking files is the process of hiding files from typical Dreamweaver operations such as global find and replace, site synchronization, and so on. For instance, you might decide to keep original Photoshop PSD files, Fireworks PNG files, Illustrator AI files, Flash FLA files, and so on in your Assets folder. Although files such as these are important to the overall design of your site, they serve little purpose in terms of how your pages function. In this situation, you might want to cloak the entire Assets folder to speed up search features such as site synchronization (Dreamweaver simply ignores anything that is cloaked). Cloaking files in Dreamweaver is easy and can be done directly from the Files panel. Simply select the folder (I'll choose the Assets folder), right-click it to access the context menu, choose the Cloaking option, and select Cloak. After you've cloaked the folder, the icon changes to a green folder with a red line through it to visually remind you that the folder is cloaked. You can also use the Files panel Options menu to cloak and uncloak files. Let's use this method to uncloak the Assets folder: Select the Assets folder, click the Files panel Options menu, and choose Site, Cloaking, Uncloak. If you perform the site synchronization operation while the Assets folder is cloaked, the Assets panel is excluded from the search. Of course, you can also cloak all files with specific extensions by checking the Cloak Files Ending With option in the Cloaking category of the Site Definition window when you define your site. With this check box selected, you have the option of creating a space-delimited list of files that should be cloaked site wide. By default, all PNG and FLA files are cloaked. Building a Site MapYou can use the site map as a visual representation of the navigation and structure of your website. This is increasingly important as your websites become more complex in their page count and navigation structure. As you saw in the beginning of the chapter, the Map View option, available from the View menu in the Files panel, displays a hierarchal list of pages in your site similar to Figure 4.30. Figure 4.30. The Map View option in the View menu generates a site map of your site.
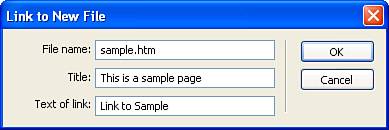
As you can see from Figure 4.30, the site map always uses index.htm as the top-level page and displays pages linked two levels deep. You can always see additional linked pages by pressing the plus/minus keys on your keyboard. NOTE Dreamweaver always detects index.htm and automatically makes that the top-level page of the site map. If your main page is not called index.htm, you can right-click your main page in the Files panel and choose the Set as Home Page option. This effectively makes the page you choose the top-level page for the site map. To maximize the viewable area of the site map, you can expand the Files panel into the Site Management window. If you're already in Map view, notice that the viewable area of the site map is expanded when you click the Site Map icon in the toolbar (see Figure 4.31). Figure 4.31. Expand the Files panel to maximize the viewable area of the site map.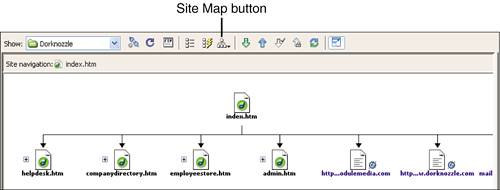 You can also show the site files in a pane to the right of the site map by holding down the Site Map icon and choosing the Map and Files option from the submenu that appears (see Figure 4.32). Figure 4.32. Select the Map and Files option from the Site Map button menu to display the files in a pane to the right.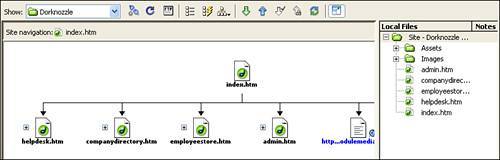 One of the benefits to using the site map is that it becomes easier to manage page titles and links. For instance, you can easily use the point to file icon directly on a page in the site map and drag it over into a file in the file list to quickly establish a link (see Figure 4.33). Figure 4.33. Easily create links from pages to files by dragging the point-to-file icon into a file in the list.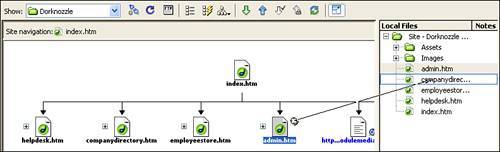 Even better than linking to existing files using the point-to-file icon, you can easily create a new file from the site map and have it link directly from a file of your choice. To demonstrate this functionality, follow these instructions:
You can easily modify the titles of documents as well. Choosing View, Site Map Options, Show Page Titles reveals the page titles similar to Figure 4.35. Figure 4.35. View the page titles by choosing the Show Page Titles option from the View menu.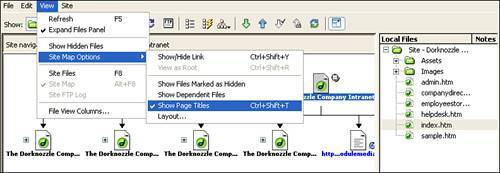 With the title view active, click once to highlight the file, and then click a second time in the text area. This makes the text editable with a blinking cursor. To change the page title, simply type the new title for the document and press Enter. After you've configured the site map the way you want it, you can easily convert it into a BMP or PNG file. To do this, choose File, Save Site Map. Navigate to the location on your computer where you want the site map to be saved, type a filename, choose what type of file you want to save it as (BMP or PNG), and click OK. Checking Links SitewideBy far one of the biggest benefits of defining a site in Dreamweaver is so that Dreamweaver can verify and fix links for you automatically. As your sites grow in proportion, so will the number of internal and external links in the site. By using the Check Links Sitewide option located in the Site menu, you can check the integrity of all paths to links and files in your site. In fact, Dreamweaver's link checker can verify the following:
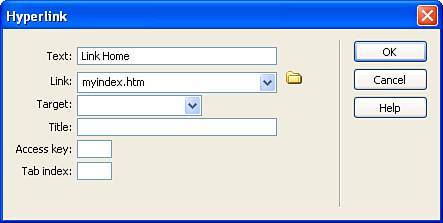
Before we demonstrate the process of checking links, let's actually create a broken link in our new sample.htm page. You can do this by opening sample.htm, placing your cursor on the page, and choosing the Hyperlink option from the Insert menu. When the Hyperlink dialog appears, enter values in the Text text box and enter a broken path in the Link field. Your values may be similar to mine (see Figure 4.36). Figure 4.36. Purposely enter a broken reference to index.htm so that we can see the Check Links Sitewide feature in action.
Click OK and save the page. Now we're ready to check the links. Checking links in your site can be accomplished using one of two methods. First, you can check the links for an individual file, and second, you can check links for an entire defined site. Because the process for both is similar, I'll demonstrate the check links site-wide feature here:
You can also check the external links in your site by choosing the External Links option from the Show menu. As you can see from Figure 4.37, the Link Checker pane lists all the external link references, including the link to the public website and the mail link we created in the previous chapter. Figure 4.37. Check the external link references in your site by choosing the External Links option from the Show menu.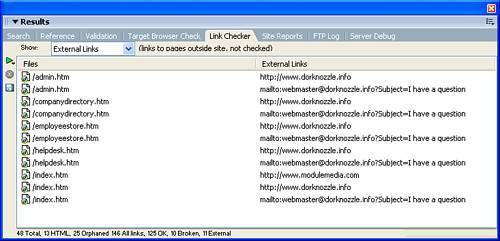 Of course, you can also change the link references in this list, however they won't ever be removed from the list. Dreamweaver always lists all external links regardless of whether you know they're correct or not. Finally, you can view orphaned files by choosing the Orphaned Files option from the Show menu. As you can see from Figure 4.38, all files not directly referenced from an HTML file are shown as orphaned. Figure 4.38. Orphaned files are listed when you select the Orphaned Files option from the Show menu.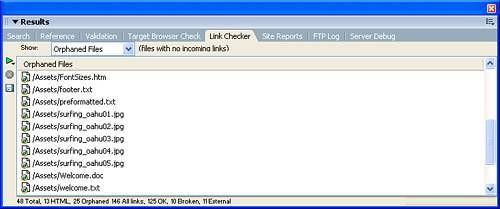 If you've determined that a file is no longer needed, you can select it from the list and press the Delete key on your keyboard. Doing this permanently deletes the file. Additional options exposed in the Link Checker window include the following:
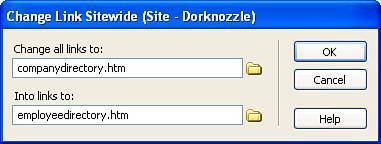
When you're satisfied with results of the Link Checker, minimize the panel or choose the Close Link Checker option from the panel Options menu. Changing Links SitewideOne of the simplest and most time-efficient methods of managing links in your site is the Change Links Sitewide feature. This feature, available by choosing the Change Links Sitewide option from the Site menu, allows you to quickly change the name of all instances of a specific link reference in your site. To demonstrate this feature, assume that Mike in Marketing decided that he no longer wants the navigation item Company Directory but instead wants it to read Employee Directory. Aside from changing the link on every page, you must also have to rename the file, essentially breaking all references to that file. A quick way to fix this, without launching the Link Checker, is to use the Change Link Sitewide feature, shown in Figure 4.39, to quickly change all link references from companydirectory.htm to employeedirectory.htm. Figure 4.39. Use the Change Link Sitewide feature to quickly change references for a link.
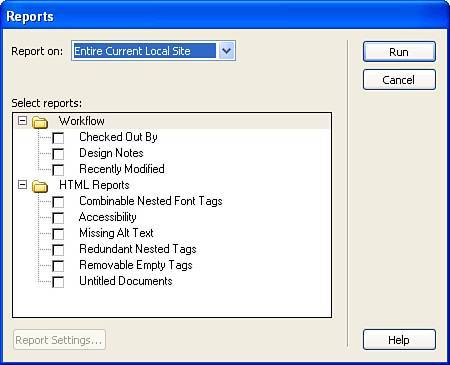
When you click OK, Dreamweaver scans and fixes all instances of the file. Creating Site ReportsOne of the basic premises behind site management is having the ability to check your work against various factors before considering your site done. Are you sure that every page has a title? Did you add alternate text to all your images for accessibility's sake? Is your HTML clean enough to be considered valid? These questions and more can be answered by running site reports on your site. Available by selecting Reports from the Site menu, the Reports dialog features numerous options for customizing site reports (see Figure 4.40). Figure 4.40. Use the Reports feature to run checks on HTML and workflow processes.
The Reports dialog is split into two parts. The first part, the Report On menu, simply allows you to choose whether to run site reports on the current document, the entire current local site, selected files within the site, or a specific folder. The second part of the dialog is the Select Reports pane. It is from this pane that you'll choose the options for reporting. These options include the following:
To run a site report, follow these steps:
After you've fixed errors, you can run the report again by selecting the Play icon to re-open the Site Reports dialog. |

EAN: 2147483647
Pages: 237