| Now that you have a basic understanding of web services, what they do, what they are composed of, and how to implement them using Dreamweaver, let's build a web service that performs a simple calculation of two numbers. After the simple web service has been created, we'll review how to consume the web service using both ASP.NET and ColdFusion server models. You can begin creating your web service by following these steps: 1. | Start by creating a new folder in C:\Inetpub\wwwroot called CalculateService.
| 2. | In Dreamweaver, create a new document by choosing the New option from the File menu. Choose the ASP.NET VB option from the Dynamic Page category and click Create.
NOTE Remember that web services are operating system agnostic and server technology independent. For this reason, you can create the web service with VB.NET and have it be consumed using ASP.NET VB, ASP.NET C#, or ColdFusion. For the sake of simplicity, we'll create the web service using VB.NET but consume it using both ASP.NET and ColdFusion. | 3. | Immediately save your file as calculate.asmx, saving it to the newly created folder C:\Inetpub\wwwroot\CalculateService. (Note that .ASMX is the extension given to ASP.NET web services.)
| 4. | Switch to Code view, remove all existing code, and add the following code to the page in its place:
<%@ Webservice %> Imports System.Web.Services Public Class CalculateService Inherits System.Web.Services.WebService <WebMethod()> Public Function Calculate(x As Integer, y As Integer) As String Return x + y End Function End Class
The code should include the Webservice directive, the System.Web.Services namespace import, and the CalculateService class that defines the Calculate function. Notice that the function is distinguished as a web method by the special <WebMethod()> identifier. The function accepts two parameters (X and Y) as integers and performs a simple addition on them, returning the value as a string. Save your work.
|
That's it! You've just created your first web service. With the web service now created, you can launch the browser to test its functionality. Testing the web service in a browser is important because it lets us make any necessary tweaks before we consume the web service using either ASP.NET or ColdFusion. To test the web service, open a browser and type the URL http://localhost/CalculateService/calculate.asmx. This is the URL to the web service that we just created. Immediately, a service screen appears, showing you a list of all available web methods. Figure 30.3 displays the only method in your web service: Calculate. Figure 30.3. The service contains just one methodCalculate. 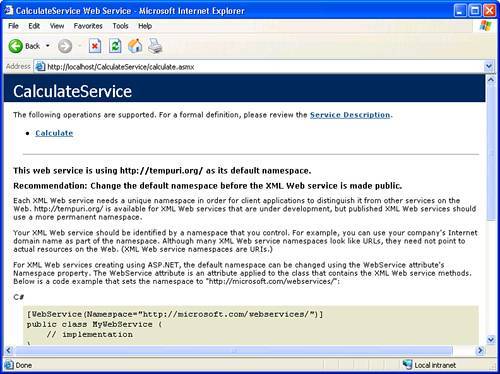
NOTE Obviously, you never wrote code that resembles what you are seeing. This screen is a service of the .NET Framework and is available with its installation for use in testing web services. The utility allows you to see all the information related to the web service including the class name, web methods exposed by the service, the WSDL contract, and more.
Now let's test the functionality of the Calculate web service. To do this, select the Calculate link that appears. Immediately, you are redirected to a new screen that enables you to input the X and Y values that the function will accept as parameters. Enter numeric values into both the X and Y text boxes and then click the Invoke button that appears similar to Figure 30.4. Figure 30.4. Click the Invoke button to invoke the function. 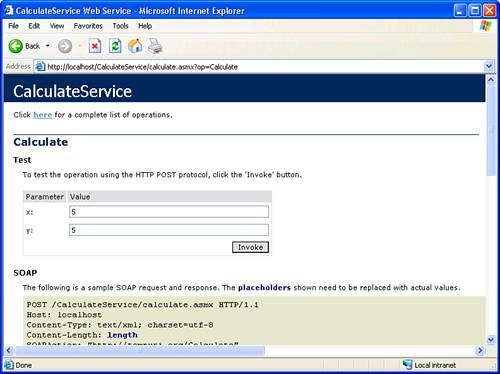
A new browser window opens, displaying the result of the calculation in XML format similar to Figure 30.5. Figure 30.5. The result of the calculation is shown in XML format. 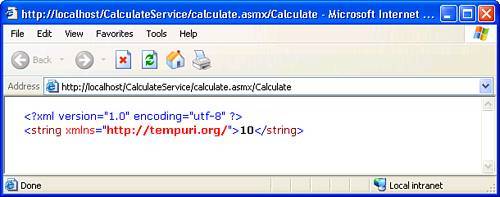
But why is the result shown in XML format? Recall that XML is a universally adopted format for describing data. For this reason, a web service can be created using any language. As long as the output is in XML, any server-side technology consuming that web service can read the result. Now that the web service is built, we need only to consume the web service using a web application that we are responsible for building. In the next two sections, we'll build an application and consume the web service using both the ASP.NET and ColdFusion server models. Consuming the Calculator Web Service in ASP.NET Our Calculate web service has been created; now what? Unfortunately, the web service testing utility you used in the previous section can only get you so far. To really take advantage of the newly created web service, we'll need to create a web application that acts as a consumer. By programming against the functionality exposed within the web service, our ASP.NET application can then dynamically pass in X and Y values from the ASP.NET application into the web service, collect a result, and process the information accordingly. To create an ASP.NET application that consumes the web service, follow these steps: 1. | Open the currently defined DorknozzleASPX site and immediately create a new document by choosing the New option from the File menu. Select the ASP.NET VB option from the Dynamic Page category and click Create.
| 2. | Switch to the Components tab and select the Add Component (+) button. Choose the Add Using WSDL option. The Add Using WSDL dialog appears.
| 3. | With the Add Using WSDL dialog open, enter the path to the web service's WSDL contract. You can do this by simply entering the path to the calculate.asmx file followed by the ?WSDL parameter (in this case, that path is http://localhost/CalculateService/calculate.asmx?WSDL). The result is shown in Figure 30.6.
Figure 30.6. Browse to the WSDL contract exposed by the web service. 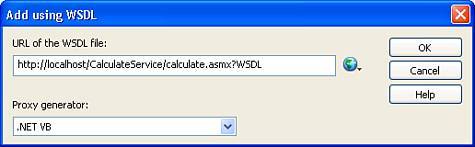
| 4. | Click OK. The web service is shown in the Components panel, similar to Figure 30.7. You can view the Calculate function by expanding the service.
Figure 30.7. The web service appears in the Components panel. Expand the web service to see the class and web method. 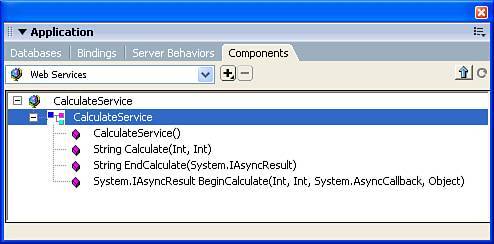
NOTE If you receive an "Unable to generate proxy" error when you click OK, don't be alarmed. This is a fairly common error and can be resolved by following a few simple steps. More information on solving this problem can be found on the companion website at www.dreamweaverunleashed.com. | 5. | It's time to create the application that will use the web method exposed by the web service. To do this, start by adding a new form (choose Insert, Form, Form). Make sure that you switch to Code view and add the runat="server" attribute and value to the form.
| 6. | Add two new TextBox controls by choosing Insert, ASP.NET Objects, asp:TextBox. Name them txtX and txtY respectively.
| 7. | Place your cursor after the txtY TextBox control and press Enter. With your cursor under the TextBox controls, add a Button control by choosing Insert, ASP.NET Objects, asp:Button. Name the Button control btnInvoke and give it the text label Invoke.
| 8. | Place your cursor just after the new Button control and press Enter again. This time, with your cursor under the Button control, add a Label control by choosing Insert, ASP.NET Objects, asp:Label. Name the Label control lblResult. The result of the completed user interface resembles Figure 30.8.
Figure 30.8. Add new controls to handle the user input of the calculation values. 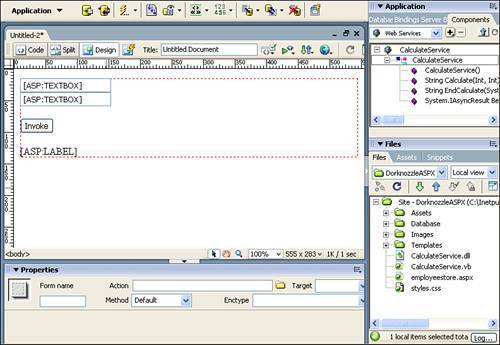
| 9. | Switch to Code view and add a new code declaration block (<script runat="server"> block) within the <head> tag of the page. Within the new code declaration block, create a new subroutine called Calculate(). The result of the code addition should resemble the following:
<script runat="server"> Sub Calculate(s As Object, e As EventArgs) End Sub </script>
| 10. | Click, hold, and drag the CalculateService() method from the Components panel into the subroutine. A new class instantiation is created within the subroutine as follows:
<script runat="server"> Sub Calculate(s As Object, e As EventArgs) dim aCalculateService as new CalculateService() End Sub </script>
| 11. | To round off the functionality, insert the following bolded code:
<script runat="server"> Sub Calculate(s As Object, e As EventArgs) dim aCalculateService as new CalculateService() lblResult.Text = aCalculateService.Calculate(txtX.Text, txtY.Text) End Sub </script>
In this case, we're setting the Text property of the Label control equal to the result of executing the Calculate() method and passing in the Text values of both the TextBox controls. The completed code should resemble Figure 30.9 in Dreamweaver.
Figure 30.9. Add the appropriate code to complete the subroutine. 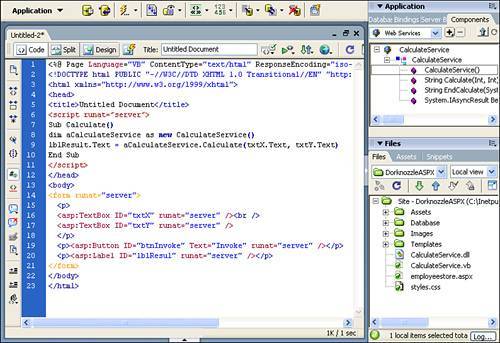
| 12. | Before we test our code, however, there are two final steps. First, you must add the onClick="Calculate" attribute and value to the Button control as follows:
<asp:Button runat="server" Text="Invoke" onClick="Calculate" />
As you probably know by now, adding this value guarantees that when the button is clicked, the Calculate() method in the page is called and, of course, the code within the method is executed. Second, you need to click, hold, and drag the CalculateService.dll file currently residing in the project root into the Bin folder. After those two steps are complete, you're ready to test the functionality.
|
NOTE You're probably wondering where that CalculateService.dll file in the DorknozzleASPX folder came from. As soon as you added the web service using the Add Component dialog box, Dreamweaver generated a proxy class and compiled it for you. It then took the compiled DLL and placed it in your project's root. All you have to do now to get the application to work is to create a Bin folder within the project and place the CalculateService.dll file in the folder.
Save your work as calculatesample.aspx. To test the results in the browser, press F12. Enter numeric values into both TextBox controls and click the Invoke button. The result is shown in Figure 30.10. Figure 30.10. Test the ASP.NET page in the browser. Type values in both TextBox controls and invoke the method by clicking the Button control. The calculation is performed and result is displayed in the Label control. 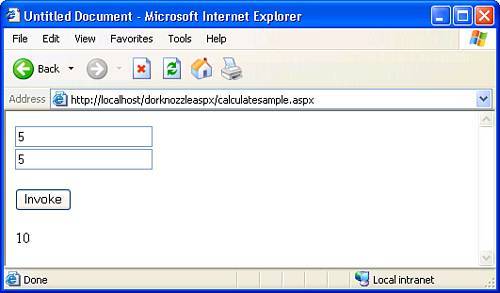
NOTE Because the calculatesample.aspx file resides in the DorknozzleASPX folder, and the folder is secured with forms authentication, you'll be required to log in first. Simply log in using any of the credentials in the database (for example, "ada" and "ada") and you'll immediately be redirected to the calculatesample.aspx page.
Notice that the application functions in a way similar to the application you used to test the web service earlier in the chapter. The difference here is that the application is actually consuming and using the web service. Imagine how complex this can get: You could create web services to handle all sorts of functions. In fact, hundreds of web services are available already that allow you to create searches, check weather, stocks, and so on. In the next example you will learn how to consume web services using ColdFusion. From there, we'll move forward, discussing web services and database interaction. Consuming the Calculator Web Service in ColdFusion As you've seen, consuming web services through an ASP.NET web application was relatively simple. Of course, the same can be said for ColdFusion applications. By programming against the functionality exposed in the web service (regardless of the language it was created in), our ColdFusion application can also dynamically pass X and Y values from the ColdFusion application into the web service, collect a result, and process the information accordingly. To create a ColdFusion application that consumes the web service, follow these steps: 1. | Open the currently defined DorknozzleCFM site and immediately create a new document by choosing the New option from the File menu. Select the ColdFusion option from the Dynamic Page category and click Create.
| 2. | Save the page as calculatesample.cfm.
| 3. | Switch to the Components tab and click the Add Component (+) icon. The Add Using WSDL dialog appears.
| 4. | With the Add Using WSDL dialog open, enter the path to the web service's WSDL contract. You can do this by simply entering the path to the calculate.asmx file followed by the ?WSDL parameter (in this case, type http://localhost/CalculateService/calculate.asmx?WSDL).
| 5. | Click OK. The web service is listed in the Components panel. Try expanding the nodes of the web service to reveal the class, method, and parameters exposed by the web service similar to Figure 30.11.
Figure 30.11. Expand the nodes of the web service to view the class, method, and parameters exposed by the service. 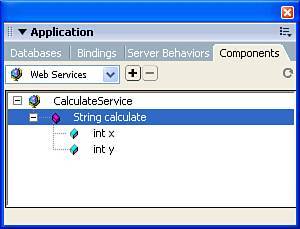
| 6. | It's time to create the application that will eventually invoke the method exposed by the web service. To do this, start by inserting a new form into the blank HTML page you created in step 1 by choosing Insert, Form, Form. With the form selected, keep the Method at POST and change the Action to calculatesample.cfm. In this case, the page will POST to itself.
| 7. | Add two Text Field form objects and a Button form object naming them txtX, txtY, and Submit respectively. The result of what you should have thus far is shown in Figure 30.12.
Figure 30.12. Add two text fields and a button form object to the form. 
| 8. | Switch to Code view. In the <head> tag of the document, enter the following code:
<CFOBJECT WEBSERVICE="http://localhost/CalculateService/calculate.asmx?WSDL" NAME="cs"> <CFIF ISDEFINED("FORM.txtX") AND ISDEFINED("FORM.txtY")> <CFSET strVal = cs.calculate(FORM.txtX, FORM.txtY)> <CFELSE> <CFSET strVal = ""> </CFIF>
In this case, the <CFOBJECT> tag is used to make reference to the web service. Using the Webservice attribute, we need only add the location to the WSDL contract as a value. The second attribute, Name, allows us to uniquely name the web service reference so that we can invoke the method later in code. As a value, I simply entered cs, which is short for CalculationService. Next and more importantly, we use a CFIF tag to determine whether or not a value has been returned from the txtX and txtY text fields. If not, we simply set a variable named strVal to nothing. If a value has been returned by the form (the user clicked the Invoke button), then we set the same strVal variable equal to the result of calling the Calculate() method and passing in the values of the txtX and txtY form objects as parameters.
| 9. | With the strVal parameter set, we can now output its value under our Invoke form button. You can do this by adding the following code directly beneath the existing Button form object:
<CFOUTPUT>#strVal#</CFOUTPUT>
As you can see, the <CFOUTPUT> tag is used to display the value returned by the web service, under the Invoke button. The result of the code additions resembles Figure 30.13.
Figure 30.13. Use the <CFOUTPUT> tag to display the result of the set variable. 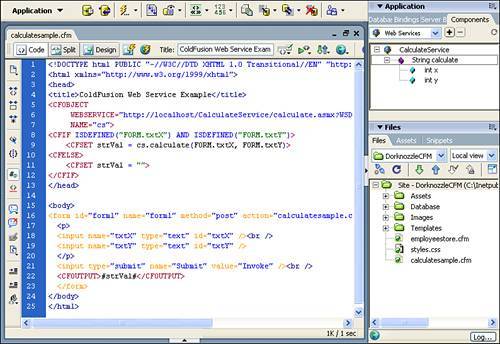
|
Save your work and test the results in the browser by pressing F12. Enter a value into the txtX text field and a value into the txtY text field and click the Invoke button. The calculation is performed by the ASP.NET-based web service and returns a result to the ColdFusion-based web application similar to Figure 30.14. Figure 30.14. The ColdFusion application calls the web service, passing in the value of the X and Y text fields. The ASP.NET web service processes the request and sends the result back the ColdFusion application. 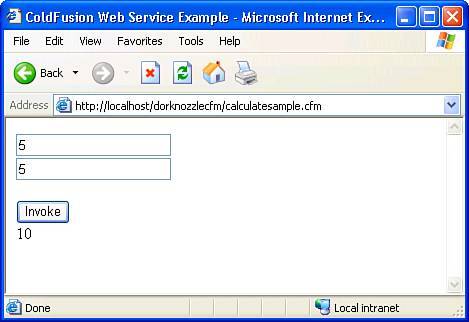
|