| Building the employee store New User Registration page can be accomplished just as easily under the ASP.NET server model as it was with the ASP, ColdFusion, and PHP server models. In fact, there are only subtle differences in the construction process. Most of the differences between ASP.NET and the other server models lie in the code, behaviors, and the interfaces that those behaviors implement. If you are specifically interested in ASP.NET, this section covers everything you need to know as it relates to inserts, updates, and deletes using ADO.NET and ASP.NET. Before we begin constructing the new user registration web page using ASP.NET, let's review the structure of the tables that we'll end up interacting with in this section. Recall that the tables that contain employees' information are the Employees, CreditCards, and Departments tables. On further inspection of those tables, notice that the following fields are necessary for new employees to be created in the Employees table: Field Name | Date Type | Key |
|---|
EmployeeID | AutoNumber | PK | DepartmentID | Number | FK | Name | Text | N/A | Username | Text | N/A | Password (Pass in Access) | Text | N/A | Email | Text | N/A | Phone | Text | N/A | Headshot | Text | N/A | BillingShippingAddress | Text | N/A | BillingShippingCity | Text | N/A | BillingShippingState | Text | N/A | BillingShippingZip | Text | N/A |
Additionally, the Departments table, which represents the specific department in which an employee works, resembles the following: Field Name | Date Type | Key |
|---|
DepartmentID | AutoNumber | PK | Department | Text | N/A |
Remember that you could also take advantage of the CreditCards table. Because of limitations on chapter length, however, we won't be using that table in the examples for this chapter. Now that you've reviewed the structure of the tables we'll be covering in this section, let's begin creating the New User Registration form is ASP.NET to accommodate the data collection. Creating the New User Registration Form As you have learned in earlier chapters, ASP.NET, like most web applications, rely on form elements to facilitate data collection. Unlike ASP, ColdFusion, or PHP which rely directly on HTML form objects, ASP.NET relies on a series of controls known as web controls. As we did in the previous chapter, we'll use web controls in the New User Registration form to facilitate interaction between the end user and the web application. Before you can begin creating the New User Registration form however, you must first create a table that will serve as the primary means for structuring the web controls in a cohesive and usable fashion. Begin creating the table by following these steps: 1. | Begin creating the New User Registration form by creating a new page from a template. From the File menu, select New, navigate to the Templates tab, and select the template named Template from the DorknozzleASPX site and click Create.
| 2. | Place your cursor in the editable region titled Content and immediately remove the text that exists in the region. Now select Insert, Form, Form. With the form selected, switch to the Split view, place your cursor in the form, and add the runat="server" attribute and value to the form.
| 3. | Switch back to the Design view. We're ready to add our table, which we'll use to structure the text and web controls. To do this, begin by selecting Insert, Table. The Insert Table dialog appears. Within the dialog, create a table that has 14 rows, 2 columns, a width of 450 pixels, and 0 border, cell padding, and cell spacing.
| 4. | Add all appropriate content for personal information including billing/shipping information, and so on to the table. You can merge cells along the way to create the header. The result is shown in Figure 26.21.
Figure 26.21. Add all appropriate content to the new table. 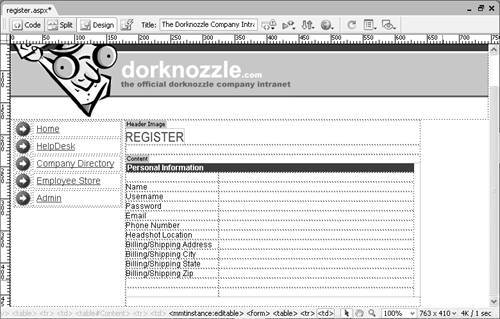
TIP You can format the table and content in the table as you see fit. Feel free to create styles so that your table and the content within it becomes more attractive. | 5. | You are now ready to begin adding all the web controls for the New User Registration form. First, place your cursor in the second cell in the Name row and choose Insert, ASP.NET Objects, asp:TextBox. The asp:TextBox dialog appears. Give your new TextBox the ID name and click OK.
| 6. | Repeat step 5 for the rest of the web controls. The following chart shows the fields, the appropriate web control to be inserted, and the unique ID to be given to each of the web controls.
Field Name | Form Object | ID |
|---|
Name | TextBox | name | Username | TextBox | username | Password | TextBox | password | Email | TextBox | email | Phone | TextBox | phonenumber | Headshot Location | TextBox | headshotloc | BillingShippingAddress | TextBox | billshipaddress | BillingShippingCity | TextBox | billshipcity | BillingShippingState | TextBox | billshipstate | BillingShippingZip | TextBox | billshipzip | | | Button | Submit |
The result of inserting all the form objects is shown in Figure 26.22.
Figure 26.22. Insert all the form objects for the New User Registration page. 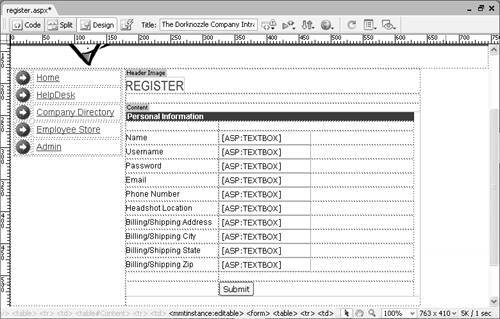
| 7. | The one object we haven't added yet is a control to hold the value that we'll use for the DepartmentID. Earlier in the chapter, we mentioned that new employees inserted into the Employees table will be associated with department number 2, Administration, when they're first created. It will be the administrator's responsibility to go back in and change the employee's corresponding department later. Because this is the case, we need some way of holding the default department ID value of 2 so that the Insert Record server behavior can read it and subsequently write that value to the database table. To hold that value, we'll use a TextBox control, set its Text property to 2, and then set the Visible property (manually) to False. You can do this by placing your cursor in any cell in the form and choosing Insert, ASP.NET Objects, asp:TextBox. When the asp:TextBox dialog appears, enter the ID departmentid, enter a text value of 2, and click OK. The TextBox is inserted onto the page. With the TextBox selected, immediately switch to Split view and enter the visible="false" attribute and value in the TextBox control's opening tag. The result of the modification is shown in Figure 26.23.
Figure 26.23. Add a TextBox control and add the visible="false" attribute and value to the control in Code view. 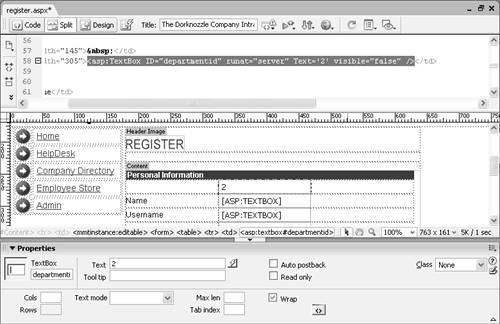
|
Save the page as register.aspx and run it in the browser by pressing F12. Notice that the TextBox with the default value of 2 isn't visible on the page. Although it's not visible on the page here, we can use the control and value programmatically in the Insert Record server behavior, covered later. Validating the Form with Validation Controls Now that you have the form created, you are ready to begin inserting the data into the database. But before you begin, make sure that you have valid data going in. Because the database tables explicitly define data types for each field, you'll want to make sure that the data the user enters is the same as what is going to be accepted by the database table; otherwise, errors will occur. The use of Validation controls allow you to check for invalid data and return an error message before the data is actually sent to the database table. There are numerous types of validation controls in ASP.NET, including the following: RequiredFieldValidator: The RequiredFieldValidator control is used to make a particular control a required entry. CompareValidator: The CompareValidator control compares the value of one control (numeric or string) with the value of another. You can also use this control to perform data-type checks. RangeValidator: The RangeValidator control checks to make sure that the value of a control (numeric or string) falls within a certain range. RegularExpressionValidator: The RegularExpressionValidator control checks for patterns using regular expressions that you write. Visit the following website for a list of commonly used regular expressions: http://regexlib.com/DisplayPatterns.aspx. ValidationSummary: Display a list of errors in a single alert box using the ValidationSummary control. The errors the ValidationSummary control displays are those returned by the preceding controls.
You can insert a RequiredFieldValidator control into your application by following these steps: 1. | Place your cursor next to the Name TextBox control and switch to Split view.
| 2. | Select Tag from the Insert Menu. Navigate to ASP.NET Tags, select Validation Server Controls, and highlight RequiredFieldValidator, as shown in Figure 26.24.
Figure 26.24. Select the RequiredFieldValidator control. 
| 3. | Click Insert. The RequiredFieldValidator's editor appears.
| 4. | Give the RequiredFieldValidator the ID rfvName, enter the value name in the Control to Validate text box, and type the custom error message Name is required! as shown in Figure 26.25.
Figure 26.25. Enter all the appropriate information for your validation control. 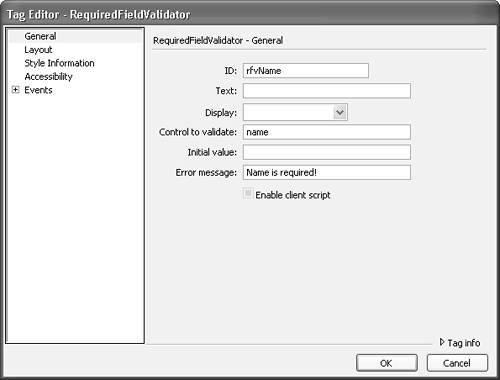
NOTE Notice that there are other options we're not modifying heresuch as Text, Display, Initial Value, and Enable Client Script. You can use these values to further customize the functionality for the particular validation control. For instance, if you wanted text to appear initially before the error appears, you could set the Text property with a custom text message. Or if you don't want your validation control to consume space on the form before it was displayed, you can set the Display property's value to Dynamic. Check the ASP.NET Reference in the Reference panel for a detailed explanation of the properties that the validation control supports. | 5. | Click OK to complete the property formatting of the RequiredFieldValidator control.
| 6. | Click Close. Your new validation control should be inserted visually in the Designer and syntactically in the code for the page.
| 7. | Save your work and test the results in the browser by pressing F12. Clicking the Submit button without typing a value for the Name field will result in an error message.
| 8. | Repeat steps 17 until all the form controls have a RequiredFieldValidator control associated with them.
|
CAUTION ASP.NET validation controls only fully work in Internet Explorer. If you use a browser other than Internet Explorer, you'll have to use server-side validation. To do this, simply uncheck the Enable Client Script check box in the Property Formatting dialog whenever you insert a validation control.
You can also make sure that your users are correctly typing in numerical values in text fields that require numbers (phone number, Zip code, and so on) by using the CompareValidator control. To insert a CompareValidator control, place your cursor next to the TextBox control you want to validate and select Insert, Tag. Next, select the ASP.NET Tags option and locate the Validation server controls. From the list of validation controls that appear, select asp:CompareValidator and click Insert. Give your CompareValidator a unique ID, type the name of the TextBox control you want to validate in the Control To Validate text box, select DataTypeCheck from the Operator drop-down menu, select Integer from the Type drop-down menu, and provide an error message in the Error Message text field. Save your work again and test the results in the browser. This time, if you type nine two one one five in the Zip code TextBox control and click Submit, you'll receive an error. Inserting a New User Now that your form is created and all your controls will be validated, you are ready to insert the data into the Employees table. Dreamweaver provides a server behavior in the Insert Record server behavior that allows for quick and intuitive insertions into a database table. To insert the employee's record into the database, follow these steps: 1. | Select Insert Record from the Server Behaviors panel. The Insert Record dialog appears.
| 2. | Among other features, the Insert Record dialog enables you to select the form on the page that will be submitting the form values. Make sure that the option form [0] is selected from the Submit values from menu.
| 3. | Choose the connDorknozzle option from the Connection menu.
| 4. | Select the Employees table from the Insert Into Table menu.
| 5. | From the Columns list box, identify each database field and match it up with its corresponding web control, selectable from the Value menu. For the most part, Dreamweaver finds the match unless the field names and web controls are named differently (in which case you'll have to match them up on your own). If some do not match, select the appropriate match from the Value drop-down list, as shown in Figure 26.26.
Figure 26.26. Match up the appropriate web control with its corresponding field in the database. 
TIP Unlike the ASP, ColdFusion, and PHP server models, the Insert Record server behavior in the ASP.NET server model supports the insertion of data through a view/stored procedure. Dreamweaver can use these views/stored procedures to insert data into multiple tables (among other things). Views and stored procedures always appear at the bottom of the list in the Insert Into Table menu. | 6. | Click OK. The Insert Record server behavior appears in the Server Behaviors panel.
|
Save your work and test the result in the browser. Enter data into the fields and click Submit. If everything goes as planned, the page should simply refresh. Now open the database and inspect the Employees table. Your new record should appear. Creating the Redirection Page The final step we want to perform before we can call the New User Registration page complete is to add the functionality that redirects the user to a thank-you page of some sort after they've registered. You can create this functionality by following these steps: 1. | While still in the New User Registration page, double-click the Insert Record server behavior. The Insert Record dialog reappears.
| 2. | Enter the value x_newusercreated.aspx in the On Success, Go To text box.
| 3. | Click OK. Save your work.
| 4. | We need to create a new page that represents the redirection page. To do this, select File, New; in the New Document dialog, switch to the Template tab and highlight the template named Template for the DorknozzleASPX site and click Create.
| 5. | In the new page, replace the text Content Goes Here in the Content editable region with the text Thank you for registering as a new user.
| 6. | Save your page as x_newusercreated.aspx.
|
That's it! This time, when a new user registers on the site, they are redirected to this thank-you page. Creating the My Account Page Using ASP.NET Now that you've added the functionality for employees to insert their information into the database, you'll want to add more functionality to allow them to modify their employee data. Suppose that an employee moved to a new location and you shipped a product to their old address. You can imagine the confusion. Fortunately, Dreamweaver provides a behavior in the Update Record server behavior that enables you to develop a page for user administrative purposes. Using dynamic web controls in conjunction with the Update Record server behavior, employees can see the information that resides in the database in editable web controls. After employees edit their information, they need only submit the form to update the information in the database. Creating the My Account Form Because all the employee information will be placed into form objects, the My Account form will be constructed much the same way that the New User Registration form was created. To create the My Account form, follow these steps: 1. | Begin creating the My Account form by creating a new page from a template. From the File menu, select New, navigate to the Templates tab, and select the template named Template from the DorknozzleASPX site.
| 2. | Remove the text from the Content editable region. With your cursor still in the region, insert a new form by selecting Insert, Form, Form. Don't forget to switch to Code view and enter the runat="server" attribute and value for the form (as you did with the New User Registration form).
| 3. | Let's add a table similar to the one we created in the New User Registration form. Select Table from the Insert menu. The Insert Table dialog appears. In the dialog, create a table that has 14 rows, 2 columns, a width of 450 pixels, and 0 border, cell padding, and cell spacing. Click OK to create the table.
TIP To make it easier on yourself, you could just open the register.aspx page, copy the existing table (along with the controls), switch back to the My Account page, and paste the table into the new form. | 4. | Add captions for all the appropriate personal information, including billing/shipping information, and so on to the table. You can merge cells along the way to create the header. The result is shown in Figure 26.27.
Figure 26.27. Add all appropriate content to the new table. 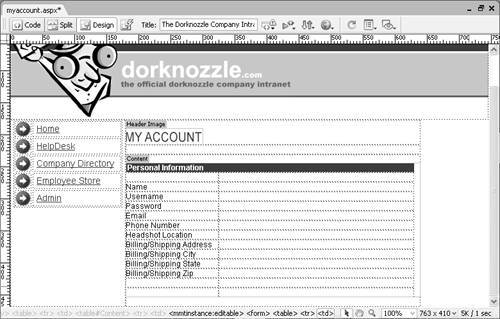
| 5. | You are now ready to begin adding all the form objects for the My Account form. The following chart shows the fields, the appropriate web controls to be inserted, and the unique IDs to be given to each of the form objects.
|
Field Name | Web Control | ID |
|---|
EmployeeID | TextBox | employeeid | Name | TextBox | name | Username | TextBox | username | Password | TextBox | password | Email | TextBox | email | Phone | TextBox | phonenumber | Headshot | TextBox | headshotloc | BillingShippingAddress | TextBox | billshipaddress | BillingShippingCity | TextBox | billshipcity | BillingShippingState | TextBox | billshipstate | BillingShippingZip | TextBox | billshipzip | | | Button | Submit |
The result of inserting all the web controls is shown in Figure 26.28. Figure 26.28. Insert all the web controls for the My Account page. 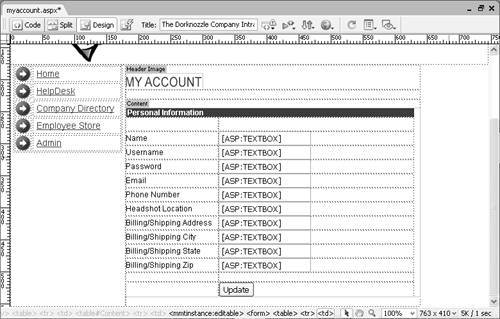
Recall that, when we created the ASP.NET-based New User Registration page, we had a TextBox (with the visible property set to false) for DepartmentID. Because a user won't be able to modify the department they belong to, we won't make that value available in this form. (Remember that the administrator is responsible for changing this value.) We have, however, replaced the DepartmentID TextBox with an EmployeeID TextBox. When updates are made to a database, you, as the developer, must specify which field will be updated. In Chapter 24, "A SQL Primer," we discussed the WHERE clause. The value, typically a numeric primary key, is appended to the WHERE clause so that application logic knows exactly which record in the database table to update. This numeric key is the EmployeeID. Knowing that, you'll need to switch to Code view and set the visible="false" attribute and value in the tag for the employeeid TextBox control. The result of the modification is shown in Figure 26.29. Save the page as myaccount.aspx. Figure 26.29. Add the visible="false" attribute and value to the employeeid TextBox control. 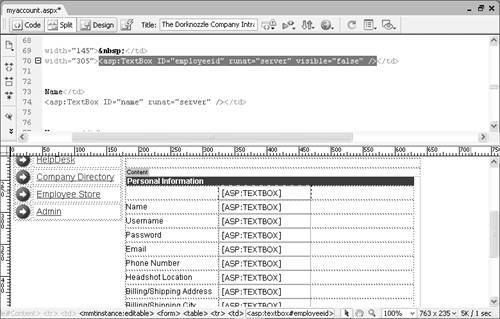
Binding Form Elements Now that you have the My Account form created, you will want to make all those web controls dynamic, meaning that when the page is loaded, text from the database automatically appears within them. In the previous chapter, you learned how to create dynamic text by dragging an item from the DataSet onto the page. Dynamic web controls are constructed much the same way in that you can drag an item from the DataSet directly onto the form object to which you want to bind that field. You can start binding all your web controls using the following process: 1. | Create a new DataSet by selecting DataSet from the Bindings panel. When the DataSet dialog appears, enter the value dsUpdateEmployee in the Name text box.
| 2. | Choose the connDorknozzle option from the Connection menu.
| 3. | Select the Employees table from the Table menu. Figure 26.30 shows the formatted DataSet dialog.
Figure 26.30. Enter all the appropriate information for your new DataSet. 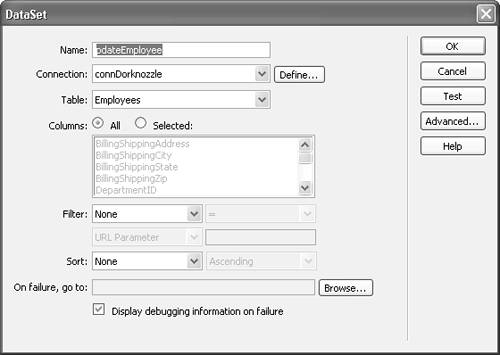
| 4. | Click OK. The Bindings panel lists the new DataSet along with the fields that it exposes.
| 5. | To create a binding, simply drag each field from the DataSet (in the Bindings panel) into its corresponding web control on the My Account page. When you have all the controls bound, the result looks similar to Figure 26.31.
Figure 26.31. Bind all the controls with fields from the DataSet. 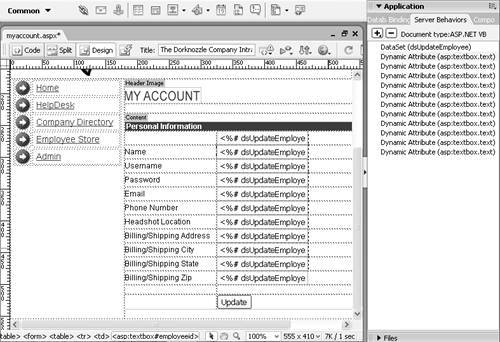
|
Save your work and test the results in the browser. The result should look similar to Figure 26.32. Figure 26.32. All the information in the database table for the particular user shows up in the web controls. 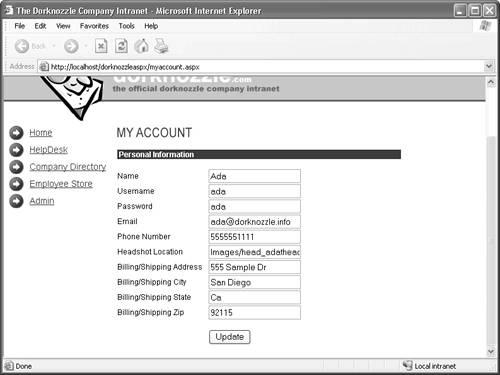
Notice that the first record (Ada's information) is displayed in the My Account page. This is because the application doesn't know who we are or what field represents us in the Employees table. In Chapter 29, "Security and User Authentication," we'll add functionality that allows the My Account page to identify our login with a specific row in the Employees table. Ultimately, this association will display the appropriate data in the My Account page. Updating an Existing User Now that you have the form created and all the objects are bound to the appropriate data fields, you are ready to add the functionality that allows users to modify their particular information. Remember the EmployeeID value you added into the hidden TextBox control? This number is used to track which employee is modifying information. If it weren't for this field, the Update Record server behavior wouldn't function properly. To add the Update Record functionality, follow these steps: 1. | Select the Update Record server behavior from the Add (+) menu in the Server Behaviors panel. The Update Record dialog appears.
| 2. | Among other tasks, the Update Record dialog allows you to select the form that is submitting the form values. Choose the form [0] option from the Submit values menu.
| 3. | Choose the connDorknozzle option from the Connection menu.
| 4. | Choose the Employees option from the Update Table menu.
| 5. | Use the Columns list to match up the database table's fields with the appropriate web controls in the form. You can use the Value menu to select the appropriate web control in the form. For EmployeeID, make sure that the Primary Key check box is selected. Figure 26.33 shows the dialog with all the necessary modifications.
Figure 26.33. Complete the modifications in the Update Record dialog. 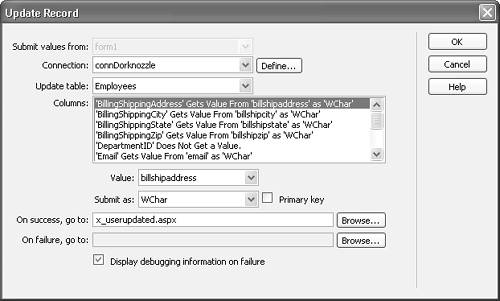
| 6. | Before you click OK, add the value x_userupdated.aspx to the On Success, Go To text box. This is the page to which the user is redirected when the update is successful.
| 7. | Click OK to close the Update Record dialog. The new server behavior appears in the Server Behaviors panel.
| 8. | Before you call the page complete, don't forget to create the x_userupdated.aspx page. You can do this by opening the New Document dialog, choosing the Template tab, selecting the template for the DorknozzleASPX site, and clicking Create. With the page open, change the text in the Content editable region to read Your information has been updated. Save the page as x_userupdated.aspx.
|
Switch back to the My Account page, save your work as myaccount.aspx, and test the result in the browser by pressing F12. Modify some of the values (I'll modify the employee's name) using the controls on the form, and click Submit. If everything goes as planned, you are redirected to the x_userupdated.aspx page with the Your information has been updated message. Now open the database, open the Employees table, and observe the data modification. |