| Aimed at giving you quick access to sophisticated interactivity without having to rely on the various panels that encompass all the objects, application objects are basically pre-designed web components you can use within your application. Application objects are easy to use; in fact, you've already used some of them and may not have even known it. Some of the application objects we'll be using are outlined in the following chart: Object | Supported Technologies | Description |
|---|
Recordset | ASP, ColdFusion, and PHP | Launches the Recordset dialog you normally see when selecting the Recordset server behavior from the Bindings panel. | DataSet | ASP.NET | Launches the DataSet dialog you normally see when selecting the DataSet server behavior from the Bindings panel. | Command | ASP | Choose this option, also available from the Bindings panel's Add (+) menu, to launch the Command dialog. From this dialog, you have the option of creating a reusable command that accepts varying parameters based on the page that is using it. From the Command dialog, you have the option of connecting to a stored procedure or working with inserts, updates, or deletes. | Stored Procedure | ASP.NET and ColdFusion | Choose this option, also available from the Bindings panel's Add (+) menu, to launch the Stored Procedure dialog. Stored procedures are pre-built SQL functions that perform a variety of tasks including insert, update, and delete operations in a database. The beauty in stored procedures is that they accept parameters. Based on these parameters, SQL code on the database, and ultimately the database table itself, can fluctuate in its functionality. | Dynamic Data (Dynamic Text, Table, Text Field, Checkbox, Radio Group, and Select Field) | ASP, ColdFusion, and PHP | Enables you to quickly create and format a table complete with bound data from your recordset on-the-fly. | Dynamic Data (Dynamic Text, DataGrid, and DataList | ASP.NET | As you saw in the previous chapter, you can use these sets of objects in conjunction with ASP.NET to create dynamic text or dynamic data that's presented in a database table-like structure. | Repeated Region | ASP, ASP.NET, ColdFusion, and PHP | Similar to the functionality outlined in the previous chapter, the Repeated Region object creates a repeated region for a dynamic table. | Show Region | ASP, ASP.NET, ColdFusion, and PHP | Use this set of conditional objects to show or not show specific regions on the dynamic page based on record count of a recordset or DataSet or the position within it. | Recordset Paging | ASP, ASP.NET, ColdFusion, and PHP | Includes the Recordset/DataSet Navigation bar as well as Move to First, Last, Previous, and Next pagination server behaviors complete with the Show Region behavior attached. As you've seen in the previous chapter, this set of objects is great for creating sets of dynamic content that can be paged from one set of data to the next based on user's interaction with a Next and Previous hyperlink/button. | Go To | ASP | Use the Go To set of objects, also available from the Server Behaviors panel's Add (+) menu, to work with functionality in conjunction with the Master Detail Page Set. You can use the Go To Detail Page or Go To Related Page to automatically redirect the user to a specific page based on dynamic form, URL, or other parameters. | Display Record Count | ASP, ASP.NET, ColdFusion, and PHP | Includes the Recordset Navigation Status objects as well as objects for displaying the starting record number, ending record number, total number of records, and the current page index. The Recordset Navigation Status object includes all this functionality in one object instance. | Master Detail Page Set | ASP, ColdFusion, and PHP | Arguably the most widely used application object, the Master Detail Page Set allows a developer to create a low-detail page that links to a second, more detailed page for a particular record. | Insert, Updated, Delete Record | ASP, ASP.NET, ColdFusion, and PHP | Opens the Insert, Update, or Delete Record dialog. These dialogs facilitate the insertion, update, and deletion of data in the database. | User Authentication | ASP, ColdFusion, and PHP | Use this set of objects/behaviors, also available from the Server Behaviors panel's Add (+) menu, to create user authentication services for your web application. Functionality includes the ability to log in a user, log out a user, or restrict user access to specific pages. More information on this set of objects can be found in Chapter 29, "Security and User Authentication." | XSL Transformation | ASP, ASP.NET, ColdFusion, and PHP | Selecting this object launches the XSL Transformation dialog. From this dialog, you have the ability to provide an XSLT and XML file to dynamically produce an HTML file that is viewable within the browser. More information on this object/behavior can be found in Appendix C. |
You might have noticed that roughly half the objects listed in the preceding chart have been covered in either this chapter or the previous chapter. For the most part, application objects are simply global server behaviors used by more than one server model. It's important to understand that each technology has its nuances within Dreamweaver. For the most part, ASP, ColdFusion, and PHP are similar. The radical shift occurs in ASP.NET, but even the objects exposed in that server model are similar to the objects used by the other models. In the coming sections, we'll discuss the application objects/server behaviors we haven't gone over yet to create dynamic tables, a navigation bar, and a master detail page set. Combine that with the ability to delete records, and we'll have a fully functioning administration console for employees of our fictitious Dorknozzle company. NOTE Because of restrictions on the length of this chapter, the admin page is built using the ASP server model. Feel free to follow along using the same application objects using the ASP.NET, ColdFusion, or PHP server model. However, if you're using the ASP.NET server model, you'll have to use either the DataGrid or DataList in place of dynamic tables. If you have not already done so, you may want to download the support files from www.dreamweaverunleashed.com. Completed versions of the projects using all server models can be downloaded from this website.
Dynamic Tables You can begin building an administration page for the Dorknozzle website using some of the application objects that come pre-bundled with Dreamweaverspecifically using dynamic tables. Dynamic tables, like the DataGrid feature under the ASP.NET server model, are an excellent choice when you must present large amounts of data in a database table-like presentation structure. If you've never used an admin console before, an admin console is a good way of modifying and deleting unnecessary products you might not want in the employee store, modifying or deleting employees that have left the company, and more. Generally, the administrator's page is the heart of the web application because most modifications stem from this page. You can begin building the admin page by following these steps: 1. | Create a new page by selecting File, New. Select the Templates tab, pick the Dorknozzle<technology> template where <technology> represents the server model you're working with (ASP, ColdFusion, or PHP), and click Create.
| 2. | The next step is to construct the new recordset. Because we'll try to use the Application Objects submenu as much as possible, select Insert, Application Objects, Recordset. The Recordset dialog appears.
| 3. | Enter the value rsProducts in the Name text box.
| 4. | Choose the connDorknozzle option from the Connection menu.
| 5. | Select the EmployeeStore option from the Table menu.
| 6. | Make sure that the Selected radio button is selected from the Columns radio button group. The Columns list becomes enabled. Hold down the Ctrl key on your keyboard ([cmd] on the Mac) and choose all the fields except for the Description and ImageURL fields. The formatted Recordset dialog should resemble Figure 26.34.
Figure 26.34. Format the Recordset dialog accordingly. 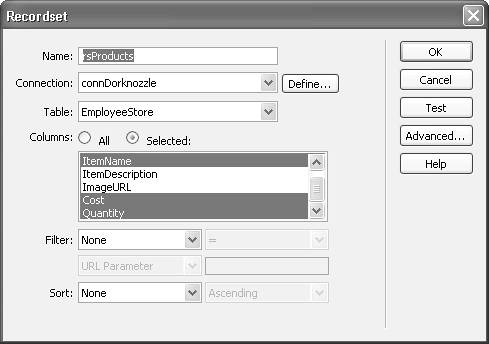
| 7. | Click OK. Dreamweaver alerts you that a new recordset has been created and that you should use the Bindings panel to interact with it. Remember that Application Objects are simply global server behaviors made available to more than one server-side technology. Even though you're using Application Objects, after they've been added to the page, they're modified by the Bindings or Server Behaviors panels.
| 8. | Select the Content Goes Here text contained within the Content editable region and delete it. In the editable region, insert a new form by selecting Insert, Form, Form.
| 9. | Select Insert, Application Objects, Dynamic Data, Dynamic Table. The Dynamic Table dialog appears.
| 10. | Choose the rsProducts option from the Recordset menu, enter the value 5 in the Show: Records At A Time text box, and format the border, cell padding, and cell spacing as you see fit. Figure 26.35 shows all the values the table in the admin page should contain.
Figure 26.35. The Dynamic Table dialog enables you to configure values for constructing a dynamic table. 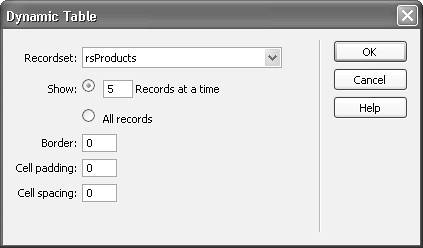
| 11. | Click OK. The table is inserted into the workspace as shown in Figure 26.36. Make any necessary aesthetic adjustments.
Figure 26.36. The table shows the dynamic text in formatted table cells. 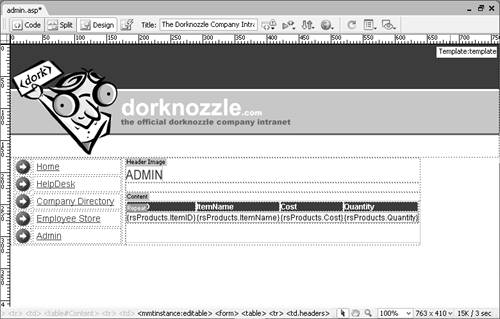
|
Save your work as admin.asp, admin.cfm, or admin.php, depending on the server model you are working with. Now test the results in the browser by pressing the F12 key. The result looks similar to Figure 26.37. Figure 26.37. Five records are shown in the dynamic table. 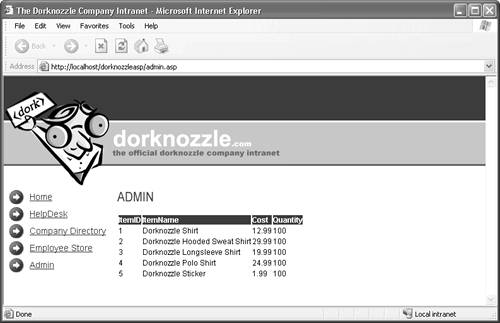
The Recordset Navigation Bar Now that you have a dynamic table with data, you can use the Recordset Navigation Bar application object to include pagination features, much like the way we did in the previous chapter. Rather than inserting four separate Paging server behaviors along with four separate Show Region server behaviors as was done in the previous chapter, however, you can use the Recordset Navigation Bar application object to accomplish the task in a few simple clicks. To insert a Recordset Navigation Bar, follow these steps: 1. | Place your cursor just below the dynamic table you created in the preceding section and select Insert, Application Objects, Recordset Paging, Recordset Navigation Bar. The Recordset Navigation Bar dialog appears.
| 2. | Make sure that the rsProducts option is selected from the Recordset menu.
| 3. | Choose the Text radio button from the Display Using radio button group. The result of the formatted Recordset Navigation Bar dialog resembles Figure 26.38.
Figure 26.38. Choose the recordset to page through. 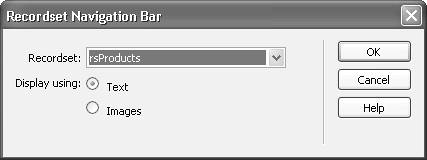
| 4. | Click OK. The navigation bar appears on the page similar to Figure 26.39. Notice how all four navigational items are present. The Show Region server behaviors that are attached to this application object cause these items to shift from being visible to invisible, depending on where you are in the recordset.
Figure 26.39. The navigation bar is inserted into your workspace. 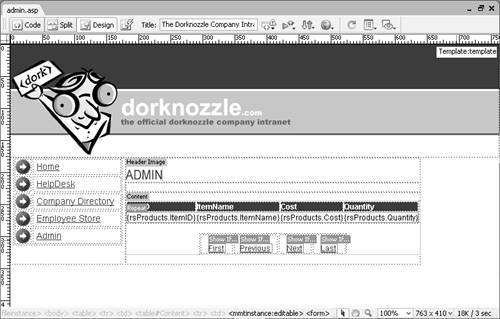
|
Save your work and test the results in the browser. The result looks similar to Figure 26.40. Notice that you can page through five records at a time. Figure 26.40. You can now page through five records at a time. 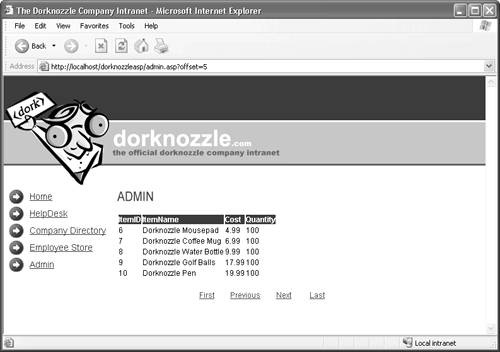
Deleting Records Up to this point, we've simply provided a mechanism for displaying and paging through the data contained in the EmployeeStore table. So far, we've merely provided an alternative method (using application objects) for functionality that was outlined in the previous chapter. This section is where the functionality begins to change. In this section, we'll manually create a new column in the dynamic table, exposing functionality that will allow an administrator to delete certain products from the EmployeeStore table. To add this functionality, follow these steps: 1. | Add a new column to the dynamic table by right-clicking the ItemID column and selecting Insert Column from the Table submenu. A new column appears to the left of the ItemID column.
| 2. | Place your cursor in the first cell of the first row and choose Insert, Form, Button. A new button is inserted in the cell.
| 3. | Select the button and change the value to Delete in the Properties Inspector. Also, select the None radio button from the Action radio button group.
| 4. | Select Insert, Application Objects, Delete Record. The Delete Record dialog appears.
| 5. | Choose the connDorknozzle option from the Connection menu.
| 6. | Choose the EmployeeStore option from the Delete From Table menu.
| 7. | Choose the rsProducts option from the Select Record From menu.
| 8. | Select the ItemID option from the Unique Key column menu.
| 9. | Make sure that the form1 option is selected in the Delete By Submitting menu. The formatted Delete Record dialog resembles Figure 26.41.
Figure 26.41. Format the Delete Record dialog. 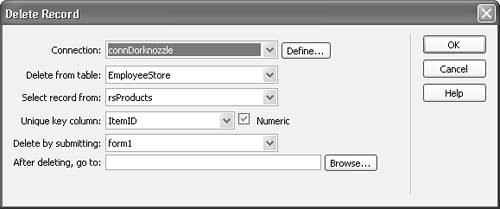
|
Save your work and test the admin page in the browser. Navigate a few records and click the Delete button. The page refreshes itself, and the selected row disappears. Check the EmployeeStore table to confirm the deletion. Master Detail Page Set The Master Detail Page Set application object is one of the most powerful objects built into Dreamweaver. It enables you to create a single page with as many fields from the recordset as you like. You can then make one of the items linkable so that it hyperlinks to a detailed page, exposing more detailed information about the linked item. In our example, we'll use the Master Detail Page Set to link the ItemName field to a second page that provides more information about the selected item. How much more information can we provide? Remember that we excluded the Description and ImageURL fields when we created the DataSet earlier in the chapter. Because these fields are relevant to the item, we'll expose these in a detailed page to which we'll link from the master page. You can work with the Master Detail Page Set by following these steps: 1. | Start by creating a new page. Select New from the File menu, choose the template from the defined Dorknozzle site, and click Create.
| 2. | Immediately save your page as admin_master.asp, admin_master.cfm, or admin_master.php, depending on the server model you're using.
| 3. | Create a new recordset. To do this, select Insert, Application Objects, Recordset. The Recordset dialog appears. Enter the name dsProducts, select the connDorknozzle connection, choose the EmployeeStore table, and select all the fields from the Columns list. Click OK to create the new recordset.
| 4. | Select the Content Goes Here text in the Content editable region and delete it. With your cursor still in the Content editable region, choose Insert, Application Objects, Master Detail Page Set. The Insert Master-Detail Page Set dialog appears.
| 5. | Make sure that the rsProducts option is selected from the Recordset menu.
| 6. | Select both the ItemDescription and ImageURL fields from the Master Page Fields list and click the Remove () button.
| 7. | Select the ItemName field from the Link to Detail from menu.
| 8. | Choose the ItemID option from the Pass Unique Key menu.
| 9. | Choose the All Records radio button from the Show radio button group.
| 10. | Enter the value admin_detail.asp, admin_detail.cfm, or admin_detail.php (depending on the server model you are using) in the Detail Page Name text box.
| 11. | Leave the Detail Page Fields list box the way it is. The formatted Insert Master-Detail Page Set dialog should resemble Figure 26.42.
Figure 26.42. Configure the Insert Master-Detail Page Set dialog accordingly. 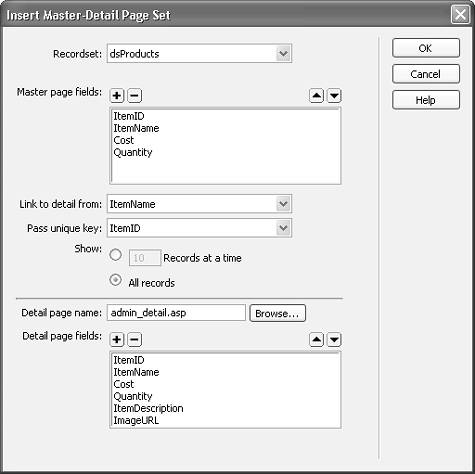
| 12. | Click OK. You are immediately taken to the detail page (admin_detail is automatically created for you because that's the name you supplied in the Master Detail Page Set dialog) as shown in Figure 26.43. Save the page.
Figure 26.43. The detail page shows all the fields you specified. 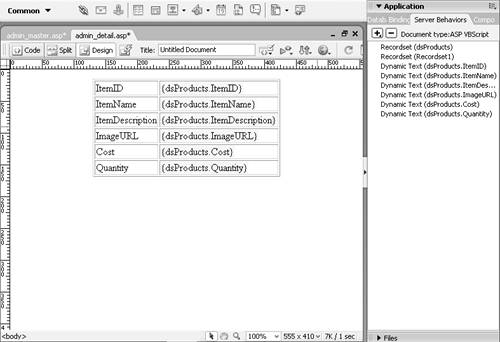
| 13. | Switch back to the admin_master.asp, admin_master.cfm, or admin_master.php page. Notice that a dynamic table along with a navigation bar and status are inserted for you.
|
Save your work and test it in the browser. Selecting the ItemName links you to the detail page for that item, exposing more detailed information about the item you selected. |