Using Access to Generate Queries
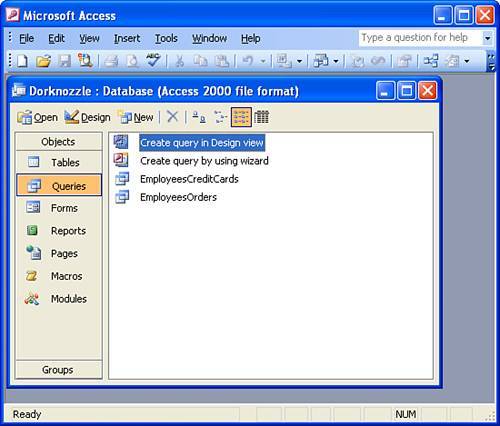
| Queries lay the foundation for data extraction from databases. You have seen how to create simple and complex queries by hand and you now have a firm grasp as to how they are constructed with clauses, operators, conditions, and expressions. Unfortunately, like most programming and authoring languages, perfection takes time and practice. Fortunately for Access users, there is an easier way. Rather than manually writing all your SQL statements, you can rely on Access to create them for you. If you've been experimenting with Access on your own, you've noticed the Queries tab on the left column. Queries can be constructed and saved for reuse in the future by using the Query Designer (see Figure 24.1). Figure 24.1. The Query Designer streamlines the way queries are created in Access.
NOTE Unfortunately, MSDE and Web Data Administrator don't offer a way to visually create queries. However, if your organization is using SQL Server, chances are you have access to Enterprise Manager. Enterprise Manager exposes a View editor that allows you to construct queries similarly to Access's Query Editor. NOTE Out of the box, MySQL doesn't offer a tool to visually create complex SQL queries. However, numerous third-party tools exist that function similarly to Access's Query Editor. One tool that I'm partial to is MySQL Maestro. Although it isn't free, a 30-day trial is available. More on this tool later in this chapter. Generating Queries in Design ViewThe easiest and quickest way to generate queries in Access is by creating them in Design view. To create a simple SELECT query, follow these steps:
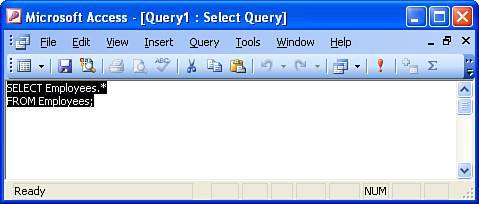
That's it! Figure 24.4 shows the resulting query in the SQL View window. Figure 24.4. SQL View presents the SQL code you can copy and paste into your application code.
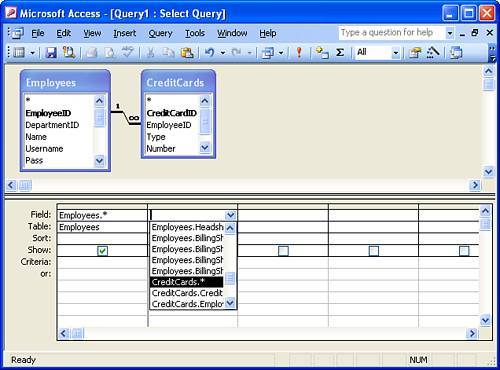
You're now free to save your query for use later. Save your query with a name that is relevant to what it performs by choosing File, Save As. TIP So far, you've learned how to write queries on your own. But how does Dreamweaver use those queries to extract data from the database? For the most part, you can construct your queries in Access, copy the SQL code, and then paste it into the Recordset dialog (covered in the next chapter). Even better, Dreamweaver allows you to use saved queries directly from Dreamweaver. For instance, if you wanted to create a complex join, you could create the statement in Access, save the query, and then use the query from Dreamweaver. More on this in the next chapter. Generating Queries with RelationshipsThe true power in the Access Query Editor lies in the fact that it can generate those complex statements with relationships that everyone hates to write by hand. To create a query that use a relationship, follow these steps:
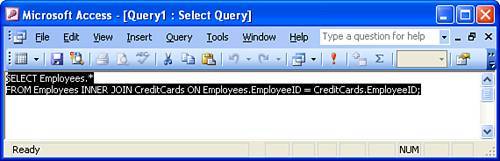
Figure 24.7 shows the datasheet view available from the View menu. Notice that the query includes all fields from both the Employees and the CreditCards tables. Figure 24.7. Access displays the results of joining two tables.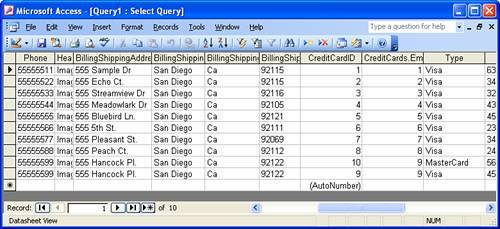 |
EAN: 2147483647
Pages: 237