| After you insert a clip art image or picture into a PowerPoint presentation, you can modify it to suit your needs. Using the Picture toolbar, you can make both minor and major adjustments to an inserted clip, such as changing its color or adjusting its contrast. Table 13.3 describes each button on the Picture toolbar. Table 13.3. Picture Toolbar Buttons | Button | Name | Description | |  | Insert Picture | Opens the Insert Picture dialog box from which you can choose another image | |  | Color | Lets you convert the image to a grayscale, black-and-white, or washout image | |  | More Contrast | Increases the contrast of the selected image | |  | Less Contrast | Reduces the contrast of the selected image | |  | More Brightness | Increases the image's brightness | |  | Less Brightness | Reduces the image's brightness | |  | Crop | Lets you crop the image to another size | |  | Rotate Left 90 | Rotates the image 90 degrees to the left | |  | Line Style | Shows a list of varying line widths and styles from which to choose | |  | Compress Pictures | Lets you compress the picture, reducing its file size | |  | Recolor Picture | Lets you change the clip art image's color | |  | Format Picture | Offers many options for formatting an image's lines, color, size, and position | |  | Set Transparent Color | Converts a single color to a transparent image | |  | Reset Picture | Returns the image to its original state | To open the Picture toolbar, choose View, Toolbars, Picture.  To get more ideas on how to format images in PowerPoint, see Chapter 14, "Creating and Formatting Objects," p. 281 . To get more ideas on how to format images in PowerPoint, see Chapter 14, "Creating and Formatting Objects," p. 281 .
Recoloring a Clip Art Image You can recolor a Windows metafile image (WMF), such as a clip art image, after you place it in a PowerPoint presentation. This can be useful if you want the image to match the colors of your design template or perhaps of your corporate logo.  | Can't recolor your image ? See the " Troubleshooting " section near the end of the chapter. |
To recolor a WMF image, follow these steps: -
Select the image you want to recolor and click the Recolor Picture button on the Picture toolbar. The Recolor Picture dialog box opens, as shown in Figure 13.18. Figure 13.18. Change the color of a WMF image to match your presentation. 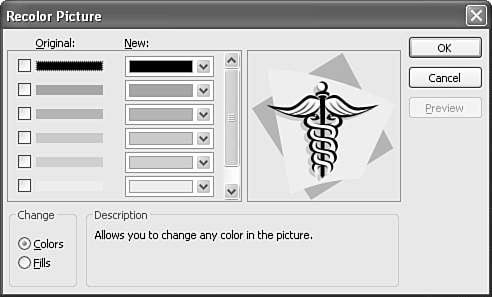 -
Select the Colors option button to change the actual image colors or the Fills option button to change background colors. NOTE Selecting Fills doesn't affect line colors. -
Under Original, place a check mark next to the color you want to change. -
Select a color from the New drop-down list. NOTE The New drop-down list shows the slide template's colors. Click More Colors to open the Colors dialog box and choose any color you like. To learn more about applying colors to objects, see "Specifying Colors" in Chapter 14, p. 290 .
For details on color theory, see "Using Color" in Chapter 25, "The MediaDesigning Visual Support," p. 566 .
-
Click the Preview button to view the suggested color changes before you make them. -
Click OK to apply the changes to the presentation. Formatting Clip Art Images When you place a clip art image in your presentation, you can make changes to its lines, size, and position in the Format dialog box. You can also combine clip art with WordArt pictures to create a complete graphic image such as a logo. For details on using the Format dialog box and working with WordArt, see "Understanding WordArt" in Chapter 14, p. 312 .
To create this image, place both a WordArt picture and clip art on the slide and adjust their positions to create the image you want. You should also group these two images together to make them one. For instructions on how to group PowerPoint objects, see "Grouping Objects" in Chapter 14, p. 311 .
|