| So far in this chapter, you've seen the structures that are part of a process and the API functions with which you (and the operating system) can manipulate processes. You've also found out how you can use tools to view how processes interact with your system. But how did those processes come into being, and how do they exit once they've fulfilled their purpose? In the following sections, you'll discover how a Windows process comes to life. A Windows process is created when an application calls one of the process creation functions, such as CreateProcess, CreateProcessAsUser, CreateProcessWithTokenW, or CreateProcessWithLogonW. Creating a Windows process consists of several stages carried out in three parts of the operating system: the Windows client-side library Kernel32.dll, the Windows executive, and the Windows subsystem process (Csrss). Because of the multiple environment subsystem architecture of Windows, creating a Windows executive process object (which other subsystems can use) is separated from the work involved in creating a Windows process. So, although the following description of the flow of the Windows CreateProcess function is complicated, keep in mind that part of the work is specific to the semantics added by the Windows subsystem as opposed to the core work needed to create a Windows executive process object. The following list summarizes the main stages of creating a process with the Windows CreateProcess function. The operations performed in each stage are described in detail in the subsequent sections. Note  | Many steps of CreateProcess are related to the setup of the process virtual address space and therefore refer to many memory management terms and structures that are defined in Chapter 7. |
Open the image file (.exe) to be executed inside the process. Create the Windows executive process object. Create the initial thread (stack, context, and Windows executive thread object). Notify the Windows subsystem of the new process so that it can set up for the new process and thread. Start execution of the initial thread (unless the CREATE_ SUSPENDED flag was specified). In the context of the new process and thread, complete the initialization of the address space (such as load required DLLs) and begin execution of the program.
Figure 6-5 shows an overview of the stages Windows follows to create a process. Figure 6-5. The main stages of process creation 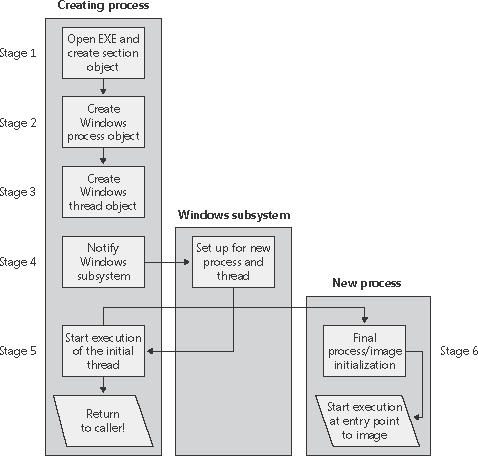
Before opening the executable image to run, CreateProcess performs the following steps: In CreateProcess, the priority class for the new process is specified as independent bits in the CreationFlags parameter. Thus, you can specify more than one priority class for a single CreateProcess call. Windows resolves the question of which priority class to assign to the process by choosing the lowest-priority class set. If no priority class is specified for the new process, the priority class defaults to Normal unless the priority class of the process that created it is Idle or Below Normal, in which case the priority class of the new process will have the same priority as the creating class. If a Real-time priority class is specified for the new process and the process's caller doesn't have the Increase Scheduling Priority privilege, the High priority class is used instead. In other words, CreateProcess doesn't fail just because the caller has insufficient privileges to create the process in the Real-time priority class; the new process just won't have as high a priority as Real-time. All windows are associated with desktops, the graphical representation of a workspace. If no desktop is specified in CreateProcess, the process is associated with the caller's current desktop.
Stage 1: Opening the Image to Be Executed As illustrated in Figure 6-6, the first stage in CreateProcess is to find the appropriate Windows image that will run the executable file specified by the caller and to create a section object to later map it into the address space of the new process. If no image name is specified, the first token of the command line (defined to be the first part of the command-line string ending with a space or tab that is a valid file specification) is used as the image filename. Figure 6-6. Choosing a Windows image to activate 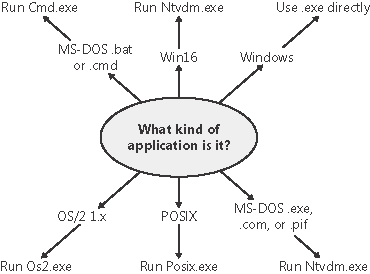
On Windows XP and Windows Server 2003, CreateProcess checks whether software restriction policies on the machine prevent the image from being run. (See Chapter 8 for a complete description of software restriction policies.) If the executable file specified is a Windows .exe, it is used directly. If it's not a Windows .exe (for example, if it's an MS-DOS, Win16, or a POSIX application), CreateProcess goes through a series of steps to find a Windows support image to run it. This process is necessary because non-Windows applications aren't run directly Windows instead uses one of a few special support images that in turn are responsible for actually running the non-Windows program. For example, if you attempt to run a POSIX application, CreateProcess identifies it as such and changes the image to be run on the Windows executable file Posix.exe. If you attempt to run an MS-DOS or a Win16 executable, the image to be run becomes the Windows executable Ntvdm.exe. In short, you can't directly create a process that is not a Windows process. If Windows can't find a way to resolve the activated image as a Windows process (as shown in Table 6-5), CreateProcess fails. Table 6-5. Decision Tree for Stage 1 of CreateProcessIf the image is a/an | And this will happen | This image will run |
|---|
POSIX executable file | Posix.exe | CreateProcess restarts Stage 1. | MS-DOS application with an .exe, a .com, or a .pif extension | Ntvdm.exe | CreateProcess restarts Stage 1. | Win16 application | Ntvdm.exe | CreateProcess restarts Stage 1. | Command procedure (application with a .bat or a .cmd extension) | Cmd.exe | CreateProcess restarts Stage 1. |
Specifically, the decision tree that CreateProcess goes through to run an image is as follows: If the image is an MS-DOS application with an .exe, a .com, or a .pif extension, a message is sent to the Windows subsystem to check whether an MS-DOS support process (Ntvdm.exe, specified in the registry value HKLM\SYSTEM\CurrentControlSet\Control\WOW\ cmdline) has already been created for this session. If a support process has been created, it is used to run the MS-DOS application. (The Windows subsystem sends the message to the VDM [Virtual DOS Machine] process to run the new image.) Then CreateProcess returns. If a support process hasn't been created, the image to be run changes to Ntvdm.exe and CreateProcess restarts at Stage 1. If the file to run has a .bat or a .cmd extension, the image to be run becomes Cmd.exe, the Windows command prompt, and CreateProcess restarts at Stage 1. (The name of the batch file is passed as the first parameter to Cmd.exe.) If the image is a Win16 (Windows 3.1) executable, CreateProcess must decide whether a new VDM process must be created to run it or whether it should use the default sessionwide shared VDM process (which might not yet have been created). The CreateProcess flags CREATE_SEPARATE_WOW_VDM and CREATE_SHARED_WOW_VDM control this decision. If these flags aren't specified, the registry value HKLM\SYSTEM\CurrentControlSet\Control\WOW\ DefaultSeparateVDM dictates the default behavior. If the application is to be run in a separate VDM, the image to be run changes to the value of HKLM\SYSTEM\CurrentControlSet\Control\WOW\wowcmdline and CreateProcess restarts at Stage 1. Otherwise, the Windows subsystem sends a message to see whether the shared VDM process exists and can be used. (If the VDM process is running on a different desktop or isn't running under the same security as the caller, it can't be used and a new VDM process must be created.) If a shared VDM process can be used, the Windows subsystem sends a message to it to run the new image and CreateProcess returns. If the VDM process hasn't yet been created (or if it exists but can't be used), the image to be run changes to the VDM support image and CreateProcess restarts at Stage 1.
At this point, CreateProcess has successfully opened a valid Windows executable file and created a section object for it. The object isn't mapped into memory yet, but it is open. Just because a section object has been successfully created doesn't mean that the file is a valid Windows image, however; it could be a DLL or a POSIX executable. If the file is a POSIX executable, the image to be run changes to Posix.exe and CreateProcess restarts from the beginning of Stage 1. If the file is a DLL, CreateProcess fails. Now that CreateProcess has found a valid Windows executable image, it looks in the registry under HKLM\SOFTWARE\Microsoft\Windows NT\CurrentVersion\Image File Execution Options to see whether a subkey with the filename and extension of the executable image (but without the directory and path information for example, Image.exe) exists there. If it does, CreateProcess looks for a value named Debugger for that key. If this is present, the image to be run becomes the string in that value and CreateProcess restarts at Stage 1. Tip  | You can take advantage of this CreateProcess behavior and debug the startup code of Windows service processes before they start rather than attach the debugger after starting the service, which doesn't allow you to debug the startup code. |
Stage 2: Creating the Windows Executive Process Object At this point, CreateProcess has opened a valid Windows executable file and created a section object to map it into the new process address space. Next it creates a Windows executive process object to run the image by calling the internal system function NtCreateProcess. Creating the executive process object (which is done by the creating thread) involves the following substages: Setting up the EPROCESS block Creating the initial process address space Initializing the kernel process block (KPROCESS) Concluding the setup of the process address space (which includes initializing the working set list and virtual address space descriptors and mapping the image into address space) Setting up the PEB Completing the setup of the executive process object
Note | The only time there won't be a parent process is during system initialization. After that point, a parent process is always required to provide a security context for the new process. |
Stage 2A: Setting Up the EPROCESS Block This substage involves nine steps: Allocate and initialize the Windows EPROCESS block. Inherit the process affinity mask from the parent process. The process minimum and maximum working set size are set to the values of PsMinimumWorkingSet and PsMaximumWorkingSet, respectively. Set the new process's quota block to the address of its parent process's quota block, and increment the reference count for the parent's quota block. Inherit the Windows device name space (including the definition of drive letters, COM ports, and so on). Store the parent process's process ID in the InheritedFromUniqueProcessId field in the new process object. Create the process's primary access token (a duplicate of its parent's primary token). New processes inherit the security profile of their parents. If the CreateProcessAsUser function is being used to specify a different access token for the new process, the token is then changed appropriately. The process handle table is initialized. If the inherit handles flag is set for the parent process, any inheritable handles are copied from the parent's object handle table into the new process. (For more information about object handle tables, see Chapter 3.) Set the new process's exit status to STATUS_PENDING.
Stage 2B: Creating the Initial Process Address Space The initial process address space consists of the following pages: To create these three pages, the following steps are taken: Page table entries are created in the appropriate page tables to map the initial pages. The number of pages is deducted from the kernel variable MmTotalCommittedPages and added to MmProcessCommit. The systemwide default process minimum working set size (PsMinimumWorkingSet) is deducted from MmResidentAvailablePages. The page table pages for the nonpaged portion of system space and the system cache are mapped into the process.
Stage 2C: Creating the Kernel Process Block The next stage of CreateProcess is the initialization of the KPROCESS block, which contains a pointer to a list of kernel threads. (The kernel has no knowledge of handles, so it bypasses the object table.) The kernel process block also points to the process's page table directory (which is used to keep track of the process's virtual address space), the total time the process's threads have executed, the process's default base-scheduling priority (which starts as Normal, or 8, unless the parent process was set to Idle or Below Normal, in which case the setting is inherited), the default processor affinity for the threads in the process, and the initial value of the process default quantum (which is described in more detail in the "Thread Scheduling" section later in the chapter), which is taken from the value of PspForegroundQuantum[0], the first entry in the systemwide quantum array. Note | The default initial quantum differs between Windows client and server systems. For more information on thread quantums, turn to their discussion in the section "Thread Scheduling." |
Stage 2D: Concluding the Setup of the Process Address Space Setting up the address space for a new process is somewhat complicated, so let's look at what's involved one step at a time. To get the most out of this section, you should have some familiarity with the internals of the Windows memory manager, which are described in Chapter 7. The virtual memory manager sets the value of the process's last trim time to the current time. The working set manager (which runs in the context of the balance set manager system thread) uses this value to determine when to initiate working set trimming. The memory manager initializes the process's working set list page faults can now be taken. The section (created when the image file was opened) is now mapped into the new process's address space, and the process section base address is set to the base address of the image. Ntdll.dll is mapped into the process. The systemwide national language support (NLS) tables are mapped into the process's address space.
Note | POSIX processes clone the address space of their parents, so they don't have to go through these steps to create a new address space. In the case of POSIX applications, the new process's section base address is set to that of its parent process and the parent's PEB is cloned for the new process. |
Stage 2E: Setting Up the PEB CreateProcess allocates a page for the PEB and initializes a number of fields, which are described in Table 6-6. Table 6-6. Initial Values of the Fields of the PEBField | Initial Value |
|---|
ImageBaseAddress | Base address of section | NumberOfProcessors | KeNumberProcessors kernel variable | NtGlobalFlag | NtGlobalFlag kernel variable | CriticalSectionTimeout | MmCriticalSectionTimeout kernel variable | HeapSegmentReserve | MmHeapSegmentReserve kernel variable | HeapSegmentCommit | MmHeapSegmentCommit kernel variable | HeapDeCommitTotalFreeThreshold | MmHeapDeCommitTotalFreeThreshold kernel variable | HeapDeCommitFreeBlockThreshold | MmHeapDeCommitFreeBlockThreshold kernel variable | NumberOfHeaps | 0 | MaximumNumberOfHeaps | (Size of a page - size of a PEB) / 4 | ProcessHeaps | First byte after PEB | OSMajorVersion | NtMajorVersion kernel variable | OSMinorVersion | NtMinorVersion kernel variable | OSBuildNumber | NtBuildNumber kernel variable & 0x3FFF | OSPlatformId | 2 |
If the image file specifies explicit Windows version values, this information replaces the initial values shown in Table 6-6. The mapping from image version information fields to PEB fields is described in Table 6-7. Table 6-7. Windows Replacements for Initial PEB ValuesField Name | Value Taken from Image Header |
|---|
OSMajorVersion | OptionalHeader.Win32VersionValue & 0xFF | OSMinorVersion | (OptionalHeader.Win32VersionValue >> 8) & 0xFF | OSBuildNumber | (OptionalHeader.Win32VersionValue >> 16) & 0x3FFF | OSPlatformId | (OptionalHeader.Win32VersionValue >> 30) ^ 0x2 |
Stage 2F: Completing the Setup of the Executive Process Object Before the handle to the new process can be returned, a few final setup steps must be completed: If systemwide auditing of processes is enabled (either as a result of local policy settings or group policy settings from a domain controller), the process's creation is written to the Security event log. If the parent process was contained in a job, the new process is added to the job. (Jobs are described at the end of this chapter.) If the image header characteristic's IMAGE_FILE_UP_SYSTEM_ ONLY flag is set (indicating that the image can run only on a uniprocessor system), a single CPU is chosen for all the threads in this new process to run on. This choosing process is done by simply cycling through the available processors each time this type of image is run, the next processor is used. In this way, these types of images are spread out across the processors evenly. If the image specifies an explicit processor affinity mask (for example, a field in the configuration header), this value is copied to the PEB and later set as the default process affinity mask. CreateProcess inserts the new process block at the end of the Windows list of active processes (PsActiveProcessHead). The process's creation time is set, the handle to the new process is returned to the caller (CreateProcess in Kernel32.dll).
Stage 3: Creating the Initial Thread and Its Stack and Context At this point, the Windows executive process object is completely set up. It still has no thread, however, so it can't do anything yet. Before the thread can be created, it needs a stack and a context in which to run, so these are set up now. The stack size for the initial thread is taken from the image there's no way to specify another size. Now the initial thread can be created, which is done by calling NtCreateThread. The thread parameter (which can't be specified in CreateProcess but can be specified in CreateThread) is the address of the PEB. This parameter will be used by the initialization code that runs in the context of this new thread (as described in Stage 6). However, the thread won't do anything yet it is created in a suspended state and isn't resumed until the process is completely initialized (as described in Stage 5). NtCreateThread calls PspCreateThread (a function also used to create system threads) and performs the following steps: The thread count in the process object is incremented. An executive thread block (ETHREAD) is created and initialized. A thread ID is generated for the new thread. The TEB is set up in the user-mode address space of the process. The user-mode thread start address is stored in the ETHREAD. For Windows threads, this is the system-supplied thread startup function in Kernel32.dll (BaseProcessStart for the first thread in a process and BaseThreadStart for additional threads). The user's specified Windows start address is stored in the ETHREAD block in a different location so that the system-supplied thread startup function can call the user-specified startup function. KeInitThread is called to set up the KTHREAD block. The thread's initial and current base priorities are set to the process's base priority, and its affinity and quantum are set to that of the process. This function also sets the initial thread ideal processor. (See the section "Ideal and Last Processor" for a description of how this is chosen.) KeInitThread next allocates a kernel stack for the thread and initializes the machine-dependent hardware context for the thread, including the context, trap, and exception frames. The thread's context is set up so that the thread will start in kernel mode in KiThreadStartup. Finally, KeInitThread sets the thread's state to Initialized and returns to PspCreateThread. Any registered systemwide thread creation notification routines are called. The thread's access token is set to point to the process access token, and an access check is made to determine whether the caller has the right to create the thread. This check will always succeed if you're creating a thread in the local process, but it might fail if you're using CreateRemoteThread to create a thread in another process and the process creating the thread doesn't have the debug privilege enabled. Finally, the thread is readied for execution.
Stage 4: Notifying the Windows Subsystem about the New Process If software restriction policies dictate, a restricted token is created for the new process. At this point, all the necessary executive process and thread objects have been created. Kernel32.dll next sends a message to the Windows subsystem so that it can set up for the new process and thread. The message includes the following information: Process and thread handles Entries in the creation flags ID of the process's creator Flag indicating whether the process belongs to a Windows application (so that Csrss can determine whether or not to show the startup cursor)
The Windows subsystem performs the following steps when it receives this message: CreateProcess duplicates a handle for the process and thread. In this step, the usage count of the process and the thread is incremented from 1 (which was set at creation time) to 2. If a process priority class isn't specified, CreateProcess sets it according to the algorithm described earlier in this section. The Csrss process block is allocated. The new process's exception port is set to be the general function port for the Windows subsystem so that the Windows subsystem will receive a message when an exception occurs in the process. (For further information on exception handling, see Chapter 3.) If the process is being debugged (that is, if it is attached to a debugger process), the process debug port is set to the Windows subsystem's general function port. This setting ensures that Windows will send debug events that occur in the new process (such as thread creation and deletion, exceptions, and so on) as messages to the Windows subsystem so that it can then dispatch the events to the process that is acting as the new process's debugger. The Csrss thread block is allocated and initialized. CreateProcess inserts the thread in the list of threads for the process. The count of processes in this session is incremented. The process shutdown level is set to 0x280 (the default process shutdown level see SetProcessShutdownParameters in the MSDN Library documentation for more information). The new process block is inserted into the list of Windows subsystemwide processes. The per-process data structure used by the kernel-mode part of the Windows subsystem (W32PROCESS structure) is allocated and initialized. The application start cursor is displayed. This cursor is the familiar arrow with an hourglass attached the way that Windows says to the user, "I'm starting something, but you can use the cursor in the meantime." If the process doesn't make a GUI call after 2 seconds, the cursor reverts to the standard pointer. If the process does make a GUI call in the allotted time, CreateProcess waits 5 seconds for the application to show a window. After that time, CreateProcess will reset the cursor again.
Stage 5: Starting Execution of the Initial Thread At this point, the process environment has been determined, resources for its threads to use have been allocated, the process has a thread, and the Windows subsystem knows about the new process. Unless the caller specified the CREATE_ SUSPENDED flag, the initial thread is now resumed so that it can start running and perform the remainder of the process initialization work that occurs in the context of the new process (Stage 6). Stage 6: Performing Process Initialization in the Context of the New Process The new thread begins life running the kernel-mode thread startup routine KiThreadStartup. KiThreadStartup lowers the thread's IRQL level from DPC/dispatch level to APC level and then calls the system initial thread routine, PspUserThreadStartup. The user-specified thread start address is passed as a parameter to this routine. On Windows 2000, PspUserThreadStartup first enables working set expansion. If the process being created is a debuggee, all threads in the process are suspended. (Threads might have been created during Stage 3.) A create process message is then sent to the process's debug port (which is the Windows subsystem function port, because this is a Windows process) so that the subsystem can deliver the process startup debug event (CREATE_PROCESS_DEBUG_INFO) to the appropriate debugger process. PspUserThreadStartup then waits for the Windows subsystem to get the reply from the debugger (via the ContinueDebugEvent function). When the Windows subsystem replies, all the threads are resumed. On Windows XP and Windows Server 2003, PspUserThreadStartup checks whether application prefetching is enabled on the system and, if so, calls the logical prefetcher to process the prefetch instruction file (if it exists) and prefetch pages referenced during the first 10 seconds the process started last time. (For details on the prefetcher, see Chapter 3.) Finally, PspUserThreadStartup queues a user-mode APC to run the image loader initialization routine (LdrInitializeThunk in Ntdll.dll). The APC will be delivered when the thread attempts to return to user mode. When PspUserThreadStartup returns to KiThreadStartup, it returns from kernel mode, the APC is delivered, and LdrInitializeThunk is called. The LdrInitializeThunk routine initializes the loader, heap manager, NLS tables, thread-local storage (TLS) array, and critical section structures. It then loads any required DLLs and calls the DLL entry points with the DLL_PROCESS_ ATTACH function code. (See the sidebar "Side-by-Side Assemblies" for a description of a mechanism introduced in Windows XP to address DLL versioning problems.) Finally, the image begins execution in user mode when the loader initialization returns to the user mode APC dispatcher, which then calls the thread's start function that was pushed on the user stack when the user APC was delivered. Side-by-Side Assemblies A problem that has long plagued Windows users is "DLL hell." You enter DLL hell when you install an application that replaces one or more core system DLLs, such as those for common controls, the Microsoft Visual Basic runtime, or MFC. Application installation programs make these replacements to ensure that the application runs properly, but at the same time, updated DLLs might have incompatibilities with other already-installed applications. Windows 2000 partly addressed DLL hell by preventing the modification of core system DLLs with the Windows File Protection feature, and by allowing applications to use private copies of these core DLLs. To use a private copy of a DLL instead of the one in the system directory, an application's installation must include a file named Application.exe.local (where Application is the name of the application's executable), which directs the loader to first look for DLLs in that directory. This type of DLL redirection avoids application/DLL incompatibility problems, but it does so at the expense of sharing DLLs, which is one of the points of DLLs in the first place. In addition, any DLLs that are loaded from the list of KnownDLLs (DLLs that are permanently mapped into memory) or that are loaded by those DLLs cannot be redirected using this mechanism. To further address application and DLL compatibility while allowing sharing, Windows XP introduces shared assemblies. An assembly consists of a group of resources, including DLLs, and an XML manifest file that describes the assembly and its contents. An application references an assembly through the existence of its own XML manifest. The manifest can be a file in the application's installation directory that has the same name as the application with ".manifest" appended (for example, application.exe.manifest), or it can be linked into the application as a resource. The manifest describes the application and its dependence on assemblies. There are two types of assemblies: private and shared. The difference between the two is that shared assemblies are digitally signed so that corruption or modification of their contents can be detected. In addition, shared assemblies are stored under the \Windows\Winsxs directory, whereas private assemblies are stored in an application's installation directory. Thus, shared assemblies also have an associated catalog file (.cat) that contains its digital signature information. Shared assemblies can be "side-by-side" assemblies because multiple versions of a DLL can reside on a system simultaneously, with applications dependent on a particular version of a DLL always using that particular version. An assembly's manifest file typically has a name that includes the name of the assembly, version information, some text that represents a unique signature, and the extension ".manifest". The manifests are stored in \Windows\Winsxs\Manifests, and the rest of the assembly's resources are stored in subdirectories of \Windows\Winsxs that have the same name as the corresponding manifest files, with the exception of the trailing .manifest extension. An example of a shared assembly is version 6 of the Windows common controls DLL, comctl32.dll, which is new to Windows XP. Its manifest file is named \Windows\Winsxs\Manifest\x86_Microsoft.Windows.Common-Controls_6595b64144ccf1df_6.0.0.0_x-ww_1382d70a.manifest. It has an associated catalog file (which is the same name with the .cat extension) and a subdirectory of Winsxs that includes comctl32.dll. Version 6 of Comctl32.dll includes integration with Windows XP themes, and because applications not written with themes-support in mind might not appear correctly with the new DLL, it's available only to applications that explicitly reference the shared assembly containing it the version of Comctl32.dll installed in \Windows\System32 is an instance of version 5.x, which is not theme aware. When an application loads, the loader looks for the application's manifest, and if one exists, loads the DLLs from the assemblies specified. DLLs not included in assemblies referenced in the manifest are loaded in the traditional way. Legacy applications, therefore, link against the version in \Windows\System32, whereas theme-aware applications can specify the new version in their manifest. You can see the effect of a manifest that directs the system to use the new common control library on Windows XP by running the User State Migration Wizard (\Windows\System32\Usmt\Migwiz.exe) with and without its manifest file: Run it, and notice the Windows XP themes on the buttons in the wizard. Open the Migwiz.exe.manifest file in Notepad, and locate the inclusion of the version 6 common control library. Rename the Migwiz.exe.manifest to Migwiz.exe.manifest.bak. Rerun the wizard, and notice the unthemed buttons. Restore the manifest file to its original name.
A final advantage that shared assemblies have is that a publisher can issue a publisher configuration, which can redirect all applications that use a particular assembly to use an updated version. Publishers would do this if they were preserving backward compatibility while addressing bugs. Ultimately, however, because of the flexibility inherent in the assembly model, an application could decide to override the new setting and continue to use an older version. |
|