Installation
Installing Windows Terminal Services is simply a matter of selecting the Terminal Services option in the Windows 2000 Server Setup dialog box during the initial installation of Windows 2000 Server, or adding the service after the installation of Windows 2000 Server is complete, using the Windows Components Wizard. If you elect to add Terminal Services after the initial installation, however, you should do it before you install any applications on the server if you expect to use the server as an application server. If you're installing Terminal Services only in administrative mode, the timing is less important, but it's still best to add Terminal Services as soon as possible after the initial installation.
Installation of Terminal Services at Windows 2000 Install
To install Windows Terminal Services during the initial installation of Windows 2000 Server, you need to do a nonupgrade install, unless you're upgrading from a Windows NT 4 Terminal Server Edition installation. If you do a fresh install, you will have an opportunity to change the Windows components that are installed just after you give the machine a name and initial Administrator password. Select Terminal Services from the list of components. If the machine you'll be installing Terminal Services on is also going to be a domain controller, you can install Terminal Services Licensing as well.
![]()
REAL WORLD Installing the Minimum
Many system administrators prefer to initially install only the bare minimum operating system on any machine. This practice limits your risk, improves the likelihood that you'll have a successful install, and lets you isolate problem-causing portions of the operating system as they are installed. If you're installing Terminal Services on a machine and you like to use this technique for your installations, you can delay the addition of Terminal Services until after the base operating system has been installed. But you should install Terminal Services as soon after you have the machine up and running as is practical.
The Terminal Services component of Windows 2000 Server requires approximately 14 MB of hard disk space , but this is strictly for the client installation-creator files. Terminal Services itself requires essentially no additional space for the operating system. However, each user who connects using Terminal Services will require a minimum of about 400 KB of disk space for his or her profile (and many users will require a lot more space) and whatever storage space he or she uses on the server.
Installation of Terminal Services After Initial Installation
You can add Windows Terminal Services after the initial installation of Windows 2000 Server. You can use the Configure Your Server Wizard if you want or simply open Add/Remove Programs in the Control Panel. In either case, you should install Windows Terminal Services as soon after installing Windows 2000 as is practical. To install Terminal Services using Control Panel:
- Open Add/Remove Programs from Control Panel.
- Click Add/Remove Windows Components in the left pane of the dialog box to open the Windows Components Wizard.
- Select Terminal Services from the list of Windows components available, shown in Figure 25-1. Don't make any changes to other settings in this wizard unless you are adding or removing other components.
- You can also select Terminal Services Licensing if this machine is destined to be a domain controller. When you've made your selections, click Next to select the appropriate mode for Terminal Services, either Remote Administration Mode or Application Server Mode, shown in Figure 25-2. (If you opted to install Terminal Services Licensing, click Next to display the Terminal Services Licensing Setup screen; make any necessary changes.) Click Next and Windows 2000 will start the configuration process.
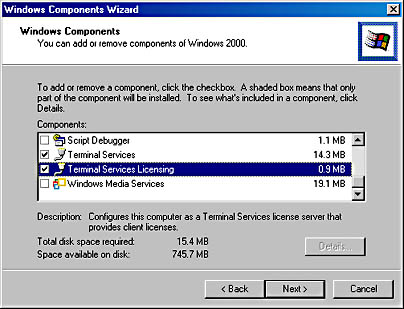
Figure 25-1. The Windows Components screen of the Windows Components Wizard.
![]()
REAL WORLD Adding and Removing Multiple Components
The temptation to install more than one application or add multiple components to Windows 2000 at a single pass is great. Knowing that you may have to reboot the machine for each of the applications, wouldn't it be easier to simply add everything at once, stacking up your reboots and saving time? Unless this is a very familiar software and machine configuration that you've done repeatedly, resist the temptation. Yes, you'll save some time if everything goes right, but it's much harder to troubleshoot a problem if you've changed multiple components at once, and it's a lot tougher to recover to a known stable state.
- You will be prompted to insert your original Windows 2000 Server CDROM. If the necessary files are found in a different location, go ahead and click OK anyway. You'll get an opportunity to choose a different location from the default.
- Click the Finish button once the additional files are loaded. Then you'll be prompted for a reboot. The changes you've made won't become effective until after that reboot.
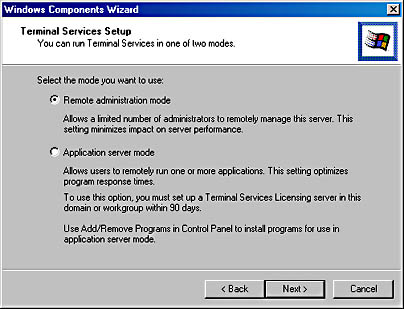
Figure 25-2. The Terminal Services Setup screen of the Windows Components Wizard.
Installing Programs
Installing programs on a Windows 2000 Server with Terminal Services installed in remote administration mode is no different from installing on a server without Terminal Services. No special steps are required, and no changes to the installation process or special compatibility scripts to support applications are required. If the application will install and run under Windows 2000 Server, it should install and run with Terminal Services installed in remote administration mode.
On the other hand, installing programs on a Windows 2000 Server with Terminal Services installed in application server mode is a different kettle of fish. When you activate the application server mode, Windows 2000 knows it must be prepared to deal with multiple users accessing the same application running simultaneously in separate memory spaces without interference or crossover. You must carefully follow the steps required to ensure that the application is installed correctly and that it will function correctly as a multiuser application.
Not all applications will install successfully, and of those applications that are supported and that will install successfully, some will require special steps or they may have special compatibility scripts that need to be run. Consult the documentation for the given application. You may want to look at the site that VeriTest maintains at http://www.veritest.com, which lists applications that have been tested for use in a Terminal Services environment.
Install Mode vs. Execute Mode
Windows 2000 Server, when configured as a Terminal Services Application Server, has two separate and distinct modes of operation—install mode and execute mode. To install an application on a server, you must be in install mode or it will not be installed correctly.
Windows 2000 is usually smart enough to recognize when you are running an installation program and will refuse to allow you to install it while the server is in execute mode. If, for example, you double-click an application's setup program, you'll get a message box like that shown in Figure 25-3.
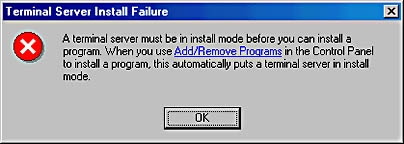
Figure 25-3. The Terminal Server Install Failure dialog box.
Unfortunately, this protection mechanism does not always work when you simply insert a CD into your CD-ROM drive; often, the installation program automatically starts. Allowing a CD to autoplay will sometimes bypass the recognition algorithm and attempt to actually install the program, usually for those CDs that have front-end menus that are called something other than Setup.exe.
You can change to install mode in either of two ways: by using the Change command on the command line or by using Add/Remove Programs in Control Panel. In general, it's best to use Add/Remove Programs, but when you need to script an installation, you'll need to use the command-line version.
Using Add/Remove Programs to Install Applications Generally, installing new applications from the server's console is best, although this isn't absolutely required for most applications. Wherever you run the installation from, however, you should make sure that all users are logged off the terminal server before beginning installation. To install a program using Add/Remove Programs, follow these steps:
- Open Add/Remove Programs from Control Panel.
- Click Add New Programs and then click CD Or Floppy to display the Install Program From Floppy Disk Or CD-ROM dialog box shown in Figure 25-4. Click Next.
- The Run Installation Program dialog box shown in Figure 25-5 opens. If Windows 2000 is able to find the setup program, you'll see it already highlighted in the Open box. But if you're installing from a network drive or Windows 2000 can't locate it for some other reason, use the Browse button to locate the installation program for the application you're installing.
- When you have highlighted the correct setup program in the box, click Next to begin the installation. While the installation is proceeding, the After Installation dialog box will remain open in the background.
- Once the installation has completed, whether successfully or not, do not accept an immediate reboot if you have a choice and the application requires one. Finish the installation and then return to the After Installation dialog box. Click Next to get to the final dialog box shown in Figure 25-6 and then click Finish. If your application requires a reboot, you can do it now.
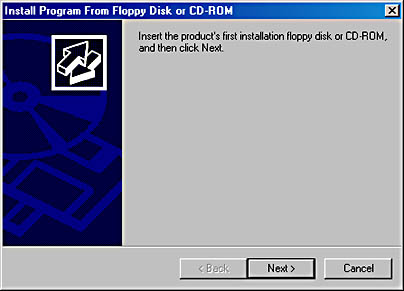
Figure 25-4. The Install Program From Floppy Disk Or CD-ROM dialog box.
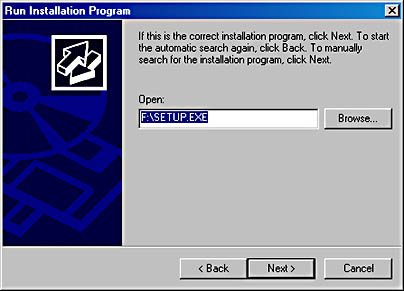
Figure 25-5. The Run Installation Program dialog box.
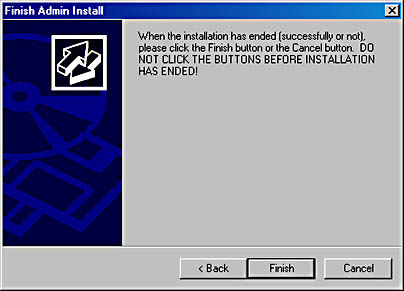
Figure 25-6. The Finish Admin Install window.
The Change Command
The Change command was introduced in Windows NT 4 Terminal Server Edition and is available in Windows 2000 Server only when you have Terminal Services installed. The Change command allows you to change between user modes (install and execute), reassign port mappings for Terminal Services sessions, and enable or disable logons to Terminal Services. The three basic commands, and their options for the Change command, are as follows:
- Change User Initiates change between install or execute mode when running as an application server. Options are:
- Install Installs new applications on the server for multiuser access
- Execute Allows programs to be executed in multiuser mode (the default value on startup)
- Query Displays the current user mode
- Change Port Changes the port assignments of COM port mappings for MS-DOS compatibility. Options are:
- portx=porty Maps port X to port Y
- /D portx Deletes the current mapping for port X
- Query Displays the current port mappings
- Change Logon Enables or disables logon sessions. Options are:
- Enable Allows users to log on from Terminal Services sessions
- Disable Prohibits users from initiating logon sessions (Current sessions aren't disconnected or terminated)
- Query Displays the current logon status
Using the Change Command to Install an Application You can also install new applications into Windows Terminal Services using the Change command. This is especially useful for scripting installations that will be installed on multiple terminal servers in an identical configuration. To install a new application using the Change command, follow these steps:
- Disable new logons to the server by typing change logon /disable.
- Find out which users are currently logged on to the server and what their session IDs are by typing query session.
- Warn the users that they will need to log off their current session by typing net send * "message".
- Reset sessions of users that are currently logged on to the server with the command reset session <sessionID>.
- Change to install mode with the command change user /install.
- Run the application's setup or installation program.
- Change back to execute mode by typing change user /execute.
- Reenable logons to the server with change logon /enable.
As you can see, using the Change command, along with other command-line utilities included with Windows 2000, enables you to easily script the installation of a program to Windows Terminal Services. In large organizations where multiple terminal servers are being used to support large user populations, using command-line utilities easily ensures that applications are installed uniformly across the enterprise, simplifying support and training.
Installing Office 2000
Installing Microsoft Office 2000 on a Windows 2000 Server that is running in application server mode requires special considerations. Like many applications that are essentially designed as single-user applications, you need to adjust settings to prevent corruption of user-specific data when the application is run in a multiuser environment.
You need a portion of the Office 2000 Resource Kit to install Office 2000 for use on a Windows 2000 Terminal Services server. You need to install the core tools portion of the kit, which you can download from http://www.microsoft.com/office/ork/2000/appndx/toolbox.htm. Once installed, run Add/Remove Programs to install Office 2000 as follows:
- Log on to the server console with an account that has administrative privileges. The installation won't run from within a Terminal Services session.
- Open Add/Remove Programs from Control Panel. Click Add New Programs and then click the CD Or Floppy button.
- If the setup program for Office 2000 isn't found automatically, use the Browse button to locate it. Once the setup program is shown, a dialog box will appear similar to that shown in Figure 25-7.
- Modify the command line shown to add TRANSFORMS="<PATH>\ termsrvr.mst" at the end. Replace the <PATH> portion with the path of the Terminal Services Tools installation from the Office 2000 Resource Kit. The default location of this file is C:\Program Files\ORKTools\ToolBox\Tools\Terminal Server Tools\termsrvr.mst, but feel free to move the file to an easier-to-type location. Click Next to begin the installation.
- When the installation has completed, close the After Installation dialog box by clicking Next and then Finish.
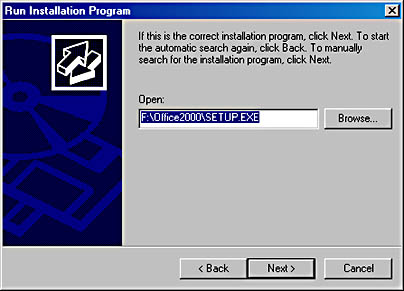
Figure 25-7. The Run Installation Program dialog box.
The special Office 2000 installation is one example of the compatibility scripts that many applications require to run correctly in Terminal Services.
EAN: 2147483647
Pages: 366