Configuring Outlook Express
Outlook Express is the free, fully featured e-mail and newsgroups client that is installed by default in all currently shipping Microsoft operating systems, making it a cinch to support. Clients are also available for the Apple Macintosh, several flavors of UNIX, and Windows 3.1, although these clients differ a little from the Windows versions, most notably the Macintosh client.
Both the Macintosh client and the UNIX client have additional support for Exchange Server, a feature not available in the Windows 3.1 clients. However, the fullest support for Exchange Server is found in Outlook 2000. Again, because this book isn't about Internet Explorer and Outlook Express, we'll only briefly cover some topics relevant to system administrators.
![]()
MORE INFO
For further information on end-user features, refer to the Microsoft Internet Explorer 5 Resource Kit or Microsoft Pocket Guide to Microsoft Internet Explorer 5 (both Microsoft Press, 1999).
![]()
NOTE
The Windows 3.1, 95/98, NT, and 2000 versions of Outlook Express do support Exchange Server via POP3 or IMAP folders, available in Exchange 5 and 5.5, respectively. However, public folder support and other Exchange Server features aren't available in the Windows Outlook Express clients.
Setting Up Accounts
Outlook Express is installed by default in Windows 2000 and with all installations of Internet Explorer, so let's jump straight into setting up accounts in Outlook Express. If you set up your e-mail account when you ran the Internet Connection Wizard, you don't even need to configure your mail account unless you have additional accounts you'd like to set up. However, you will need to configure your news servers for access to newsgroups, so read this section anyway. To set up accounts, follow this procedure:
- Launch Outlook Express and then choose Accounts from the Tools menu.
- Click the Add button. Select Mail to add a new e-mail account, select News to add a new news server, or select Directory Service to set up an LDAP directory server, as shown in Figure 23-27.
- Use the Internet Connection Wizard to set up your account and click Finish when you're done.
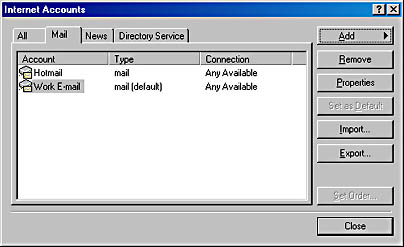
Figure 23-27. The Mail tab of the Internet Accounts dialog box.
![]()
REAL WORLD Outlook Express
When you join a Windows 2000–based domain, Outlook Express automatically configures itself with support for Active Directory. You can then use the Find People feature of Outlook Express to search Active Directory, along with any other LDAP directories and your address book.Outlook Express now includes the ability to access Web-based e-mail, specifically the Hotmail service. When you set up a Hotmail account in Outlook Express, you can access your Hotmail folders just as if they were IMAP4-based instead of Web-based. Other services might be supported—check with your e-mail provider to see if they support Outlook Express.
Changing Where Your Mail Is Stored
Your message store is where Outlook Express stores all of your local folders, including both local e-mail folders and all downloaded newsgroup information. The message store is stored by default in \Documents and Settings\useraccount\Local Settings\Application Data\Identities\{84B06BA3-9B42-4256-A39B-765E5CB06C82}\Microsoft\Outlook Express.
![]()
NOTE
The long, cryptic string in the middle of the above path is different on every machine—this is what it looks like on one of our client machines.
This place isn't bad for storing your Outlook Express folders, but you might want to place the message store somewhere easier to access if you like to poke around in the folder manually or back up only your Outlook Express folders (perhaps so you can perform a clean install of the operating system). To move your Outlook Express message store, follow these steps:
- Go to the Tools menu and choose Options.
- Click the Maintenance tab and then click the Store Folder button.
- Click Change, browse to the folder in which you want to store your Outlook data, and click OK.
Sharing Address Books with Outlook
By default, Outlook Express is set up to share its address book with Outlook's default Contacts folder. This is really handy if you use both Outlook and Outlook Express and would like to have a single address book shared across both applications. (You might do this so that you can access your Hotmail account via Outlook Express or use Outlook Express's newsreader function.)
However, sharing an address book can also be a pain if you want to keep separate address books or if you have a tendency to forget that the address book is shared and not simply imported. (It's hard to understand why anyone would be foolish enough to think that the contacts are simply imported, and therefore delete the entire contacts list, but it has happened—or so we've been told.)
To toggle the sharing of your contacts list between Outlook and Outlook Express, perform the following procedure:
- Click the Addresses toolbar button to display the address book in Outlook Express.
- Choose the Options command from the Tools menu.
- Select the first option, shown in Figure 23-28, to store all of your addresses in Outlook's Contacts folder.
- Select the second option to store your addresses in the Windows Address Book (.WAB)—a holdover from the days Outlook Express was called Internet Mail and News.
- Click OK when you're done.
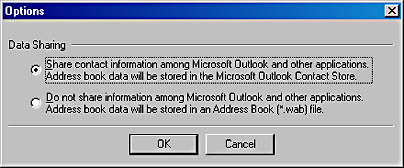
Figure 23-28. The Options dialog box.
Customizing Outlook Express's Appearance
You can customize Outlook Express's appearance to better suit you or your users or even to look like Outlook (sort of). While Outlook Express's interface can't be customized, as the Outlook 2000 interface can, and the program doesn't yet support personalized menus and toolbars, as Outlook 2000 and Windows 2000 do, you can still tweak it by using the following procedure:
- From the View menu, choose Layout. To make Outlook Express look more like Outlook, select the Outlook Bar check box and clear the Folder List check box, shown in Figure 23-29. Figure 23-30 shows the results.
- To display your contacts list under the folder list (if displayed), select the Contacts check box.
- Use the Preview Pane check boxes to toggle the preview pane and preview pane header on or off, as well as to control where the pane is placed onscreen.
- To add or remove buttons from a toolbar, click the Customize Toolbar button. When you're finished customizing your toolbar in the Customize Toolbar dialog box, click Close.
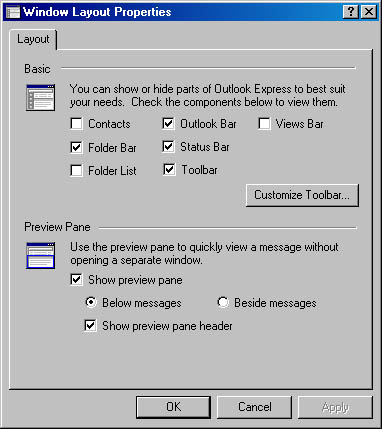
Figure 23-29. The Window Layout Properties dialog box.
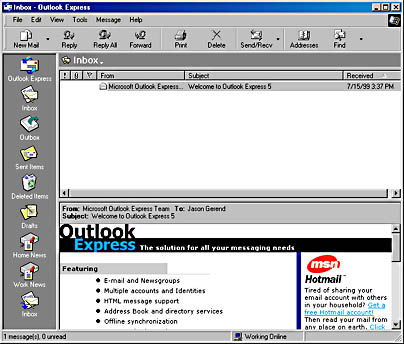
Figure 23-30. Outlook Express's appearance made to look similar to Outlook's appearance.

TIP
You can add shortcuts to the Outlook Bar in Outlook Express just as you can in Outlook 2000: display the folder list and drag the folder onto the Outlook Bar.
Setting Up Outlook Express Identities
Outlook Express has a relatively new feature called identities that you're going to think is kind of pointless. Identities are a nonsecure way of setting up Outlook Express for multiple users (or for a single user with multiple personalities, if you prefer)—all in a single user account. When you set up a new identity, a new folder is created—with the long string of gibberish being your unique, new identity—called something like \Documents and Settings\useraccount\Local Settings\Application Data\Identities\{84B06BA3-9B42-4256-A39B-765E5CB06C82}\.
The folder store isn't in a different user account, just a different folder in the same user account. It's not really a feature that was created with Windows NT or Windows 2000 in mind, but is instead intended for users of Windows 95/98 who don't set up separate profiles. If multiple users want to share a computer, we recommend that they set up multiple user accounts, which adds file security that identities don't provide (assuming that you use an NTFS volume to store your user settings).
However, the identities feature is occasionally handy for keeping your personal folder store moderately separate from your business folder store, although it usually makes more sense to set up separate folders in your single Outlook Express folder store and use message rules to move messages received from different accounts to different folders. (For more information, see "Creating Message Rules to Automatically Process Mail and News" later in this chapter.) If you still want to set up and use multiple identities after reading this, you've probably found a good reason, so without further ado, here's how to do it:
- From the File menu, choose Identities, and then choose Add New Identity from the submenu.
- Enter your name and then select the Require A Password check box to provide a minimal amount of security to your identity. Click OK when you're finished.
- In the Manage Identities dialog box shown in Figure 23-31, select the identity to use as the default identity when starting Outlook Express and then click Close to be done with identities.
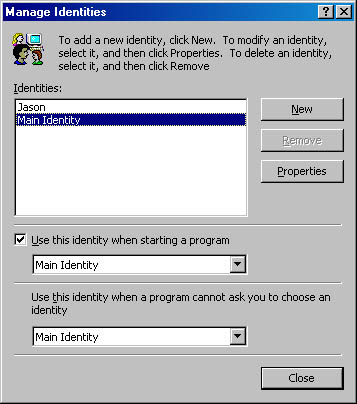
Figure 23-31. The Manage Identities dialog box.
Changing the Default Mail Program
When you install Outlook Express, the program automatically becomes your default e-mail and newsreader program. To change the default e-mail program you use on your system to another program, follow these steps:
- Open the Internet Options Control Panel tool.
- Click the Programs tab and then select the programs to use for each type of Internet activity as shown in Figure 23-32.
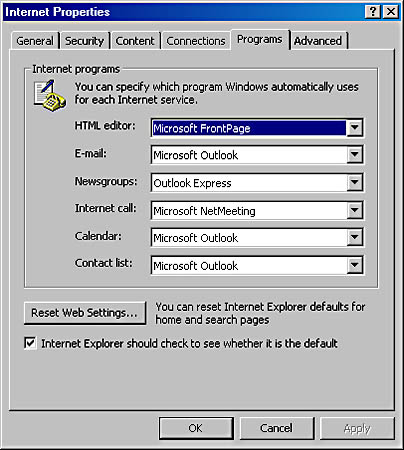
Figure 23-32. The Programs tab of the Internet Properties window.
![]()
NOTE
If you change the default e-mail program from Outlook Express to another program, the next time you launch Outlook Express, you'll be asked whether you want to use Outlook as your default e-mail program. Click No.
Creating Message Rules to Automatically Process Mail and News
Outlook Express, like Outlook 2000, has the ability to create rules that will automatically process your e-mail and newsgroup messages for you. (Remember message rules don't work for IMAP4 or HTTP mail accounts, only for POP3 accounts.) To use this feature, follow these steps:
- In the Inbox, choose Message Rules from the Tools menu, and then either select Mail to create a new rule that processes e-mail, or select News to create a new rule that processes posts in newsgroups that you read.
- In the Select The Conditions For Your Rule box (Figure 23-33), select the rule conditions.
- In the Select The Actions For Your Rule box, select the actions to perform when your specified conditions are met.
- Click the underlined words in the Rule Description box to fill in necessary information.
- Enter a name for the rule in the text box at the bottom of the dialog box and then click OK.
- To disable a rule in the Message Rules dialog box shown in Figure 23-34, clear the check box next to it.
- To run a rule now on the messages you currently have, select the message and click the Apply Now button.
- To add people to a list of blocked senders from whom messages are deleted (for e-mail messages) or hidden (for news messages), click the Blocked Senders tab, click Add, and then enter the sender's e-mail address in the text box provided.
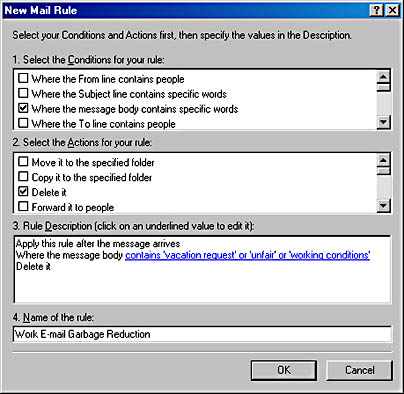
Figure 23-33. The New Mail Rule dialog box.
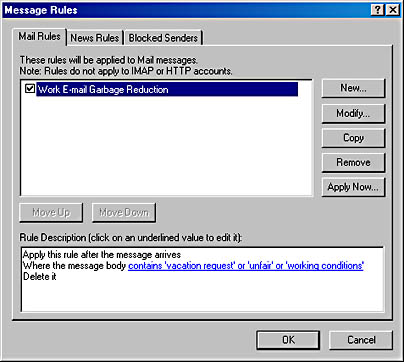
Figure 23-34. The Mail Rules tab of the Message Rules dialog box.
Configuring Secure E-Mail
Outlook Express allows you to increase the security of your e-mail messages by using a digital ID to digitally sign and optionally encrypt them. Digitally signing your e-mail allows the recipients of your messages to verify that you were the sender of the message and not someone trying to impersonate you. Encryption allows you to encode your messages such that your e-mail can't be read by anyone other than the intended recipient, even if the message is intercepted.
To use secure e-mail in Outlook Express, you need to obtain a digital ID from a certificate authority such as Verisign, Inc. For more information on obtaining a digital ID, choose Options from the Tools menu, click the Security tab, and then click the Get A Digital ID button. Once you have a digital ID, follow these steps to set up Outlook for secure e-mail:
- After obtaining and installing your digital ID in Internet Explorer as directed by the certificate authority you obtained your digital ID from, go to the Tools menu and choose Options.
- Click the Security tab, and click the Digital IDs button to verify that your certificate is installed correctly.
- Select the Encrypt Contents And Attachments For Outgoing Messages check box at the bottom of the Security tab to automatically encrypt all messages you send.
- Select the Digitally Sign All Outgoing Messages check box to automatically sign all messages you send.
- To be able to receive encrypted replies from your recipients, click Advanced and then select the Include My Digital ID When Sending Signed Messages check box, shown in Figure 23-35.
- Select the Encode Messages Before Signing option to prevent the message from being tampered with. Note that recipients whose e-mail programs don't support S/MIME signatures (such as most programs you access through Telnet) won't be able to read your messages.
- Select the Add Senders' Certificates To My Address Book option to automatically save other users' certificates to your address book when you receive digitally signed messages, allowing you to send encrypted messages back to the sender.
- Select the Only When Online option to check digitally signed messages you receive to see if the certificates are valid or select Never to disable this check.
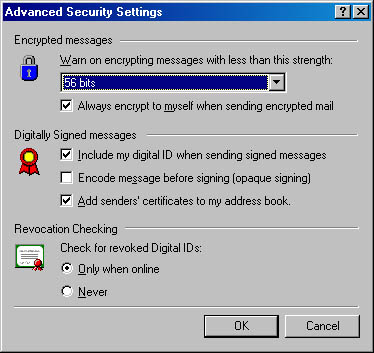
Figure 23-35. The Advanced Security Settings dialog box.
TIP
To strengthen the security of Outlook Express's message encryption, you can download a 128-bit encryption version of Internet Explorer from the Windows Update site.
EAN: 2147483647
Pages: 366