Customizing the Way Outlook Handles E-Mail
Another Outlook 2000 benefit is that it makes dealing with your e-mail easier and more secure. You can set up rules to automatically process your messages, create filters to handle junk mail and adult-content messages, and provide encrypted message support and digitally sign your messages. Outlook can simplify your e-mail life in many other ways, but because this book isn't about Outlook, we can only briefly touch on its virtues.
Turning on Junk Mail and Adult-Content Rules
If you post messages on Internet newsgroups using a real e-mail name, perhaps you know the joy of receiving lots of junk mail and so-called adult messages. Fortunately, Outlook can help you deal with this—and not by abandoning your e-mail address, picking a new one, and keeping it a secret (although this is a surefire way to reduce the hassle).
Outlook has configurable filters for junk mail and adult messages that allow you to color—or move to another folder—messages that contain certain keywords. To turn on these filters, follow these steps:
- Display your Inbox and then click the Organize toolbar button.
- Click the Junk E-Mail tab, shown in Figure 23-24.
- To color junk or adult e-mails a different color, choose Color from the first drop-down list box and then select the color to use from the second.
- To move junk or adult e-mails to a different folder, such as the Deleted Items folder, choose Move from the first drop-down list box and then select the folder to move the messages to from the second box.
- Click Turn On to apply the rule.
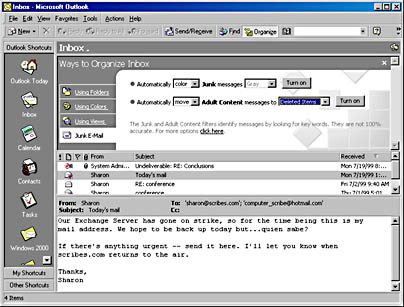
Figure 23-24. Using junk e-mail filters and adult-content filters.

CAUTION
Junk e-mail filters and adult-content filters work by looking for messages with certain keywords in them. Sometimes they might snag legitimate messages. Therefore, you might not want to set up the rules to move messages to the Deleted Items folder. You might also want to use the Rules Wizard to copy the rule, and then modify it by adding a list of exceptions to the rule so that key messages aren't accidentally deleted.
Creating Message Rules to Automatically Process Mail
Outlook 2000 contains an extremely useful tool called the Rules Wizard that allows you to create client-side rules or server-side rules (when used with an Exchange server) that will process your e-mail for you. If you're using Outlook with an Exchange server, you can also use the Out Of Office Assistant command on the Tools menu to create a special server-side rule that can handle and respond to mail received while you're out of the office. To use this feature, follow these steps:
- In the Inbox, choose the Rules Wizard from the Tools menu.
- Click New to create a new rule.
- Use the Rules Wizard's screens to supply the conditions to which the rule should be applied and to determine which actions should be performed. Click Finish when you're done.
- To disable a rule in the Rules Wizard screen shown in Figure 23-25, clear the check box next to it.
- To run a rule now on the messages you currently have, select the message and click the Run Now button.
- To import or export message rules, click the Options button.
- When you're finished creating rules, click OK.
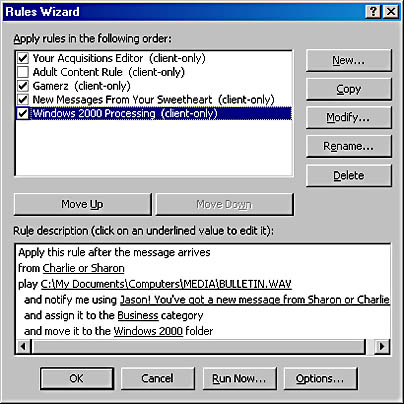
Figure 23-25. Using the Rules Wizard to create and manage rules for processing your e-mail.
Setting Up Security
Outlook allows you to increase the security of your e-mail messages by using a digital ID to digitally sign and optionally encrypt your e-mail messages. Digitally signing your e-mail allows the recipients of your messages to verify that you were the sender of the message and not someone trying to impersonate you. Encryption allows you to encode your messages such that your e-mail can't be read by anyone other than the intended recipient, even if the message is intercepted.
To use secure e-mail in Outlook, you need to obtain a digital ID from a certificate authority such as Verisign or from the Key Management server on your Exchange Server network. To obtain a digital ID, choose Options from the Tools menu, click the Security tab, and then click the Get A Digital ID button. Once you have a digital ID, follow the steps below to set up Outlook for secure e-mail.

TIP
To strengthen the security of Outlook's message encryption, you can download a 128-bit encryption version of Outlook 2000 from Microsoft's Office 2000 Web site at http://officeupdate.microsoft.com.
- After obtaining and installing your digital ID in Microsoft Internet Explorer, as directed by the certificate authority you obtained your digital ID from, choose Options from the Tools menu.
- Click the Security tab and click the Setup Secure E-Mail button. Outlook displays the Change Security Settings dialog box, shown in Figure 23-26.
- Enter a name for your security settings in the Security Settings Name box.
- Select S/MIME from the Secure Message Format drop-down list box to specify the settings for Internet e-mail, or select Exchange Server Security to specify the settings for use with Exchange Server mail.
- Select the Default Security Setting For This Secure Message Format check box to use these settings for all secure e-mail in this message format (S/MIME-based Internet e-mail or Exchange Server mail).
- Select the Default Security Setting For All Secure Messages check box to use these security settings for all secure messages, both Internet E-Mail and Exchange Server mail.
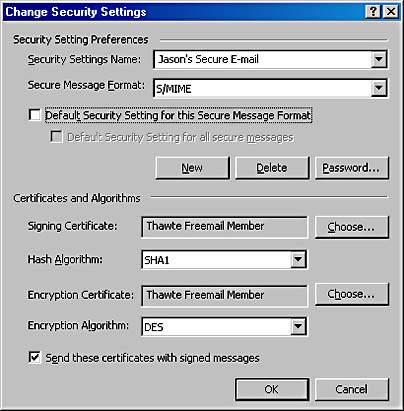
Figure 23-26. The Change Security Settings dialog box.
CAUTION
Don't use Exchange Server security for all secure messages unless your Exchange Server ID is S/MIME-compatible, because secure e-mail to Internet-mail-based recipients might not be readable (if encrypted) or the signature might be unrecognizable (if signed).
- If your digital ID isn't already displayed, click the Choose button next to the Signing Certificate box to select the digital ID to use. Note that the e-mail address on the certificate must match the e-mail address you use to send mail.
- To be able to receive encrypted replies from your recipients, select the Send These Certificates With Signed Messages check box.
- Click OK and then select the Encrypt Contents And Attachments For Outgoing Messages check box at the top of the Security tab to automatically encrypt all messages you send.
- Select the Add Digital Signature To Outgoing Messages check box to automatically sign all messages you send.
- Select the Send Clear Text Signed Message option to allow recipients whose e-mail programs don't support signatures (such as most programs you access through Telnet) to be able to read your messages.
EAN: 2147483647
Pages: 366
- Chapter I e-Search: A Conceptual Framework of Online Consumer Behavior
- Chapter V Consumer Complaint Behavior in the Online Environment
- Chapter X Converting Browsers to Buyers: Key Considerations in Designing Business-to-Consumer Web Sites
- Chapter XVI Turning Web Surfers into Loyal Customers: Cognitive Lock-In Through Interface Design and Web Site Usability
- Chapter XVIII Web Systems Design, Litigation, and Online Consumer Behavior