Wireless Security Using 802.1X Authentication
|
| < Day Day Up > |
|
Securing 802.11 (Wi-Fi) networks is a subject of much debate and a myriad of options. (See the Real World sidebar, “Wireless Security Strategies,” appearing later in this chapter.) One of the most sophisticated methods of securing an 802.11 network is using 802.1X authentication in conjunction with WEP or WPA encryption. Although setting up 802.1X authentication evokes panic in the hearts of many administrators due to its complexity, it’s not as hard as you might think, especially when done in a simplified manner suitable for small businesses, as discussed in the following sections.
| Caution | Deploying 802.1X authentication is a complex process, so it’s extremely important to carefully follow the steps in each section, double-check your work, and not skip any sections. |
Wireless Security Strategies
There are a number of strategies for securing wireless 802.11a/b/g networks:
-
MAC address filtering Usually combined with disabling SSID broadcasting and using static IP addresses for clients, MAC address filtering can be hacked easily with a network sniffer, requires a lot of administrative work and hassle, and is a complete waste of time.
-
Wired Equivalent Privacy (WEP) Encryption This method secures a network against casual hacking attempts, but is easily defeated by monitoring network traffic for an extended period of time (which can be as short as several hours on a busy network— even when 128-bit keys are used). WEP encryption also requires manually typing long encryption keys on all clients and access points, which can be a nuisance. To maximize security with WEP, change encryption keys weekly if possible.
-
Wi-Fi Protected Access (WPA) WPA provides good security for wireless networks, but you must manually type network keys on all clients and access points, unless 802.1X authentication is used. Not all client operating systems support WPA yet—only newer access points support it—and WPA can be easily compromised when the keys used aren’t long (128 bits), randomly generated strings.
-
VPNs An extremely popular, secure, and easily set up method of securing wireless networks is to place access points in a perimeter network and have clients establish a VPN connection to access the internal network. However, there is some performance impact; Group Policy Computer Configuration doesn’t work over VPN links; and remote administration of clients only works while the VPN is connected.
-
802.1X Authentication 802.1X authentication using WEP or WPA encryption is very secure (keys are generated dynamically and mutual authentication occurs) and offers the most seamless client experience—authentication takes place using the user account and digital signatures. This is the preferred wireless solution by Microsoft; however, it does require additional configuration on the server and clients, as well as access points that support 802.1X authentication.
Choosing Authentication Protocols
The 802.1X authentication standard requires the use of an authentication protocol. There are two worth considering:
-
Protected Extensible Authentication Protocol (PEAP) combined with Microsoft Challenge Handshake Authentication Protocol version 2 (MS-CHAP v2)
-
Extensible Authentication Protocol-Transport Layer Security (EAP-TLS)
PEAP is the easiest protocol to implement—only the Windows Small Business Server computer requires a certificate. However, because PEAP relies on user credentials for authentication, Group Policy computer configuration information won’t work, nor will remote administration while the user is logged off.
EAP-TLS provides higher security and greater functionality by requiring client authentication using computer and user certificates. This allows a client computer to remain connected to the network while the user is logged off (the computer is authenticated), and also permits Group Policy computer configuration processing. However it does mean installing computer and user certificates on the client.
Because PEAP is easier to configure, start by implementing PEAP and switch to a full-blown EAP-TLS configuration when you’re ready—immediately or at a later date.
| Tip | A wireless client receives updated Computer Configuration policies every time it restarts while connected to the network via an Ethernet connection, including during the initial process of joining the computer to the Windows Small Business Server network. For companies that rarely change Group Policy settings, updating Computer Configuration policies in this manner might be satisfactory. |
802.1X Authentication Process
Here’s a summary of the 802.1X authentication process for a client.
-
The client associates with an access point.
-
The client asks for the RADIUS server’s certificate to authenticate the server.
-
The client sends its computer account credentials to the RADIUS server.
-
The RADIUS server contacts Active Directory to verify the computer account credentials, and checks any remote access policies to verify that the computer belongs to a group with access permissions.
-
If the client’s computer account has the proper permissions, the client and RADIUS server generate WEP (or WPA) keys and establish a secure session, logging the computer onto the domain.
-
The client sends user credentials, which the RADIUS server also checks in Active Directory.
-
If successful, the user is logged onto the domain and given network access.
PEAP and Group Policy Processing
Although PEAP provides great wireless security and is easier to implement than EAP-TLS authentication, there are two significant drawbacks. The first is that you won’t be able to remotely administer wireless clients unless someone’s logged on. The second is that Group Policy Computer Configuration won’t work.
Group Policy Computer Configuration is used by Windows Small Business Server to apply the following Group Polices to computers in the network:
-
Password policies
-
Account lockout policies
-
Tightened Kerberos policies
-
Prohibit installation of Network Bridge on internal network
-
Prohibit use of Internet Connection Firewall on internal network
-
Prohibit use of Internet Connection sharing on internal network
-
Enable Domain Admins to offer remote assistance without invitation
Additionally, Group Policy Computer Configuration is the easiest way to enable clients to connect to Software Update Services for patches (as discussed in Chapter 6.)
Deploying Certificates
The first step in deploying 802.1X authentication is to deploy user and computer certificates to all wireless clients (when implementing EAP-TLS), and request a computer certificate for the Windows Small Business Server computer. (Even though the computer already has several certificates, it needs a domain controller certificate signed by a trusted certificate authority for PEAP and EAP-TLS.) Follow the steps in the “Deploying Certificate Services” section of this chapter to do this.
Adding Access Points as RADIUS Clients
After deploying user and computer certificates to wireless clients and the Windows Small Business Server computer, set up IAS to recognize wireless access points as RADIUS clients. To do so, install Internet Authentication Service if you haven’t already (as described in the “Using Internet Authentication Service to Increase VPN Security” section), and then complete the following steps:
-
Open Internet Authentication Service from the Administrative Tools folder.
-
Right-click the RADIUS Clients container and choose New RADIUS Client from the shortcut menu. This opens the New RADIUS Client Wizard.
-
On the Name And Address page (Figure 15-20), type a descriptive name for the access point in the Friendly Name box. In the Client Address (IP or DNS) box, type the IP address of the access point, and then click Next.
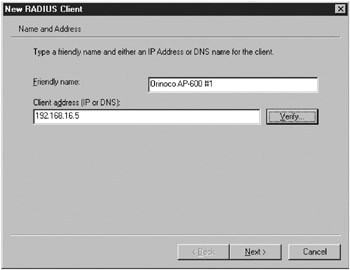
Figure 15-20: The New RADIUS Client Wizard.Caution The access point should use a static IP address or a DHCP reservation. When using a static IP address, either make sure that the address is in the range of addresses automatically excluded from the DHCP scope by Windows Small Business Server (192.168.16.3 to 192.168.16.9), or add an exclusion range that includes the IP address of the access point, as discussed in “Managing DHCP” earlier in this chapter.
-
On the Additional Information page, type a complex password in the Shared Secret and Confirm Shared Secret boxes. You must type this password into each access point as well, as discussed in the “Configuring Wireless Access Points” section of this chapter. Click Finish when you’re done.
| Note | A shared secret is a password used between an IAS server and any wireless access points. The shared secret must be the same on both the IAS server and all access points and must follow general password rules: it’s case sensitive, can use alphanumeric and special characters, and can be up to 255 characters long. Use a long (16-characters or longer) and complex string to maximize security—because the shared secret is embedded in the software and is only typed once, you don’t need to memorize it. |
Creating a Remote Access Policy
The next step in configuring wireless security is to create a new remote access policy that allows clients that use 802.1X authentication (and have proper domain logon permissions) to connect to the network. To do so, complete the following steps:
-
Open Internet Authentication Service from the Administrative Tools folder.
-
Right-click Remote Access Polices and choose New Remote Access Policy from the shortcut menu. This displays the New Remote Access Policy Wizard. Click Next on the first page.
-
On the Policy Configuration Method page, type a policy name such as Wireless access to internal network. Click Next.
-
On the Access Method page, select Wireless (Figure 15-21) and then click Next.
-
On the User Or Group Access page, select Group and then click Add.
-
In the Select Groups dialog box, type Domain Users; Domain Computers and then click OK. The User Or Group Access page updates to show the Domain Users and Domain Computers groups (Figure 15-22). Click Next to continue.
Tip To limit wireless access to certain users, create a new security group named Wireless Users, add the desired users and their associated computer accounts to the group, and then specify this group in the Select Groups dialog box instead of Domain Users and Domain Computers.
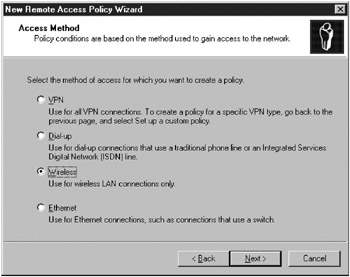
Figure 15-21: The Access Method page of the New Remote Access Policy Wizard.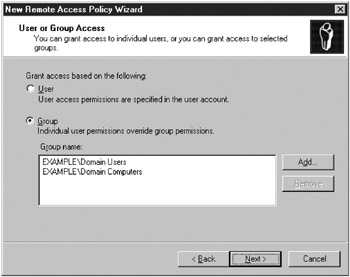
Figure 15-22: The User Or Group Access page of the New Remote Access Policy Wizard. -
On the Authentication Methods page, select the type of authentication to use and then click Next.
-
Protected EAP (PEAP) Choose this if you’ve decided not to deploy user and computer certificates to all wireless clients, or you want to simplify initial testing and client deployment.
-
Smart Card Or Other Certificate Choose this if you’ve decided to implement EAP-TLS authentication, which requires that wireless clients have valid user and computer certificates. See the “Enabling EAP-TLS” section later in this chapter for the additional steps required to deploy EAP-TLS.
-
-
Review the settings and then click Finish. If you have trouble getting to this page, check to make sure that the certificate was properly issued to the server.
-
In the Remote Access Policies container, double-click the remote access policy you just created and click Edit Profile in the Properties dialog box.
-
Click the Encryption tab and clear all check boxes except Strongest Encryption (MPPE 128 bit) to maximize the security of the connection. Click OK twice.
Configuring Wireless Access Points
Once the Windows Small Business Server computer is properly configured for 802.1X authentication, it’s time to set up the wireless access points. The procedure varies from access point to access point, but here are the settings to configure:
-
Set up the access points with static IP addresses in the range of 192.168.16.3 through 192.168.16.9, a subnet mask of 255.255.255.0, and a gateway address of 192.168.16.2. (If you need more addresses, see the “Managing DHCP” section earlier in this chapter for information about creating new exclusion ranges.)
-
Disable the DHCP server feature of the access point.
-
Change the SSID to one that’s appropriate for the network but doesn’t reveal the location or name of the business.
-
Change all access point passwords to secure passwords.
-
Enable Primary RADIUS Server, and type the IP address of the Windows Small Business Server in the Primary RADIUS Server IP Address field (most likely 192.168.16.2). In the Destination Port, type 1812.
-
Type the shared secret you typed when adding the access points as RADIUS clients. (See the “Adding Access Points as RADIUS Clients” section in this chapter for more information.)
-
Enable WEP encryption or WPA if all access points and clients support it.
-
Enable 802.1X Authentication with 128-bit keys.
Configuring Clients to Use PEAP
Most companies set up 802.1X authentication using PEAP before implementing EAP-TLS authentication. PEAP is simpler to set up (clients don’t need certificates) and is easier to test. To configure clients for 802.1X authentication using PEAP, complete the following steps. (See the next section to set up EAP-TLS authentication.)
-
Using a wired network connection, join the computer to the Windows Small Business Server network using the Network Configuration Wizard, if you haven’t already. See Chapter 12 for help with this step.
-
While still connected via wired network connection, click Start, choose Run, type \\sbssrv\CertEnroll in the Open box (where sbssrv is the name of the Windows Small Business Server computer), and then click OK.
-
In the list of certificates, double-click the certificate corresponding to the Windows Small Business Server computer.
-
In the Certificate dialog box (Figure 15-23), click Install Certificate. The Certificate Import Wizard appears.
Tip If there are a large number of wireless clients on the network, use Group Policy to automate the deployment of certificates and 802.11 settings after verifying that 802.1X authentication is working properly. For information about how to do this, see the “Using Group Policy to Automatically Configure 802.11 and Certificate Settings” section later in this chapter.
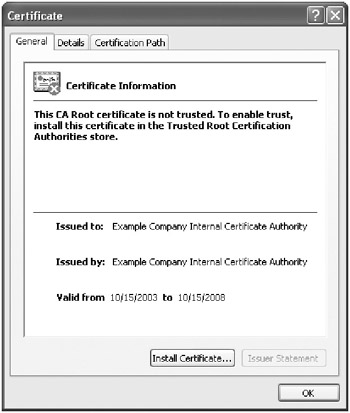
Figure 15-23: The Certificate dialog box. -
Click Next on the first page of the Certificate Import Wizard, click Next on the Certificate Store page, and then click Finish to install the certificate automatically. This places it in the root store.
-
Disconnect from the wired network (if you’re connected), right-click the Wireless Network Connection icon in the system tray, and choose View Available Networks from the shortcut menu. Clients running operating systems other than Windows XP should follow the instructions provided with their wireless network card.
-
In the Wireless Network Connection dialog box, click Advanced.
-
In the Available Networks section of the Wireless Network Connection Properties dialog box (Figure 15-24), select the correct network and then click Configure. (This dialog box looks different on computers running Windows XP Service Pack 2 or later.)
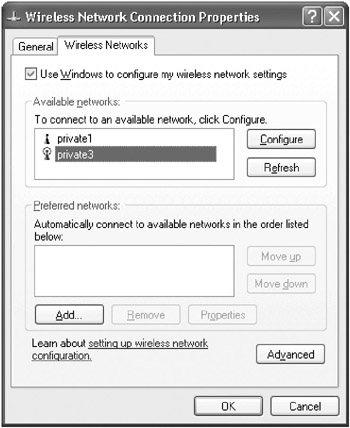
Figure 15-24: The Wireless Network Connection Properties dialog box on a computer running Windows XP Service Pack 1. -
If the client is running Windows XP Service Pack 1 without the WPA patch, verify that the Data Encryption (WEP Enabled) and The Key Is Provided For Me Automatically check boxes are selected in the Wireless Network Properties dialog box (Figure 15-25). If the client has the WPA patch installed or is running Windows XP Service Pack 2 or later, select Open from the Network Authentication box (or WPA if using WPA), and WEP from the Data Encryption box (or TKIP if using WPA). The dialog box might look somewhat different in Windows XP Service Pack.
-
Click the Authentication tab (Figure 15-26), select the Enable IEEE 802.1x Authentication For This Network check box, choose Protected EAP (PEAP) from the EAP Type box, select Authenticate As Computer When Computer Information Is Available, and then click OK. After clicking OK again, the computer authenticates and connects to the network.
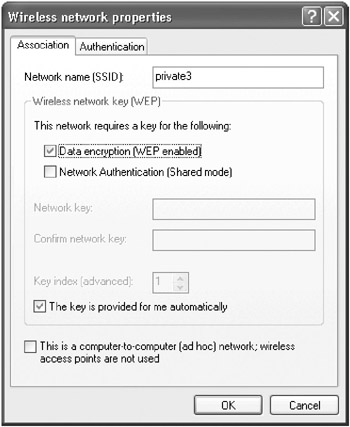
Figure 15-25: The Wireless Network Properties dialog box on a computer running Windows XP Service Pack 1.
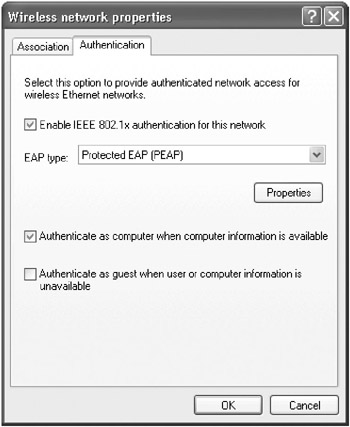
Figure 15-26: The Authentication tab of the Wireless Network Properties dialog box.
Troubleshooting 802.1X Authentication
If clients can’t connect using 802.1X authentication, check Event Viewer on the Windows Small Business Server computer for clues. Enable all encryption levels in the Remote Access Policy, and verify that the client computer has the Windows Small Business Server computer’s certificate properly installed. Installing Network Monitor and performing a network capture while the client attempts to connect can also be helpful.
If the client loses a connection when roaming between access points in the same network, click Properties on the Authentication tab of the Wireless Network Properties dialog box and select the Enable Fast Reconnect check box.
Enabling EAP-TLS
Once 802.1X authentication is working with PEAP, implementing EAP-TLS authentication is relatively easy. (PEAP is often deployed first to simplify initial testing.) To enable EAP-TLS, use the following sections to modify the wireless remote access policy and configure the clients to authenticate using certificates.
| More Info | User and computer certificates must be installed on wireless clients before they can authenticate using EAP-TLS. To request user and computer certificates, see the “Requesting Computer and User Certificates” section of this chapter. |
Enabling EAP-TLS in Remote Access Policy
If you created a remote access policy that permits PEAP authentication (in the “Creating a Remote Access Policy” section of this chapter), use the following steps to add EAP-TLS to the list of allowed authentication protocols. If you chose Smart Card Or Other Certificate on the Authentication Methods page when creating the remote access policy, skip this section.
To add EAP-TLS authentication to the remote access policy you created earlier in this chapter, complete the following steps:
-
Open Internet Authentication Service from the Administrative Tools folder.
-
Select Remote Access Policies and then double-click the wireless access policy you created in the “Creating a Remote Access Policy” section of this chapter.
-
In the Properties dialog box, click Edit Profile.
-
In the Edit Dial-In Profile dialog box, click the Authentication tab (Figure 15-27).
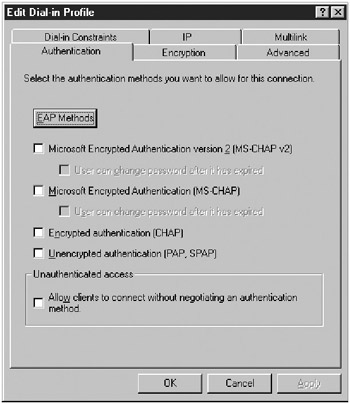
Figure 15-27: The Authentication tab of the Edit Dial-In Profile dialog box. -
Click EAP Methods. In the Select EAP Providers dialog box, click Add.
-
In the Add EAP dialog box, select Smart Card Or Other Certificate and then click OK.
-
In the Select EAP Providers dialog box (Figure 15-28), select Protected (EAP) and click Remove. If you want to leave PEAP enabled until EAP-TLS is deployed and operating on all clients, select PEAP and click Move Down so that it is used only by clients who can’t authenticate using EAP-TLS. When you’re finished, click OK, and then click OK again twice to return to the Internet Authentication Service console.
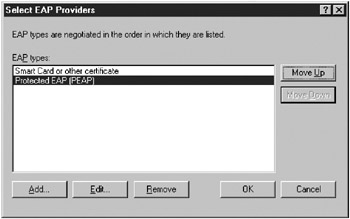
Figure 15-28: The Select EAP Providers dialog box.
Configuring Clients to Use EAP-TLS
After enabling EAP-TLS in the remote access policy and deploying computer and user certificates to wireless clients (as discussed in the “Requesting Computer and User Certificates” section of this chapter), complete the following steps to configure clients for 802.1X authentication using EAP-TLS.
-
On a client computer, disconnect from the wired network (if you’re connected), right-click the Wireless Network Connection icon in the system tray, and choose View Available Networks from the shortcut menu. Clients running operating systems other than Windows XP should follow the instructions provided with their wireless network card.
-
In the Wireless Network Connection dialog box, click Advanced. (Computers running Windows XP Service Pack 2 or later might appear somewhat different.)
-
In the Available Networks section of the Wireless Network Connection Properties dialog box (Figure 15-29), select the correct network and then click Configure.
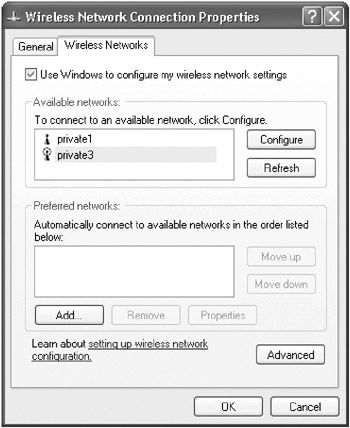
Figure 15-29: The Wireless Network Connection Properties dialog box. -
If the client is running Windows XP Service Pack 1 without the WPA patch, verify that the Data Encryption (WEP Enabled) and The Key Is Provided For Me Automatically check boxes are selected in the Wireless Network Properties dialog box. If the client has the WPA patch installed or is running Windows XP Service Pack 2 or later, select Open in the Network Authentication box (or WPA if using WPA), and WEP in the Data Encryption box (or TKIP if using WPA on the network). The dialog box might look somewhat different in Windows XP Service Pack 2.
-
Click the Authentication tab (Figure 15-30), select the Enable IEEE 802.1x Authentication For This Network check box, choose Smart Card Or Other Certificate in the EAP Type box, select Authenticate As Computer When Computer Information Is Available, and then click OK. After clicking OK again, the computer authenticates and connects to the network.
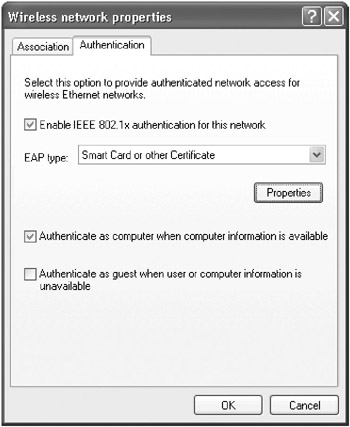
Figure 15-30: The Authentication tab of the Wireless Network Properties dialog box.
|
| < Day Day Up > |
|
EAN: 2147483647
Pages: 224