Creating L2TP VPN Connections
|
| < Day Day Up > |
|
Layer 2 Tunneling Protocol (L2TP) is currently the most secure VPN protocol available in Windows Small Business Server 2003, offering significantly higher levels of security than PPTP. Unfortunately, setting up L2TP is a complex process involving a number of different services and tasks. The following sections reduce this complexity into a series of straightforward steps that make deploying L2TP almost easy.
Deploying Certificates
The first step in setting up L2TP is to deploy user and computer certificates to all VPN clients, and to request a computer certificate for the Windows Small Business Server computer. (Even though the computer already has several certificates, it needs a domain controller certificate signed by the certificate authority.) Follow the steps in the “Deploying Certificate Services” section of this chapter to do this.
Modifying the Small Business Remote Access Policy
After deploying user and computer certificates to VPN clients and the Windows Small Business Server computer, edit the Small Business Remote Access Policy to allow authentication via certificates. To do so, install Internet Authentication Service, if it’s not already (as described in the “Using Internet Authentication Service to Increase VPN Security” section of this chapter), and then complete the following steps:
-
From the Start menu, choose the Administrative Tools folder and then select Internet Authentication Service. This opens the Internet Authentication Service console.
-
Select Remote Access Policies and then double-click Small Business Remote Access Policy.
-
In the Small Business Remote Access Policy Properties dialog box, click Edit Profile. The Edit Dial-In Profile dialog box appears.
-
Click the Authentication tab and then click EAP Methods. The Select EAP Providers dialog box appears.
Security Alert To increase the security of VPN connections, disable MS-CHAP authentication and require 128-bit encryption using the Authentication and Encryption tabs, as discussed in the “Using Internet Authentication Service to Increase VPN Security” section of this chapter.
-
Click Add, select Smart Card Or Other Certificate, and then click OK. The Select EAP Providers dialog box (Figure 15-14) lists the newly added EAP type.
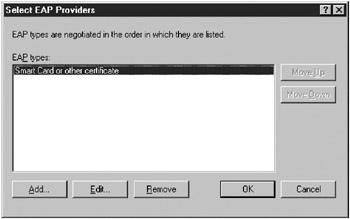
Figure 15-14: The Select EAP Providers dialog box. -
Select Smart Card Or Other Certificate and click Edit. In the Smart Card Or Other Certificate Properties dialog box that appears, select the certificate the server should use to authenticate itself with VPN clients and then click OK. Click OK, and then click OK again to finish updating the profile.
| Tip | Add the Protected EAP (PEAP) authentication method as well if you want to allow L2TP connections authenticated with MS-CHAP v2 instead of certificates. PEAP authentication provides a way of gradually moving to a certificate-based authentication—implement L2TP connections using certificates when possible, and PEAP when not. PEAP authentication also makes troubleshooting L2TP VPN connections easier. |
Opening Ports in the Firewall
After deploying certificates and modifying the default remote access policy, open ports in the firewall to allow L2TP VPN connections to pass through to the internal network. The following sections show how to open the appropriate ports in ISA Server 2000 (for Windows Small Business Server 2003, Premium Edition, users) and in the Routing and Remote Access firewall (for Windows Small Business Server, Standard Edition, users).
Opening Ports in ISA Server 2000
If you’re using ISA Server 2000, complete the following steps to open ports for L2TP:
-
Click Start, choose All Programs, Microsoft ISA Server, and finally ISA Management.
-
Expand Servers And Arrays, then SBSSRV (assuming the server is named SBSSRV), and finally select Network Configuration. The Configure Network Connection taskpad appears.
-
Click Configure A Client Virtual Private Network (VPN). The ISA VPN Server Wizard appears.
-
Click Next and then Finish (it’s a short wizard). An ISA Virtual Private Network (VPN) Wizard dialog box appears.
-
Click Yes to install the Routing And Remote Access service, and then click Yes to restart the service.
| Caution | The first time you run the ISA VPN Server Wizard, the wizard clears any Routing And Remote Access settings you might have customized. |
| Note | If you have a stand-alone firewall, open UDP port 500 for Internet Key Exchange (IKE), UDP port 4500 for IPSec NAT-Traversal traffic, and IP Protocol port 50 for IPSec ESP traffic. |
The Configure E-Mail and Internet Connection Wizard Disables L2TP Packet Filters
Changing firewall settings using the Configure E-Mail and Internet Connection Wizard disables packet filters created by the ISA VPN Server Wizard for L2TP VPN connections. To get L2TP connections working again, complete the following steps:
-
In the ISA Management console, expand Servers And Arrays, then SBSSRV (assuming the server is named SBSSRV), and finally select Access Policy. The Configure Access Policy taskpad appears.
-
Double-click Allow L2TP Protocol IKE Packets, select the Enable This Filter check box in the Properties dialog box, and then click OK.
-
Double-click Allow L2TP Protocol Packets, select the Enable This Filter check box in the Properties dialog box, and then click OK.
Opening Ports in Routing and Remote Access
If you’re using Windows Small Business Server 2003, Standard Edition, complete the following steps to open ports for L2TP in the Routing and Remote Access firewall:
-
Open Server Management, and expand Advanced Management, Computer Management, Services And Applications, and finally Routing And Remote Access.
-
Expand IP Routing, and then NAT/Basic Firewall. Right-click Network Connection and choose Properties from the shortcut menu. The Network Connection Properties dialog box appears.
-
Click the Services And Ports tab (Figure 15-15), select the following protocols, and then click OK:
-
IP Security (IKE)
-
IP Security (IKE NAT Traversal)
-
VPN Gateway (L2TP/IPSec—running on this server)
-
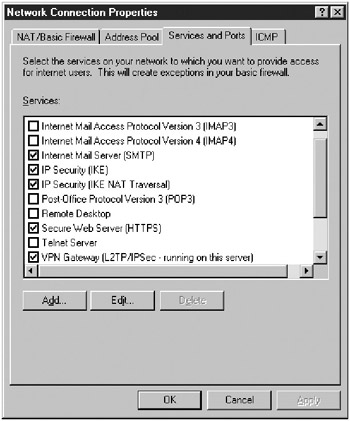
Figure 15-15: The Services And Ports tab of Network Connection Properties dialog box.
| Note | If you have a stand-alone firewall, open UDP port 500 for Internet Key Exchange (IKE), UDP port 4500 for IPSec NAT-Traversal traffic, and IP Protocol port 50 for IPSec ESP traffic. |
Enabling EAP in Routing and Remote Access
The final step in preparing a server to accept incoming L2TP VPN connections is to enable Extensible Authentication Protocol (EAP) in Routing and Remote Access. To enable EAP in Routing and Remote Access, complete the following steps:
-
Open Server Management, and expand Advanced Management, Computer Management, Services And Applications, and finally Routing And Remote Access.
-
Right-click Routing And Remote Access and choose Properties from the shortcut menu. The Routing And Remote Access Properties dialog box appears.
-
Click the Security tab, and then click Authentication Methods. The Authentication Methods dialog box appears (Figure 15-16).
-
Select Extensible Authentication Protocol (EAP), click OK, and then click OK again.
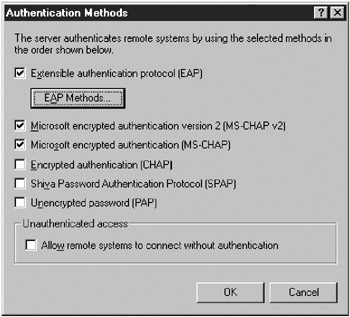
Figure 15-16: The Authentication Methods dialog box.
Creating the VPN Connection
After the server is properly configured to accept incoming L2TP connections, manually create a VPN connection on the client computer using the following steps:
-
On the client computer, open the Network Connections (Windows XP) or Network and Dial-Up Connections folder (Windows 2000).
Note VPN connections created using the Windows Small Business Server 2003 Connection Manager automatically connect using PPTP.
-
Choose New Connection from the File menu. When the New Connection Wizard appears, click Next.
-
On the Network Connection Type page, choose Connect To The Network At My Workplace (Windows XP) or Connect To A Private Network Through The Internet (Windows 2000), and then click Next.
-
On the Network Connection page, choose Virtual Private Network Connection and then click Next. (This page doesn’t appear in Windows 2000.)
-
On the Connection Name page, type the name for the connection and then click Next. (This page doesn’t appear in Windows 2000.)
-
On the Public Network page, choose whether to establish a dial-up Internet connection before using the VPN connection and then click Next. (This page doesn’t appear in Windows 2000.)
-
On the VPN Server Selection page (Windows XP) or Destination Address page (Windows 2000), type the Internet-accessible IP address of the Windows Small Business Server computer and then click Next.
-
On the Connection Availability page, choose whether to allow other users access to the VPN connection and then click Next. Type a name for the connection (if creating a connection in Windows 2000) and then click Finish to complete the wizard. The Connect dialog box appears.
-
In the Connect dialog box, click Properties.
-
Click the Networking tab (Figure 15-17) and choose L2TP IPSec VPN (Windows XP) or Layer-2 Tunneling Protocol (L2TP) (Windows 2000) from the Type Of VPN box.
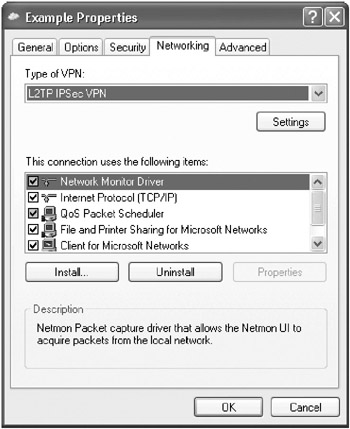
Figure 15-17: The Networking tab. -
Click the Security tab, choose Advanced, and then click Settings. The Advanced Security Settings dialog box appears.
-
Choose Use Extensible Authentication Protocol (EAP), select Smart Card Or Other Certificate, as shown in Figure 15-18, and then click Properties. The Smart Card Or Other Certificate Properties dialog box appears.
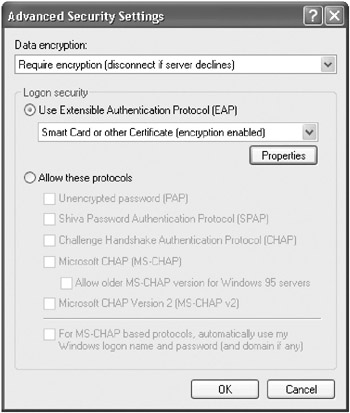
Figure 15-18: The Advanced Security Settings dialog box. -
Choose Use A Certificate On This Computer, as shown in Figure 15-19, select Validate Server Certificate, and then select the name of the Windows Small Business Server computer in the Trusted Root Certification Authorities section of the dialog box. Click OK when you’re finished. Click OK, and then click OK again. The VPN connection is then established.
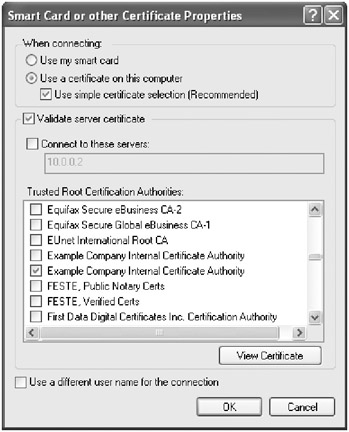
Figure 15-19: The Smart Card Or Other Certificate Properties dialog box. -
In the Validate Server Certificate dialog box, click OK to accept the server’s credentials and connect to the network.
| Tip | Once you’ve got L2TP VPN connections working, automate the process of creating L2TP VPN connections for clients using the Connection Manager Administration Kit, which can be installed using the Windows Component Wizard, accessible from Add Or Remove Programs. |
L2TP Troubleshooting
If you have trouble connecting via L2TP, try establishing an L2TP VPN connection from inside the internal network (this tests whether the problem is in the firewall configuration). Check Event Viewer and use Network Monitor to perform a network capture, if necessary. L2TP connections might not work properly if the client computer is behind a NAT firewall.
If you receive Error 778 or Error 801 on the client when establishing a VPN connection, verify that the Windows Small Business Server enterprise root CA certificate appears in the list of Trusted Root Certification Authorities, and that the correct server certificate is used by IAS (see the “Modifying the Small Business Remote Access Policy” section earlier in this chapter). Clearing the Validate Server Certificate check box in the Advanced Security Settings dialog box on the client can also resolve these errors, though at the expense of mutual authentication.
|
| < Day Day Up > |
|
EAN: 2147483647
Pages: 224
- An Emerging Strategy for E-Business IT Governance
- Measuring and Managing E-Business Initiatives Through the Balanced Scorecard
- Technical Issues Related to IT Governance Tactics: Product Metrics, Measurements and Process Control
- The Evolution of IT Governance at NB Power
- Governance Structures for IT in the Health Care Industry