Chapter 17: Managing Power on a Desktop Computer
Every computer requires electric power to operate the CPU and other electronic circuits, the video display, and the motors inside the disk drives and other storage devices. Most modern computers don't require a huge amount of power, but in today's era of increasingly expensive energy, it's in everybody's interest to do whatever you can to consume as little as possible without reducing the computer's performance.
This chapter explains how to use the power options in Windows and other tools and techniques for controlling your computer's power consumption.
Setting Windows Power Options
Depending on the motherboard and the BIOS, Windows can support either of two power management schemes: the Advanced Configuration and Power Interface (ACPI) or the older Advanced Power Management (APM). Both of these specifications were created in order to control the way a computer consumes power, but each takes a different approach. In ACPI, the operating system is in control; APM places that control in the BIOS.
In general, APM does not run on desktop computers because it is primarily concerned with monitoring battery status in portable computers. In ACPI, Windows (or another operating system) uses a power policy to specify the devices to turn off when they are not in use, and when to place the whole computer in a low-power condition. In most cases, the power policy for each device is implemented by the device driver.
Under ACPI, devices within the computer that consume power, including the CPU, the disk drives, the graphics controller and monitor, and the network interfaces work closely with Windows to provide full power when necessary, but to shift to a reduced-power mode when they're not in use. For example, if the computer is idle, the operating system can reduce power to the hard drive. AMD's Cool'n'Quiet and Intel's SpeedStep fan controls are similar power-saving features.
Much of this power control happens automatically, but there are a few optional settings explained later in this chapter.
To learn if your computer is using ACPI, follow these steps:
-
From the Windows desktop, right-click the My Computer icon and choose Properties from the pop-up menu, or choose System from the Control Panel. The System Properties window opens.
-
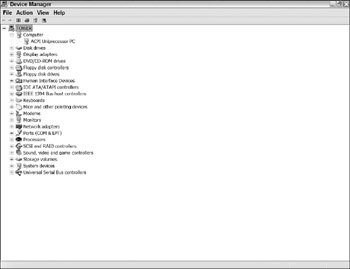
Click the Hardware tab and then click the Device Manager button. The Device Manager window shown in Figure 17.1 opens.

Figure 17.1: If ACPI is active, it appears under Computer in the Device Manager. -
Double-click Computer near the top of the list of devices.
If there's an active ACPI item listed under Computer, Windows is using ACPI. The exact name of the item might be slightly different from the text in the figure.
If you don't see an ACPI item, look in the BIOS Settings utility to confirm that ACPI is active. If you can't find an ACPI setting, look for a BIOS update. After you update the BIOS, you have to reinstall Windows to turn on ACPI mode.
| CROSS-REF | See Chapter 8 for information about finding and installing a new BIOS version. |
Standby and hibernation
When the computer goes into standby mode, it stores the details about the current state of the system, including active programs, network connections, and so on in RAM, and then it turns off most of the circuits and devices. When the computer returns to the active state, it uses the data stored in memory to return to the computer's condition when it went into standby. Because the standby data is stored in RAM, the computer loses that data if the computer loses power while it's in standby.
When the computer goes into hibernation, it stores the current system information on the hard drive and turns off power. When it comes out of hibernation, the computer restores all the programs and network connections that were active when hibernation began.
To enable or disable hibernation, follow these steps:
-
From the Control Panel, choose Power Options. The Power Options Properties window appears.
-
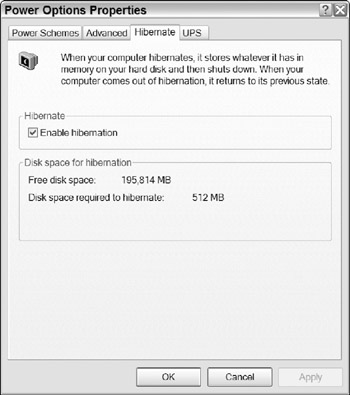
In the Power Options Properties windows, choose the Hibernate tab. The dialog box shown in Figure 17.2 appears.

Figure 17.2: Use the Hibernate tab to turn hibernation on or off. -
Use the Enable hibernation option to turn hibernation on or off.
-
Click OK to save your choice and close the properties window.
To restore the computer from either standby or hibernation, either push the power button or (on a laptop), open the lid of the computer. If you're using the computer in a location where unauthorized users might try to gain access to the system when you're not there, you can set it to require a login and password to restore itself from hibernation or standby.
To turn password control on or off, follow these steps:
-
From the Control Panel, open the Power Options window.
-
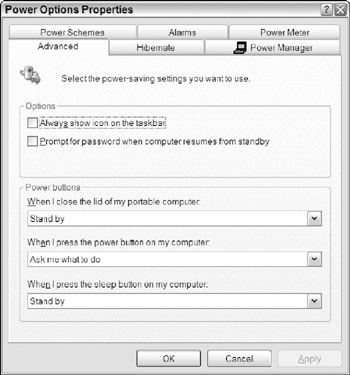
Choose the Advanced tab to open the dialog box shown in Figure 17.3. You don't see the Sleep button or Close the lid options unless your computer has those features.

Figure 17.3: Use the Advanced tab to enable or disable password control. -
To require a password, click the box next to the Prompt for password option.
-
Click OK to save your change and close the Properties window.
If the wake-on options in the BIOS are turned on, the computer can also restore itself from standby or hibernation when it receives a telephone call through the modem or an incoming request for access through the network interface. These wake-up functions don't require a password, so turn them off if security is an issue.
Don't try to connect or disconnect a peripheral device (including USB flash drives) while the computer is in standby or hibernation. If you do, the system may not be able to return to normal operation properly.
To restart the computer when it refuses to come out of standby, use the reset button or the power button on the front of the computer to restart the computer.
If the computer fails to come out of hibernation, the Hiberfil.sys file that contains the contents of the computer's memory is damaged. You will see this message or something similar:
Delete restoration data and proceed to system boot menu
Press Enter to delete the Hiberfil.sys file and perform a normal startup.
Power schemes
Windows organizes its power management settings into power schemes that specify the amount of idle time before it turns off the monitor and disk drives, and until the computer enters the standby and hibernation states. After you have created a scheme for your office or home computer that uses AC power, there's usually no reason to change it. In a laptop or other portable, you may want to use different schemes for battery operation in different situations (such as a long flight where you want to maximize battery life, or an office or hotel room where you have unlimited access to AC power).
| Tip | If you're using your computer in a display or presentation, you might want to change to the Presentation scheme in which the monitor never goes dark and the computer never shifts to standby mode. |
Because it takes longer to read data from a disk drive than it does to read the same data from RAM memory, the usual arrangement is to go to standby first, and then wait a bit longer before it goes to hibernation.
To change to a different power scheme, or to create a new scheme, follow these steps:
-
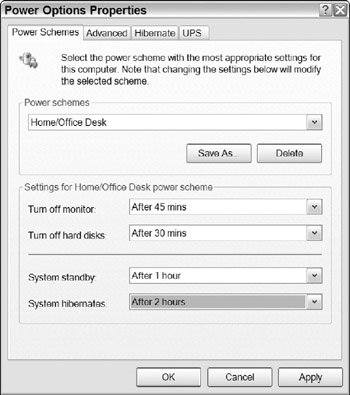
Open the Windows Control Panel and select the Power Options icon. If you use the Category View, look for Power Options in the Performance and Maintenance window. The Power Options Properties window shown in Figure 17.4 appears.

Figure 17.4: Use the Power Schemes tab to create or change a power scheme. -
Use the Power schemes drop-down menu to choose the power scheme whose name comes closest to the way you are using this computer. For example, use Home/Office Desk for your desktop system, or Always On to keep the system running all the time.
-
If you want to change one or more of the settings for the scheme you choose, use the drop-down menus in the Settings section.
-
If you have made any changes to the standard settings, click Save As, assign a new name to your scheme, and then click OK to save the scheme and close the Properties window. If you're using a standard scheme, just click OK.
EAN: 2147483647
Pages: 372