| With all the layers properly nested into separate sequences, you're ready to try applying effects to the nested sequence material. For this lesson, you will be fading in and enlarging the Rome name, alluding to the fact that the Rome photo montmontage will appear next. 1. | Open Nest_Effects_Start.prproj from the APPST2 Lesson Files/Chapter 13 folder. Open the Ma Comp sequence in the Timeline pane, and click on the Florence clip in the Video 2 track. Press the P key to activate the Pen tool. With the Pen tool, click on the Opacity line for the Florence clip and drag downward so that Opacity is 50% (Figure 13.8).
Figure 13.8. Using the Pen tool, you can adjust individual keyframes or constant values fordisplayed effects in all audio and video tracks. Adjusting a constant effect value yields asmall line with two arrows next to the Pen tool's icon. Here, the adjustment reduces the Opacity of the entire clip to a constant 50% value. In Premiere Pro 2.0, Show Keyframes is the default track display 
Instead of using the Effect Controls panel in this step, you displayed and adjusted keyframes in the Timeline panel. Setting Opacity to 50% made the entire Florence name clip somewhat transparent. Next, you will assign a simple fade out of the Opacity setting.
| | | 2. | Position the Edit Line at 02;00 in the timeline. In the Video 2 track header, press the Add Keyframe button to add a keyframe handle to the current position (Figure 13.9). Move the Edit Line to 03;00 in the timeline, and add another keyframe. With the Pen tool selected, click and drag the second keyframe to the bottom of the track, making Opacity 0%.
Figure 13.9. To add a keyframe to the current Edit Line position, simply press the Add/Remove Keyframe button in the track header.Clicking the same button when the Edit Line is ontop of a keyframeremoves that keyframe 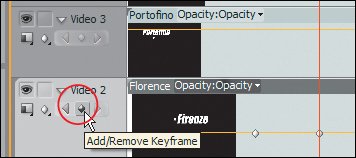
This step introduced a method for creating a custom opacity fade: You created two keyframes to anchor the starting (50%) and ending (0%) Opacity values of the fade. Now the clip starts at50% Opacity for two seconds and has a one-second fade out to 0%. Because you want all the city names to start opaque and fade together, in the next step you will copy the opacity keyframes from the Florence clip into the other city clips.
| | | 3. | Using the Pen tool, hold down the Shift key and click each of the opacity keyframes that you created. With both keyframes selected (yellow), right-click on one of the two and select Continuous Bezier from the menu that appears (Figures 13.10a and b ).
Figures 13.10a and b. When you are assigning keyframes within your video track, you can adjust and create curves between the keyframes. 13.10a shows the options for creating the curve. To adjust the curve once it is assigned, you can click on and adjust the Bezier handle associated with each individual keyframe. In 13.10b, the Bezier handle appears as the short blue line 
When you first created the keyframes to assign the fade, a straight line joined the two. This would be considered a Linear relationship between the two keyframes. To create a smooth fade from one to the other, you assigned Continuous Bezier. If you want a smooth curve between multiple keyframes, you can select all the keyframes that you want to adjust the line for and select Continuous Bezier.
| | | 4. | Open the Effect Controls Panel in your workspace, and click on the Florence clip in the Map Comp sequence if it isn't already selected. Right-click on the Opacity listing in Effect Controls panel, and choose Copy (Figures 13.11a and b). Selectthe both the Portofino clip and Rome clip in the Map Comp sequence, and press CTRL+V on your keyboard to paste the selected opacity settings onto the two selected clips.
Figures 13.11 a and b. Select the Florence clip in the Timeline panel to display its effect parameters in the Effect Controls panel. By selecting an individual effect listing, Opacity in this case, you can right-click and copy the entire effect to your clipboard (a). Selecting other clips in the timeline, you can paste the Opacity selection directly onto them (b) 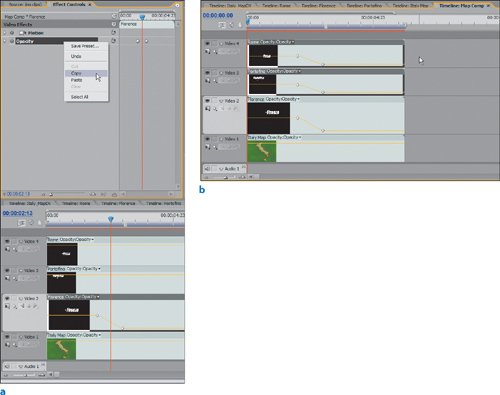
Copying and pasting effect listings in the Effect Controls panel is a quick way to apply the same effect and keyframes to multiple clips. Keep in mind that you would have done about three times more work if the sequences had not been nested.
Although you originally made the opacity adjustments in the timeline, you can view and manipulate the entire effect parameters for each individual clip in the Effect Controls panel. Anytime a clip is selected, you can view its effect parameters in the Effect Controls panel.
| | | 5. | With the same workspace layout, select the Rome clip in the timeline. Position the Edit Line at 03;00. In the Effect Controls panel, twirl down the Opacity listing and change the value of the current Opacity keyframe to 100%. (Figure 13.12)
Figure 13.12. With the Rome clip selected, you can view its keyframes in the Effect Controls panel. Here, the Edit Line is positioned on top of the second Opacity keyframe, which was previously set to 0%. Notice how the Add/Remove Keyframe button is darkened, indicating you ar positioned on a keyframe. Twirling down the Opacity listing you can manually assign a new and exact Opacity value for this keyframe. Adjusting Opacity to 100% changes the fade out to a fade in. Also notice that Toggle Animation stopwatch is active, signifying that there are keyframes assigned to the effect. Notice how the fade ramps up in the timeline below 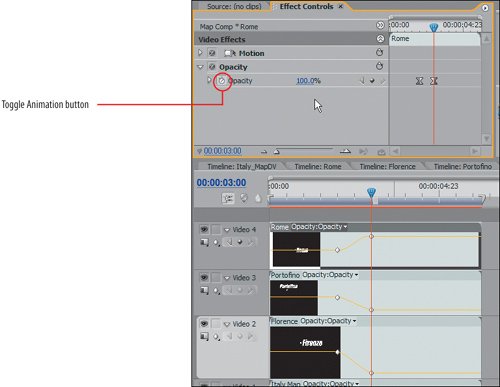
You can easily modify keyframes directly in the Effect Controls pane. Here you changed Opacity to create a fade in for the Rome clip. (You'll need it in the next chapter when you build the Rome photo montage.) Next, you will apply a gradual size increase that occurs as the word "Rome" fades in.
Tip When you want to adjust an exact keyframe, the Edit Line must be positioned directly ontop of it. To make sure you are on top of an exact keyframe, use the Go to Next/Previous Keyframe buttons for the keyframed effect's listing. | | | 6. | Double-click on the nested Rome clip in the Map Comp sequence to open it in its own Timeline panel. Select Roma/Italy_MapDV.psd on the Video 2 track. In the Effect Controls panel, twirl down the Motion listing. Position the Edit Line at 02;00. Click the Toggle Animation button on for Scale. Reposition the Edit Line to 05;00. Adjust the Scale value to 175.0. Marquee select both of the keyframes you just added, right-click on one, and select Continuous Bezier from the context menu (Figures 13.13a, b, and c ). Press Enter to preview your results. Finally, click on the Map Comp sequence tab in the Timeline panel, and press Enter to preview theresults of the entire nested sequence.
Figure 13.13a, b, and c. You can marquee select two Scale keyframes (a), and set the Continuous Bezier option for interpolating a curved line between them (b). The resulting curved value for Scale appears in the video track (c) when displaying keyframes for Motion:Scale. The result is a smooth scaling increase from 100% to 175% 
To emphasize only the city name, you navigated into the original Rome sequence and applied a Scale adjustment to the city name layer only. Turning on Toggle Animation assigns a keyframe at the current Edit Line position with the current value for the parameter being animated. In this case, 100% Scale was assigned at the 2;00 keyframe. With keyframe animation turned on, if you reposition the Edit Line and modify an effect parameter, Premiere will create a new keyframe to reflect the adjustment. Here, a keyframe for 175% Scale was created at 5;00. You also made sure that the Scale was a smooth curved value between 100% and 175% by assigning a Continuous Bezier to the keyframes.
This step articulates the power and control of nesting. The result of the two keyframes is a dynamic scaling of the single layer from 100% to 175%. Because this sequence is nested into the Map Comp, the scaling adjustments are seen along with the Opacity adjustment made to the nested sequence itself.
| 7. | Create a new sequence and name it Photo Montage. Holding the Ctrl key, double-click on the Map Comp sequence from the Project pane to open it in the Source Monitor.(If you click Play, Premiere will play the Sequence in the monitor.) Toggle Take Audio/Video to Take Video Only. Drag and drop the Map Comp sequence into Video 1. With the Edit Line positioned at the head of the timeline, press Ctrl+D (Figure 13.14). Now you are ready for the next chapter, where you will easily incorporate these graphics with your photo montage.
Here's to redundancy! This step nested the Map Comp sequence inside a new sequence, which you will use in the next chapter to build your final photo montage. If any changes need to be made to the Map Comp, you can tweak any of the nested sequence settings in the Map Comp sequence or the individual layers in the original city name or map image sequences.
|
Figure 13.14. Compared to the original nine layers, this final nested sequence is much easier to manage. Because this nested sequence references numerous sequences and source fileswith specific settings, the results show through in the current nested view 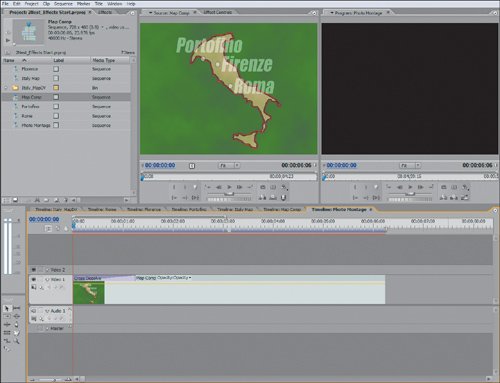
By properly nesting the Map Comp into the Photo Montage sequence, any and all changes to the sequences and layers it references will be revealed in the final nested instance. To see my final results, open the file Nest_Effects_Finish.prproj from the APPST2 Lesson Files/Chapter 13 folder. As you can see, using a nested structure has definite advantages. By separating individual layers and sequences, and thus controlling them separately, you can more easily modify and change any of the nested elements. So, not only can you easily apply changes to an entire sequence in one step, you can also quickly adjust any single element. From reducing clutter to controlling separate layers, there are numerous uses for nesting. |