| Using nesting techniques, you can create effects that are much easier to control and adjust. Here, you will import a nine-layer Photoshop file and reduce it down to four sequence files, each consisting of grouped layers. The Photoshop file for the example project maps three cities in Italy and will become the intro to a photo montage. Each of the city's names will fade in and enlarge, then the scene will cut to photographs of the named city. To adjust the different city names separately, you will need to nest specific cities together. This lesson preps the framework for the files so that you can create the desired effect with a greater amount of control in the next lesson. | | 1. | Open the Nest_Start.prproj file from the APPST2 Lesson Files/Chapter 13 folder. Select File > Import, and open Italy_MapDV.psd from the same folder. From the resulting Import Layered File dialog, select Sequence from the Import As drop-down menu, and click OK (Figure 13.2 ).
Figure 13.2. When you open a Photoshop file, you can import single layers or the entire document as a flattened still (Footage) or import all of the layers as a sequence 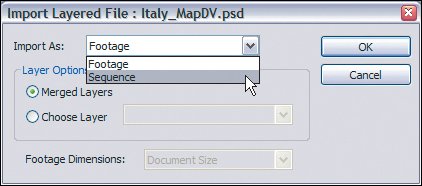
This step imports the Photoshop file as a unique sequence that properly reflects the Photoshop document's stacking order. Each layer becomes a separate still in its own track (Figures 13.3 and Figures 13.4). Transfer modes, such as Darken, Difference, and Exclusion, are not supported when importing into Premiere Pro.
Figure 13.3. The original document in Photoshop. Notice the name of each layer and the order in which the layers are stacked 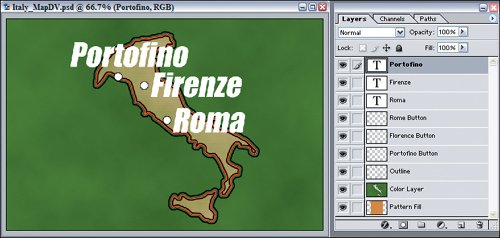
Figure 13.4. Importing the layered Photoshop file into Premiere Procreates this sequence. Notice that the stacking order and layer names duplicate those of the original and that the image looks the same in the Program Monitor as it did in Photoshop. Also notice that the track names match the layers as well 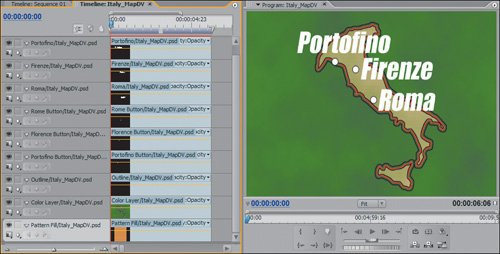
When you import, Premiere creates a new folder: Italy_MapDV. Inside are nine still images and a single sequence. Each still image reflects an individual layer from the Photoshop file. sequence, named exactly for the Photoshop file, contains all the stills stacked above each other in the same order as the original Photoshop file. These nine files make up the image that displays in the Program Monitor when you scrub over their timeline position.
| 2. | Select Project > Projects Settings > Default Sequence. Set Video Tracks to 2 and Audio Master to Stereo with 1 Stereo Track. Click OK to close out of this dialog, then create five new sequences and name them: Rome, Florence, Portofino, Italy Map, and Map Comp.
Adjusting the default sequence value lets you quickly create sequences with a specific track number. The five unique sequences you created later will house, respectively, the three city layers, the map layers, and the final composition of the four sequences.
| 3. | Click on the Rome tab in the Timeline panel to open the Rome sequence. Open the Italy_MapDV folder, and drag and drop the Rome Button/Italy_MapDV.psd file onto the Video 1 track of the Rome sequence. Drag and drop the Roma/Italy_MapDV.psd file onto the Video 2 track directly above the instance on Video 1 (Figure 13.5 ).Open the Florence sequence. Drag and drop the Florence Button/Italy_MapDV.psd file to Video 1 and Firenze/Italy_MapDV.psd to Video 2. Finally,open the Portofino sequence, then drag and drop the Button layer to Video 1 and the Name layer to Video 2.
Figure 13.5. With the Edit Line over the two tracks, the Program Monitor displays the result of the two Rome layers, the name and the button. Because the layers were created in Photoshop, the black space around the letters is attributed to the alpha channel; this means that it is transparent and will key out when you place it on top of other content 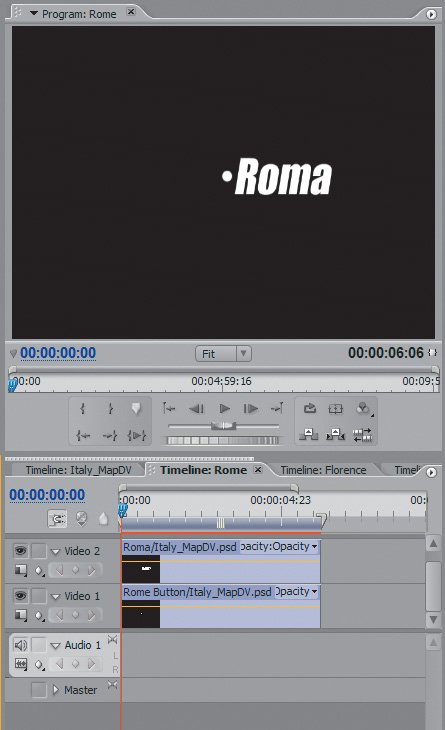
Because you want to control the city name and its button independently, both layers need to be nested into their own sequence. Putting the button on Video 1 and city name on Video 2 ensures that the city name remains on top of the button when it is resized or repositioned. Each single city sequence now reflects the result of the two layers inside of it.
| | | 4. | Cick the Italy Map tab in the Timeline pane to open the sequence. Drag and drop the Pattern Fill/Italy_MapDV.psd to Video 1. Drag and drop the Color Layer/Italy_MapDV.psd to Video 2 directly on top of the file onVideo 1. Drag and drop the Outline/Italy_MapDV.psd file into the gray space above Video 2, snapping to the head of the timeline directly on top of the files below. This is known as the drop zone.
As you did for the city names, here you created a single sequence to display the map layers. Because there were only two tracks available for adding content, you created a third by dragging and dropping to the empty gray space above Video 2.
Although you won't be applying an effect to the Map layers, one file will be easier tomanage than three in the final composition.
| | | 5. | Click on the Map Comp tab in the Timeline pane to open the Map Comp sequence. Locate the five sequences you created in the Project pane. Hold down the Ctrl key, and double-click on the Italy Map sequence in the Project pane to load it in the Source Monitor. Toggle the Take Audio/Video button to Video Only. Drag and drop the Source Monitor sequence into the Video 1 track of the Map Comp sequence (Figure 13.6).
Figure 13.6. The Italy Map sequence was opened as if it were a clip in the Source Monitor by holding down Ctrl and double-clicking on the icon for it in the Project pane. When Take Audio/Video is set to Video Only the result of the drag and drop to the timeline is a single video clip on the Video 1 track. Notice that the clip name is the same as the name of the sequence that it represents. Double-clicking on this clip, which is now a nested sequence , in Video 1 opens the Italy Map sequence in the Timeline pane 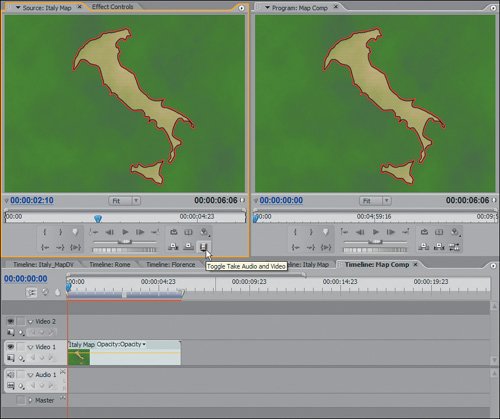
Because you are not going to use any of the audio tracks from the individual sequences, you turned off their audio before nesting them into the final composition. Nesting the Italy Map on Video 1 ensured that the map is beneath all the other layers. Now you can finish nesting the rest of the sequences.
| | | 6. | Open the three remaining city sequences in the Source Monitor, turn off their audio, and add them to the Map Comp sequence with Florence on Video 2, Portofino on Video 3, and Rome on Video 4 (Figure 13.7).
Figure 13.7. The final result of your nesting work. Here you can see all four of the nested sequences stacked one on top of the other with the result displayed in the Program Monitor. Notice how the icon for the nested sequence in the Timeline pane displays a snapshot of the content of the sequence. Even when nesting, the alpha channel for the files in the city name sequences is preserved and used to display the city names on top of each other and the map 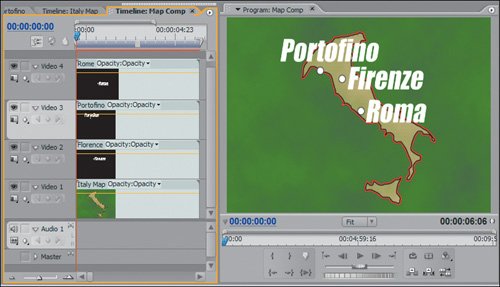
Tip To open the source sequence for any nested sequence, simply double-click on the nested sequence; the source sequence opens inside the Timeline pane. Alternately, you can target the video track that holds the nested sequence, and with the Edit Line positioned over the nested sequence that you want to open, press Shift+T. This action is called Match Frame. If you want to open a nested sequence in the Source Monitor, just Ctrl+double-click on the nested sequence. Compared to the original nine-layer sequence, the Map Comp sequence is now quite manageable with fewer files, revealing the benefits of nesting. Say you want to fade up the Rome name and Rome button. In the original sequence, you would have dropped transitions on both files, whereas in the nested sequence you can drop a transition on only the single enested sequence for Rome. If you want to create a motion path for the Rome Name and Button layers, instead of creating the same path twice, you could apply the motion path to the nested sequence. To look at the final results I came up with, open Nest_Finish.prproj in the APPST2 Lesson Files/Chapter 13 folder
All of the work in this first lesson builds the proper framework and structure from which you can independently adjust groups of layers without affecting the entire document. To take this even further, you can open any of your nested sequences and apply effects to the individual tracks in the sequence. Any effect applied to the contents of the nested sequence will be revealed any place the sequence is nested. This next lesson demonstrates the power and benefits of this feature.
|
|